
You can make 13 cute cake pops that also work as Christmas decorations, and they’re easier than they look. Start by baking and crumbing cake, mix in frosting, shape balls or figures, insert sticks, and chill. Coat each pop with colored candy melts, add sprinkles, edible glitter, or fondant details like hats, bows, and tiny hangers. I’ll show recipes, shaping tips, and quick decorating tricks so you can finish a full set.
Peppermint Snowball Cake Pops
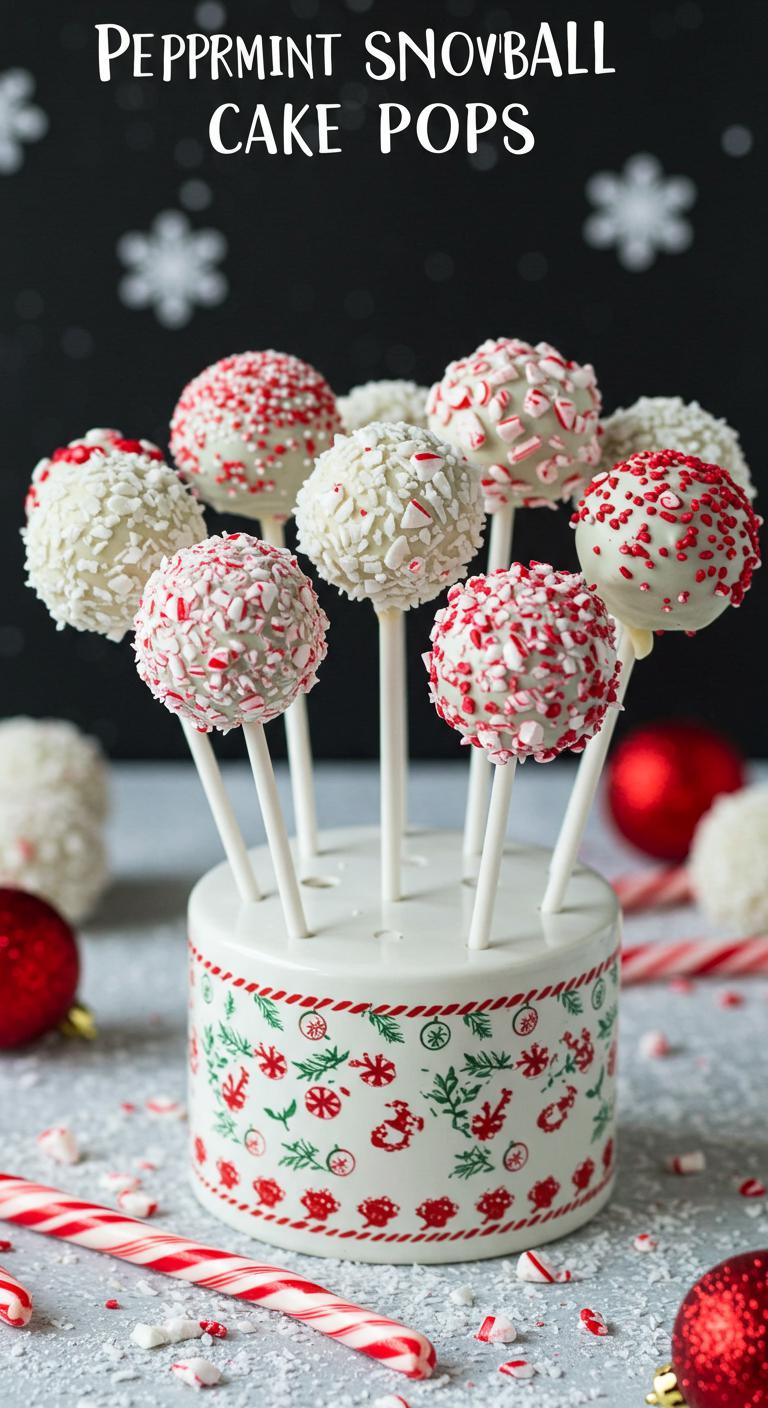
Peppermint Snowball Cake Pops — cool, festive bites that taste like a holiday snowball and melt in your mouth.
Ingredients:
- 1 batch chocolate or vanilla cake (about 9×13), baked and cooled
- 1 cup vanilla or cream cheese frosting
- 2 cups white chocolate or candy melts, melted
- 1/2 tsp peppermint extract
- 12–18 crushed candy canes or peppermint candies (fine crush)
- 24–30 cake pop sticks
- 1–2 cups shredded coconut or white sanding sugar (for “snow” coating)
- Sprinkles or mini red candies for decoration (optional)
- Parchment paper or a silicone mat
How to Make:
- Crumble the cooled cake into a large bowl until it’s fine crumbs.
- Add the frosting and peppermint extract; mix until the mixture holds together and is evenly moistened.
- Scoop about 1–2 tablespoons of the mixture and roll into balls; place on a lined baking sheet.
- Chill the cake balls in the fridge for 15–30 minutes so they firm up.
- Dip the tip of a cake pop stick into a little melted white chocolate, then insert it halfway into a chilled cake ball; repeat for all pops and chill 10 minutes.
- Melt the remaining white chocolate until smooth and temper slightly if desired for crisp coating.
- Dip each cake pop into the melted chocolate, tapping off excess so the coating is smooth and even.
- While the coating is still wet, roll or sprinkle the pop with shredded coconut or white sanding sugar to create a snowball effect.
- Immediately press a few crushed candy cane pieces onto each pop or sprinkle on decorations before the chocolate sets.
- Stand the pops upright in a styrofoam block or a prepared holder until fully set.
Enjoy your Peppermint Snowball Cake Pops — a festive, minty treat perfect for gifting or a holiday dessert table!
Gingerbread Man Cake Pops on Mini Stands
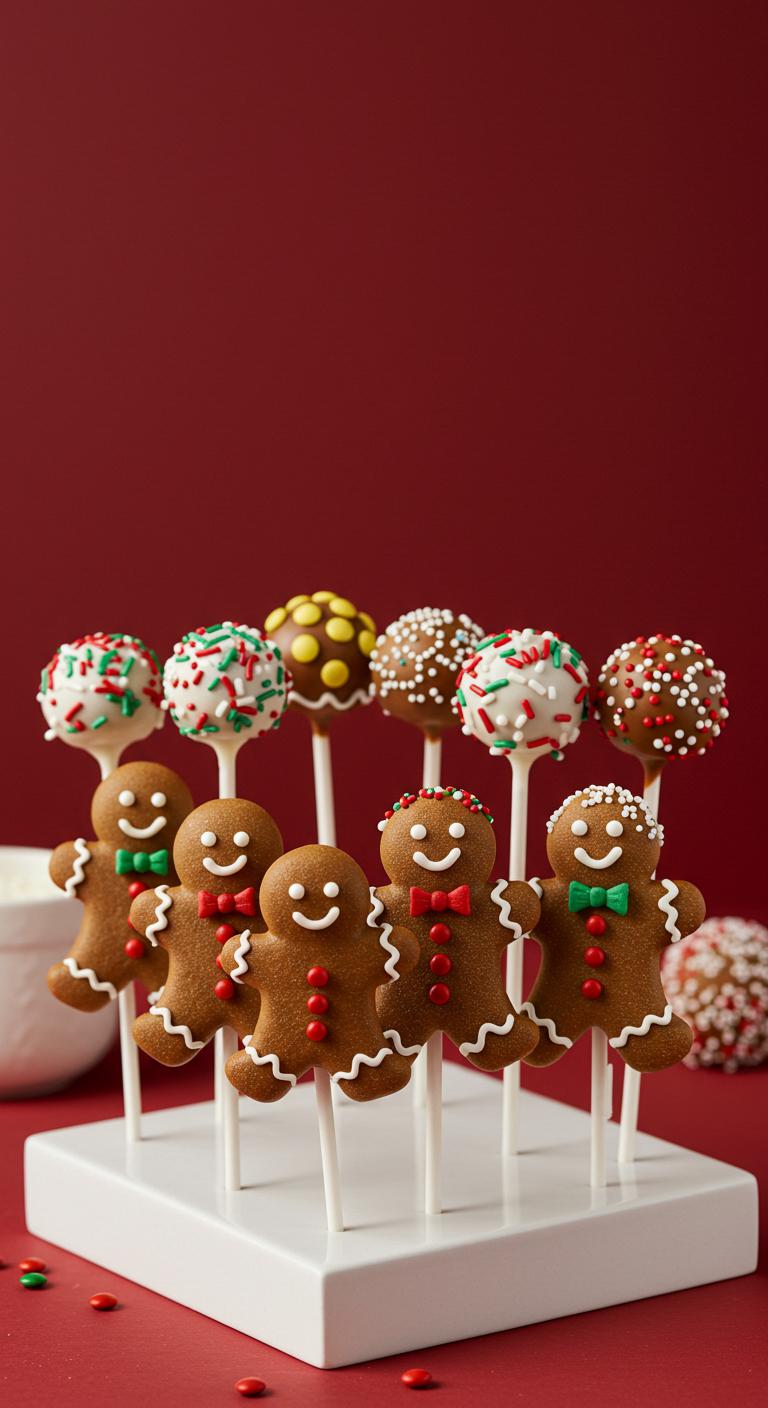
Gingerbread Man Cake Pops on Mini Stands — festive, bite-sized ginger-spiced treats dressed to delight.
Ingredients:
- 1 batch gingerbread cake or 9×13-inch gingerbread (cooled)
- 1 cup cream cheese or vanilla buttercream frosting (for binding)
- 12–18 candy or lollipop sticks
- 12–18 mini cake pop stands or holders
- 12 oz white candy melts or white chocolate, for coating
- 1 tsp shortening or vegetable oil (to thin coating, optional)
- Brown food coloring (if using white coating and want darker color)
- Assorted decorating candies: mini M&Ms, tiny sprinkles, nonpareils, red/green sugar
- Royal icing or chocolate in piping bag for facial/details
- Edible glitter or shimmer dust (optional)
How to Make:
- Crumble the cooled gingerbread cake into a large bowl until fine crumbs form.
- Add the cream cheese or buttercream a little at a time and mix until the mixture holds together when pressed.
- Scoop about 1.5–2 tablespoons of mixture and shape each into a small gingerbread-man silhouette or round ball if shaping is hard.
- Chill the shaped pops on a tray for 15–20 minutes to firm up.
- Melt the white candy melts in a microwave-safe bowl in 20–30 second intervals, stirring between, until smooth; stir in shortening and a touch of brown food coloring if you want a gingerbread-brown coat.
- Dip the tip of a stick into the coating, insert into each pop about halfway, then dip the stick end into the pop to secure.
- Holding by the stick, dip each pop into the melted coating, tap off excess, and set into mini stands to dry upright.
- While coating sets slightly, pipe faces and buttons with royal icing or melted chocolate and add tiny candies or sprinkles for eyes, mouths, and mittens.
- Let the pops sit until fully set, about 30–60 minutes, then add any final shimmer or detail touches.
Enjoy serving these gingerbread man cake pops on their mini stands — cute, handheld holiday cheer with every bite!
Ornament Bauble Cake Pops With Edible Hangers
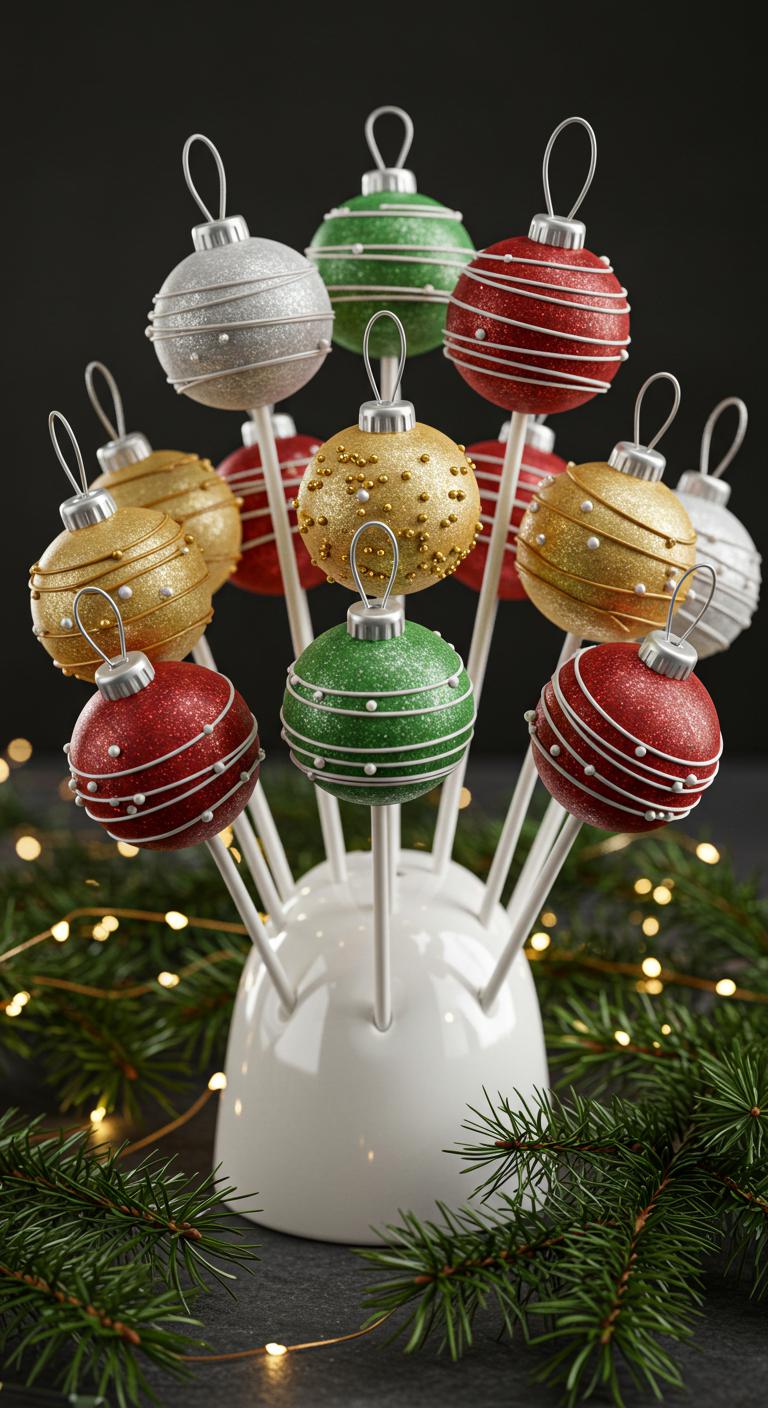
Sparkling ornament bauble cake pops — festive, bite-sized treats with edible hangers!
Ingredients:
- 2 cups cake crumbs (from about one 9×13 cake or 2 boxed cakes)
- 1 cup frosting (vanilla or cream cheese), plus extra if needed
- 12–16 lollipop sticks or wooden skewers (trimmed)
- 1 lb (about 450 g) candy melts or white chocolate for coating
- Gel food coloring (red, green, gold, silver — as desired)
- Edible shimmer dust or luster powder (gold or pearly white)
- Edible gold/silver sugar pearls or sprinkles (for decoration)
- Small round candy rings or thin pretzel loops (for hanger base) OR mini fondant rings (optional)
- Piping gel or melted chocolate (for attaching hangers)
- Wax paper or parchment for drying
How to Make:
- Crumble cooled cake finely into a large bowl.
- Mix in 1 cup frosting until mixture holds together when pressed; add a little more frosting if too dry.
- Roll the mixture into 1 1/4–1 1/2 inch balls and place on a baking sheet lined with parchment.
- Chill the balls in the fridge for 30–45 minutes or freezer 10–15 minutes until firm.
- Melt candy melts or white chocolate according to package instructions, keeping it smooth and slightly warm.
- Dip the tip of each stick into the melted coating, then insert halfway into each chilled ball; return to chill 10 minutes so the stick sets.
- Divide melted coating into small bowls and tint each with gel color for your desired ornament shades.
- Dip each cake ball fully into the colored coating, tapping off excess and smoothing the coating with a spoon or by rotating gently.
- Place coated pops on parchment to set; if coating thickens, rewarm briefly to keep smooth.
- While coating is still tacky, dust with edible shimmer or luster powder for a metallic finish.
- Make edible hangers: use small candy rings, pretzel loops, or form tiny fondant rings. Attach each ring to the top of a pop with a dot of piping gel or melted chocolate and let set.
- Add extra decoration like sugar pearls, stripes, or dots using contrasting melted coating or piping gel; work quickly so decorations adhere.
- Let all pops fully set until coating is firm, about 30–60 minutes at room temperature.
- Serve upright in a styrofoam block or decorative holder, or wrap individually in cellophane for gifting.
Enjoy your shiny, edible ornament baubles — perfect for snacking under the tree!
Candy Cane Swirl Cake Pops
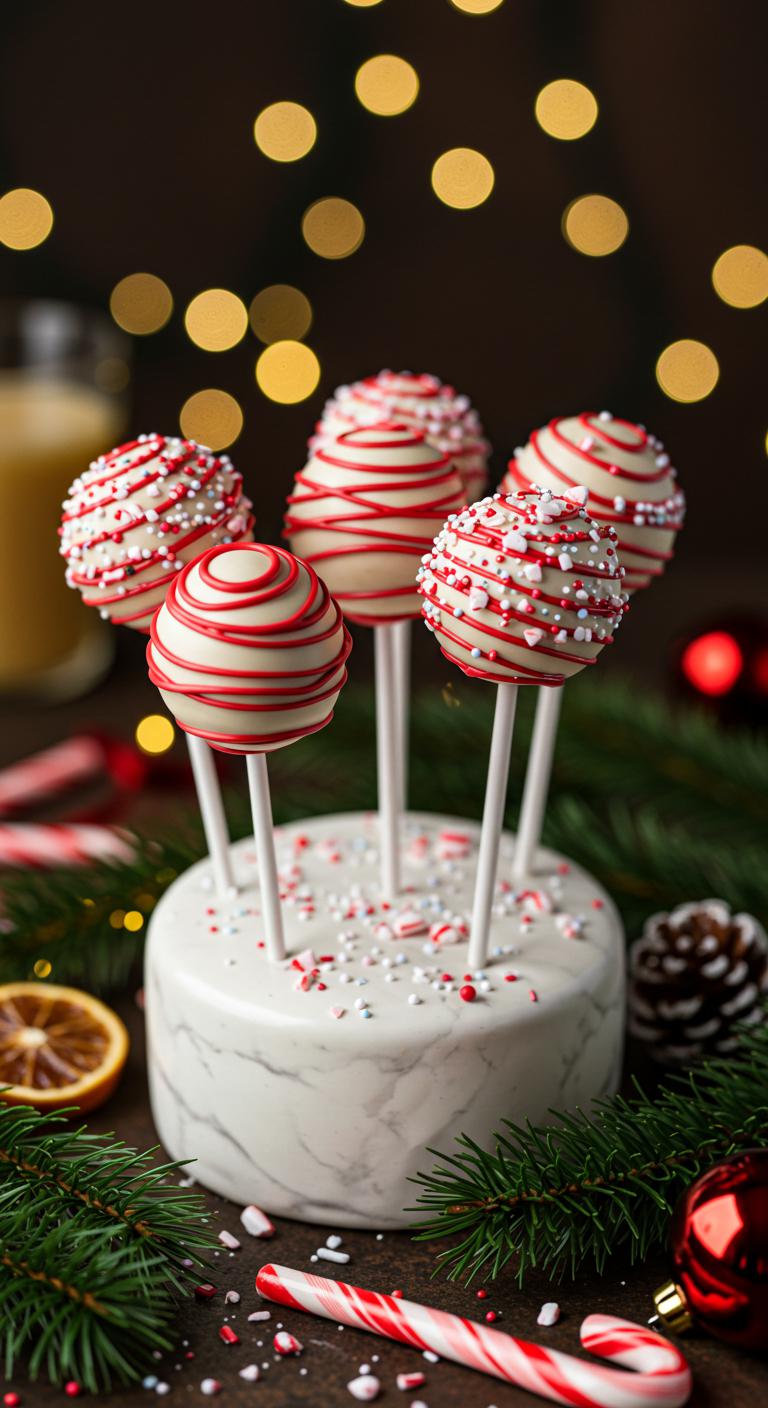
Candy Cane Swirl Cake Pops — festive peppermint-and-chocolate bites on a stick that taste like holiday cheer.
Ingredients:
- 1 batch of baked chocolate or vanilla cake (about 9×13 or equivalent), cooled
- 1 cup buttercream or cream cheese frosting (adjust to reach a moldable consistency)
- 12 oz white chocolate or candy melts, chopped
- 2–3 drops peppermint extract (or to taste)
- Red candy melts or red food coloring (optional)
- Crushed candy canes or peppermint candies, for garnish
- Lollipop sticks or cake pop sticks
- Sprinkles (optional)
How to Make:
- Crumble the cooled cake into a large bowl until fine crumbs form.
- Add the frosting and mix gently until the crumbs hold together when pressed; don’t overmix.
- Stir 2–3 drops of peppermint extract into the chopped white chocolate; melt gently in a microwave in 20–30 sec bursts, stirring between, until smooth.
- Shape cake mixture into 1–1.5 inch balls and place on a baking sheet lined with parchment. Chill 15–30 minutes until firm.
- Dip the tip of each lollipop stick into the melted white chocolate, then insert halfway into each cake ball; return to the fridge 5–10 minutes to set.
- If making a red swirl, melt red candy melts or tint a small portion of white chocolate with red coloring.
- Dip each cake pop into the melted white chocolate, tapping off excess and rotating to cover evenly.
- Immediately drizzle or swirl red chocolate over the white-coated pop to create a candy cane stripe effect.
- Sprinkle crushed candy canes onto the wet coating so they stick; add sprinkles if desired.
- Stand pops upright in a foam block or a lined glass to fully set.
- Once set, serve or package in cellophane for gift-giving.
Enjoy a pepperminty, chocolatey swirl that’s perfect for decorating, gifting, or sneaking a few while no one’s looking — happy holidays!
Rudolph the Red-Nosed Reindeer Pops
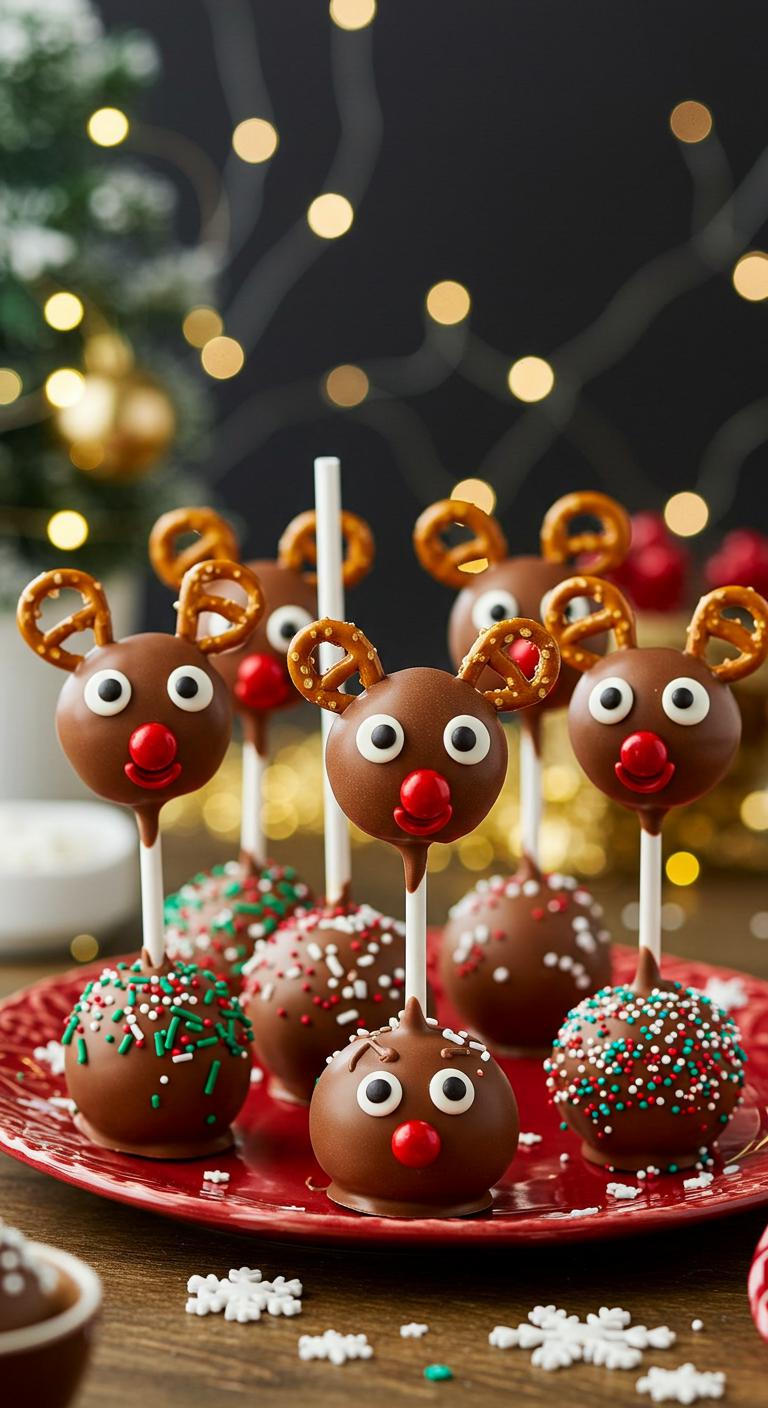
A festive, bite-sized Rudolph that’s as cute to look at as it’s delicious to eat.
Ingredients:
- 1 batch chocolate cake crumbs (about 3 cups, from one 9-inch chocolate cake)
- 1/2 to 3/4 cup chocolate frosting (or cream cheese frosting, to bind)
- 12 oz milk chocolate or dark chocolate, for coating
- 4 oz white candy melts or white chocolate, for eyes
- Mini chocolate chips or small brown candies, for pupils
- 12 red candy-coated chocolates (M&Ms) or red candies for noses
- 24 small pretzel twists or mini pecan halves for antlers
- 12 lollipop sticks
- Optional: sprinkles or edible glitter for extra holiday sparkle
How to Make:
- Crumble the cooled chocolate cake finely into a large bowl until no big pieces remain.
- Add 1/2 cup frosting and mix gently; add more frosting a tablespoon at a time if mixture feels too dry. It should hold together when pressed.
- Roll mixture into 1- to 1.25-inch balls and place on a baking sheet lined with parchment. Chill for 20–30 minutes until firm.
- Melt the coating chocolate in a microwave-safe bowl in 20–30 second bursts, stirring until smooth, or melt using a double boiler.
- Dip the tip of a lollipop stick into the melted chocolate, insert it about halfway into each chilled cake ball, then return to the sheet and chill 5 minutes to set the stick.
- Fully coat each cake pop by dipping into the melted chocolate, tapping off excess gently and smoothing with a spoon if needed. Let excess drip back into bowl.
- Before coating sets, attach two small pretzel twists or pecan halves near the top as antlers; press gently so they stick.
- Pipe or dot small circles of melted white chocolate for eyes; immediately place a mini chocolate chip or small brown candy in the center for pupils.
- Press a red candy onto the front as Rudolph’s nose while coating is still wet.
- Let cake pops stand upright in a styrofoam block or cake pop stand until chocolate is fully set.
- If desired, add sprinkles or edible glitter before the coating hardens for extra holiday sparkle.
Enjoy these adorable Rudolph cake pops — perfect for holiday parties and guaranteed to bring smiles!
Frosted Evergreen Tree Cake Pops
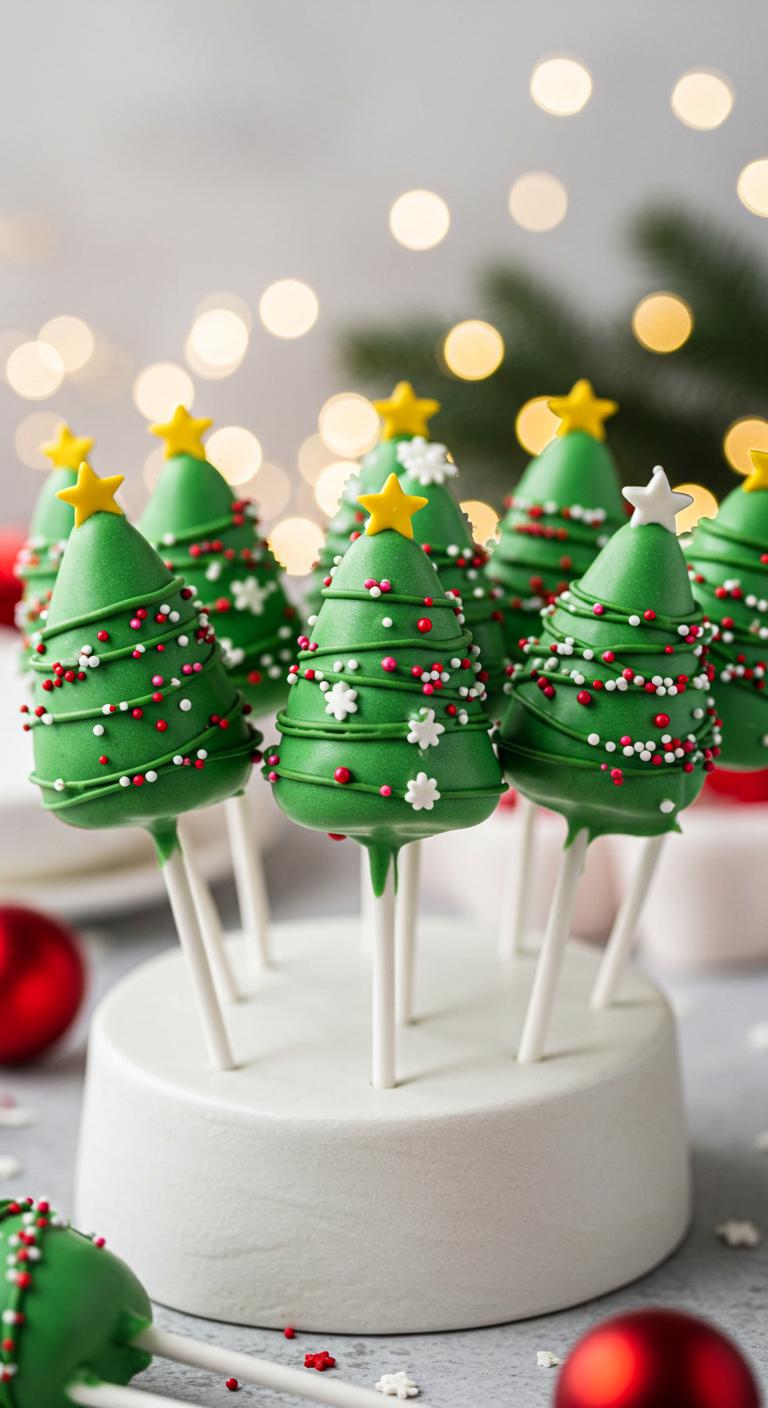
Frosted Evergreen Tree Cake Pops — cute, festive bites that look like mini Christmas trees.
Ingredients:
- 2 cups prepared cake crumbs (any flavor)
- 3/4 to 1 cup frosting (vanilla or cream cheese)
- Green candy melts or green chocolate coating, about 12–16 oz
- Lollipop sticks or cake pop sticks
- Small star sprinkles or mini sugar stars (for tree toppers)
- Assorted sprinkles or nonpareils (for garland/ornaments)
- White candy melts (optional, for snow accents)
- Vegetable shortening (optional, 1–2 tsp to thin coating)
- Styrofoam block or cake pop stand (to dry)
How to Make:
- Crumble the cake finely into a large bowl until no large pieces remain.
- Add 3/4 cup frosting to the crumbs and mix until the mixture holds together; add more frosting if it’s too dry.
- Shape the mixture into small cone shapes (about 1–1.5 inches tall) to resemble evergreen trees.
- Insert a lollipop stick into each cone, then place the pops on a baking sheet and chill in the fridge for 20–30 minutes to firm up.
- Melt the green candy melts according to package directions; stir in 1–2 tsp shortening if the coating is too thick.
- Dip each chilled cake pop into the green coating, using a spoon to smooth and create texture if desired; let excess drip off.
- While the coating is wet, add star sprinkles to the top and press assorted sprinkles onto the tree as ornaments.
- If using white candy melts, melt and drizzle lightly over the trees for a snowy effect.
- Stick the finished cake pops upright in a Styrofoam block or stand until the coating sets completely.
- Once set, display and serve your frosted evergreen tree cake pops.
Enjoy making these adorable, festive treats — perfect for holiday parties and snacking under the twinkling lights!
Hot Cocoa Mug Cake Pops With Mini Marshmallows
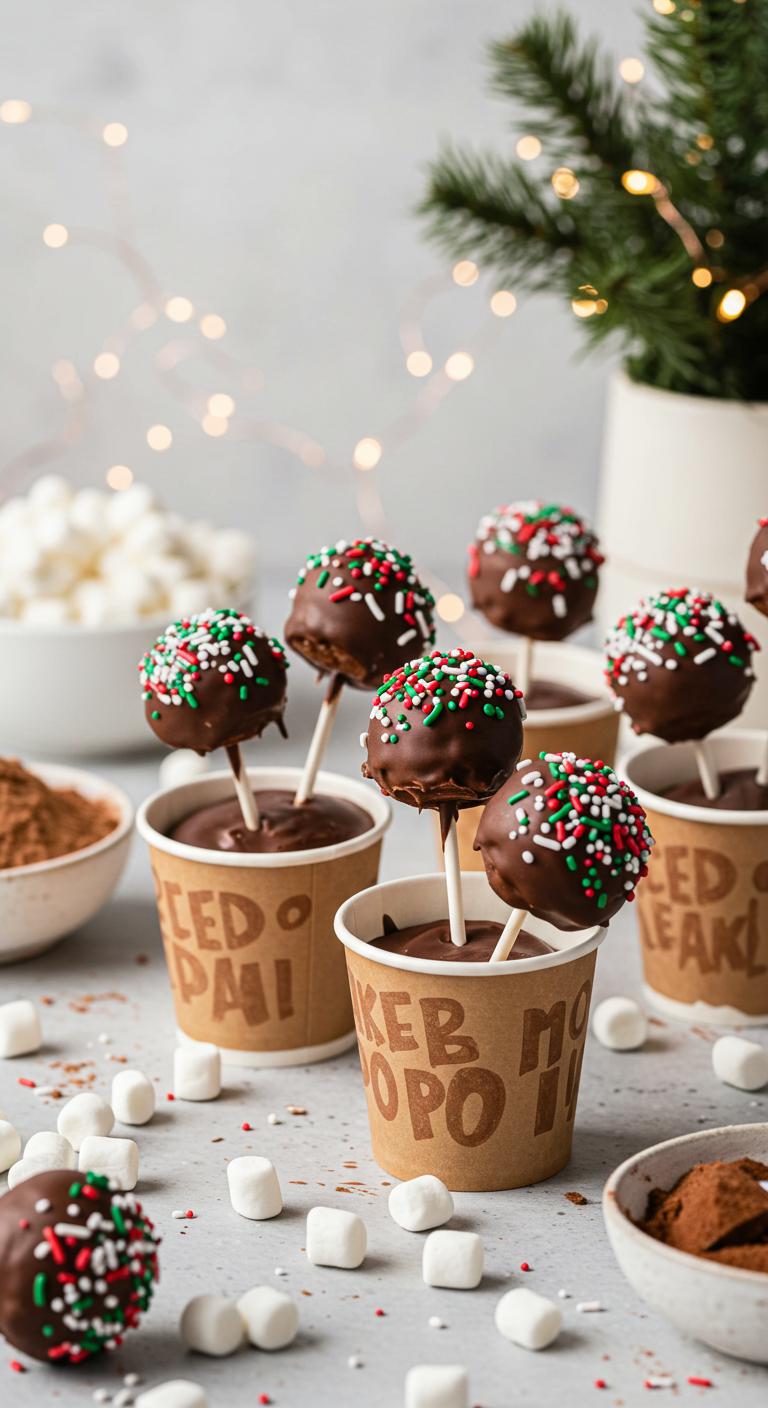
A cozy little cup of hot cocoa turned into a playful, handheld treat — meet hot cocoa mug cake pops with mini marshmallows.
Ingredients:
- 1 box chocolate cake mix (or 1 1/2 cups homemade chocolate cake crumbs)
- Ingredients called for on cake mix box (usually eggs, oil, water) or equivalent for homemade cake
- 1/2 cup hot cocoa mix (instant)
- 1/4 cup powdered sugar (optional, for sweetness balance)
- 1/2 cup cream cheese or buttercream frosting (to bind)
- Mini marshmallows, about 1 cup, plus extra for garnish
- 12–16 cake pop sticks
- 8 oz chocolate or candy melts (milk or dark), for coating
- Sprinkles or crushed candy canes for decoration (optional)
- Mini disposable paper cups or small silicone molds (optional, for display)
How to Make:
- Bake the chocolate cake according to the box directions (or prepare your homemade cake), then let it cool completely.
- Crumble the cooled cake into a large bowl until fine crumbs form.
- Mix in the hot cocoa mix and powdered sugar until evenly combined.
- Add the frosting a little at a time, mixing until the mixture holds together when pressed.
- Fold in about 3/4 cup mini marshmallows, leaving some out for garnish.
- Roll the mixture into 1–1.5 inch balls and place them on a baking sheet lined with parchment.
- Freeze the cake balls for 15–20 minutes to firm up.
- Melt the chocolate or candy melts in a microwave-safe bowl in 20–30 second bursts, stirring until smooth.
- Dip the tip of a cake pop stick into the melted chocolate, then insert it about halfway into a cake ball to secure.
- Dip each cake pop fully into the melted chocolate, allowing excess to drip off.
- Immediately press a few mini marshmallows onto the top and add sprinkles or crushed candy cane if using.
- Stand the pops upright in a styrofoam block or place them in mini paper cups to set completely.
- Once set, arrange them in mugs or give them as festive gifts.
Enjoy these hot cocoa mug cake pops — they’re like sipping warm cocoa, but crunchier and way more fun!
Nutcracker Soldier Cake Pops
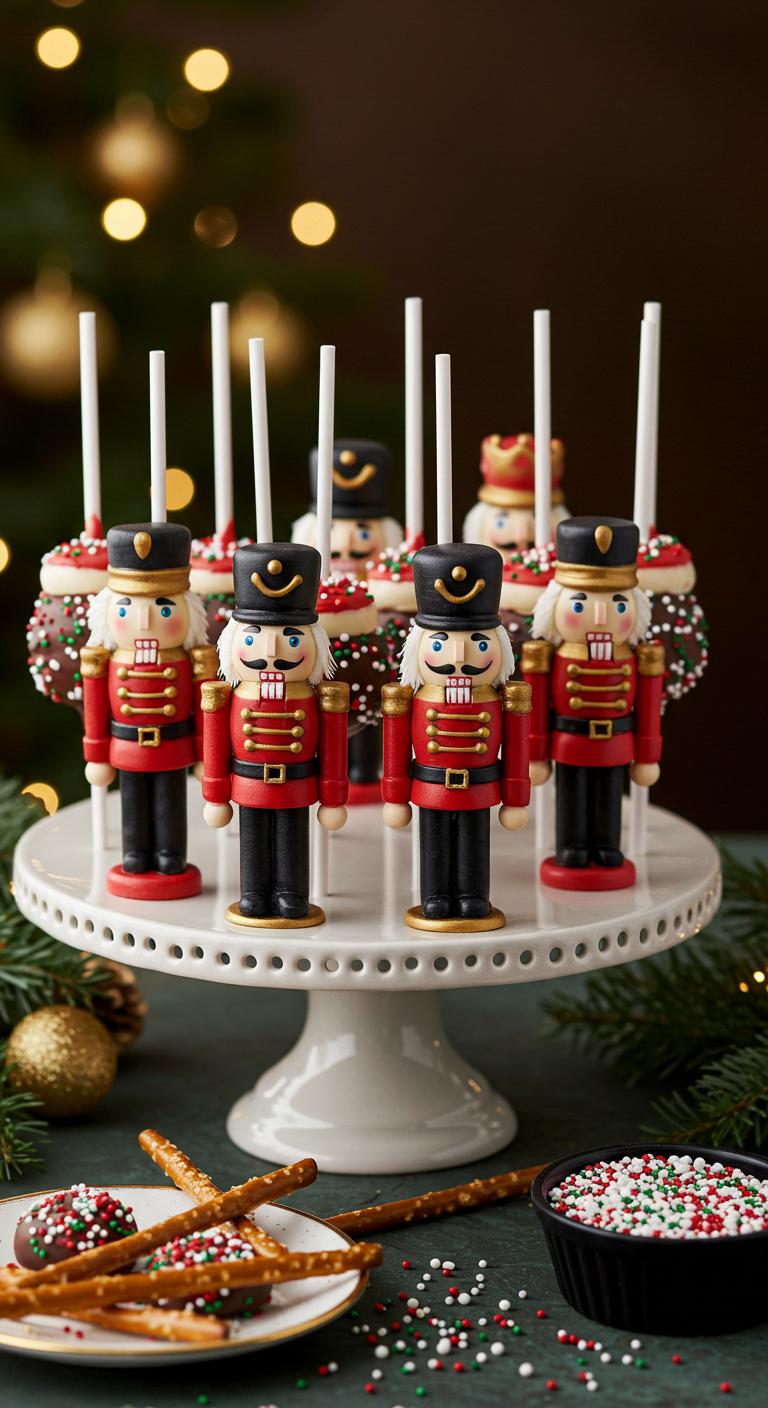
A festive Nutcracker Soldier cake pop that’s as charming to look at as it’s delicious.
Ingredients:
- 1 batch chocolate cake, crumbled (about 4 cups crumbled cake)
- 1 cup chocolate or vanilla frosting (room temperature)
- 24 cake pop sticks
- 24 round cake pop styrofoam or stand holes for drying
- 16 oz red candy melts
- 8 oz black candy melts
- 6 oz white candy melts
- 4 oz gold candy melts or edible gold dust mixed with a little white candy melt
- 1 cup tiny round sprinkles or nonpareils (for buttons)
- Edible black marker or thin piping of black melted candy (for face details)
- Miniature pretzel sticks or small edible wafer sticks (for musket/arm props, optional)
- Parchment paper or wax paper for drying
How to Make:
- Crumble the cooled chocolate cake finely into a large bowl.
- Add frosting gradually, mixing until the cake holds together but is still soft and moldable.
- Roll about 2 tablespoons of mixture into smooth balls for heads and slightly larger oval balls for bodies if making two-piece pops; alternatively make single-round pops for simplified soldiers.
- Chill formed cake balls on a baking sheet for 20–30 minutes until firm.
- Melt red candy melts in a microwave-safe bowl in 20–30 second intervals, stirring until smooth.
- Dip the tip of a cake pop stick into melted red candy and insert into each chilled cake ball about halfway; return to chill 5 minutes to set.
- Dip each pop into the red candy coating, tapping off excess and smoothing with a spoon; place into styrofoam or stand to dry.
- Melt black candy melts and dip or pipe on a small stripe near the top for the hat; use black to coat lower edges if making boots.
- Melt white candy melts and pipe face area and trim lines for the jacket, plus small dots or stripes for uniform accents.
- Use gold candy melt or edible gold dust to add epaulets, belt buckle, and hat trim; add tiny round sprinkles down the jacket front as buttons.
- Draw or pipe eyes and mouth with edible black marker or thin black melted candy; keep faces simple and cute.
- Insert miniature pretzel sticks or wafer sticks as muskets or arms if desired, securing with a dab of melted candy.
- Let all decorations fully set at room temperature or in the fridge for 10–15 minutes before serving.
Enjoy your marching band of Nutcracker Soldier cake pops — perfect for holiday parties and tiny, tasty traditions!
Snowman Trio Cake Pops With Carrot Noses
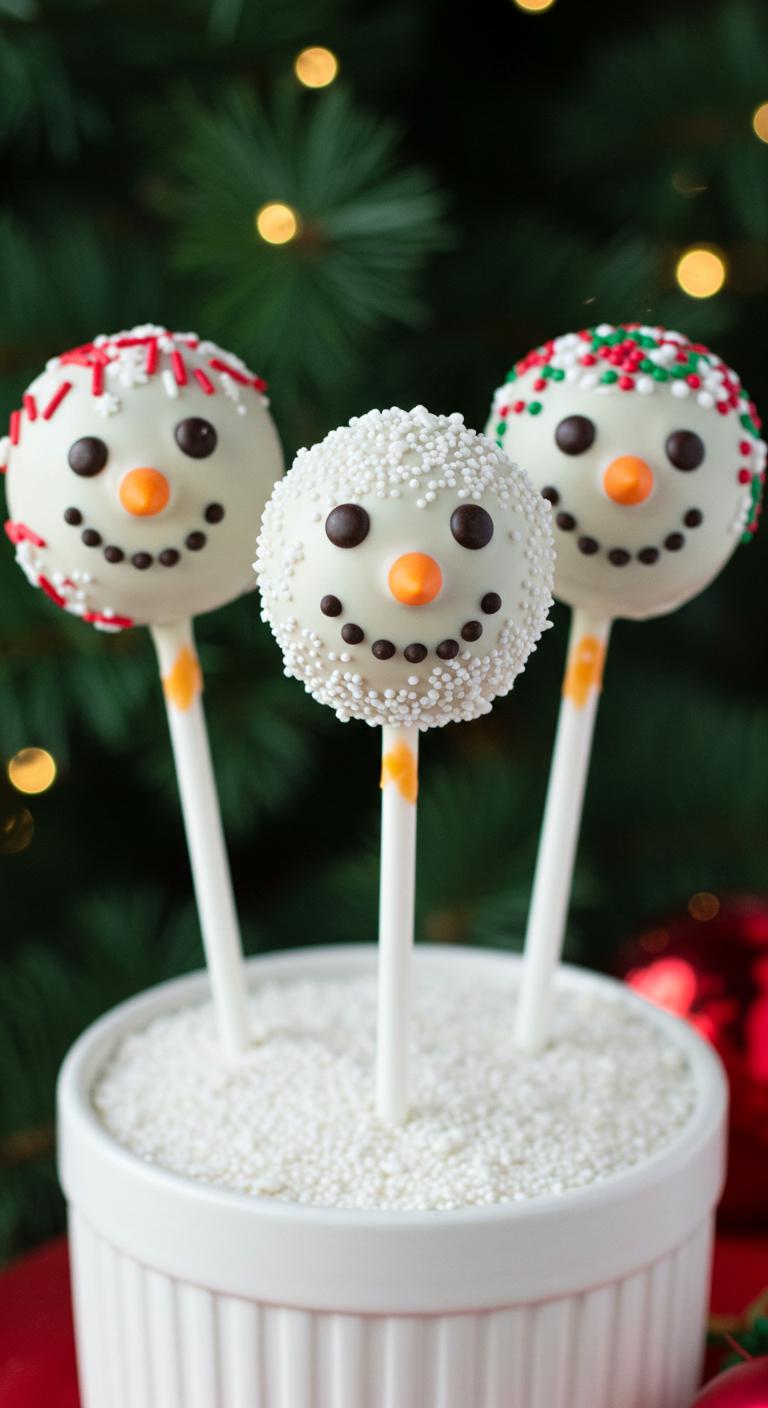
A trio of adorable snowman cake pops—sweet, festive, and topped with tiny carrot noses!
Ingredients:
- 1 batch chocolate or vanilla cake, crumbled (about 4 cups crumbles)
- 1 cup cream cheese or vanilla frosting
- White candy melts or white chocolate, about 12–16 oz
- Lollipop sticks or small wooden skewers
- Orange fondant or orange candy melts for carrot noses (or small orange M&M’s)
- Mini chocolate chips or black decorating gel for eyes and buttons
- Pink or red edible dust or tiny sprinkles for rosy cheeks (optional)
- Pretzel sticks or thin licorice for arms (optional)
- Sprinkles, edible glitter, or colored sugar for decoration (optional)
How to Make:
- Mix the cake crumbs and frosting in a bowl until the mixture holds together when pressed.
- Shape the mixture into sets of two balls per snowman: one larger for the body and one smaller for the head.
- Chill the cake balls on a tray for at least 30 minutes so they firm up.
- Melt the white candy melts in a microwave-safe bowl, stirring every 30 seconds until smooth.
- Dip the end of a lollipop stick into the melted candy, then insert it into a body ball about halfway; let set briefly.
- Dip the top of the stick into the candy, attach the head ball on top, and chill again until firm.
- Fully coat each assembled snowman in the melted white candy, tapping off excess and smoothing with a spoon if needed.
- Before the coating sets, attach small orange carrot noses made from fondant or melted orange candy; press gently so they stick.
- Use mini chocolate chips or black decorating gel to make eyes and buttons; add rosy cheeks with edible dust or a tiny dab of pink icing if you like.
- Add pretzel or licorice arms and any extra decorations, then let the coating fully harden upright in a styrofoam block or a cake pop stand.
- Serve chilled or at room temperature, and enjoy the cuteness!
These snowman cake pops are perfect for gifting or brightening any holiday dessert table—enjoy every adorable bite!
Plaid Flannel Cake Pops for Cozy Charm
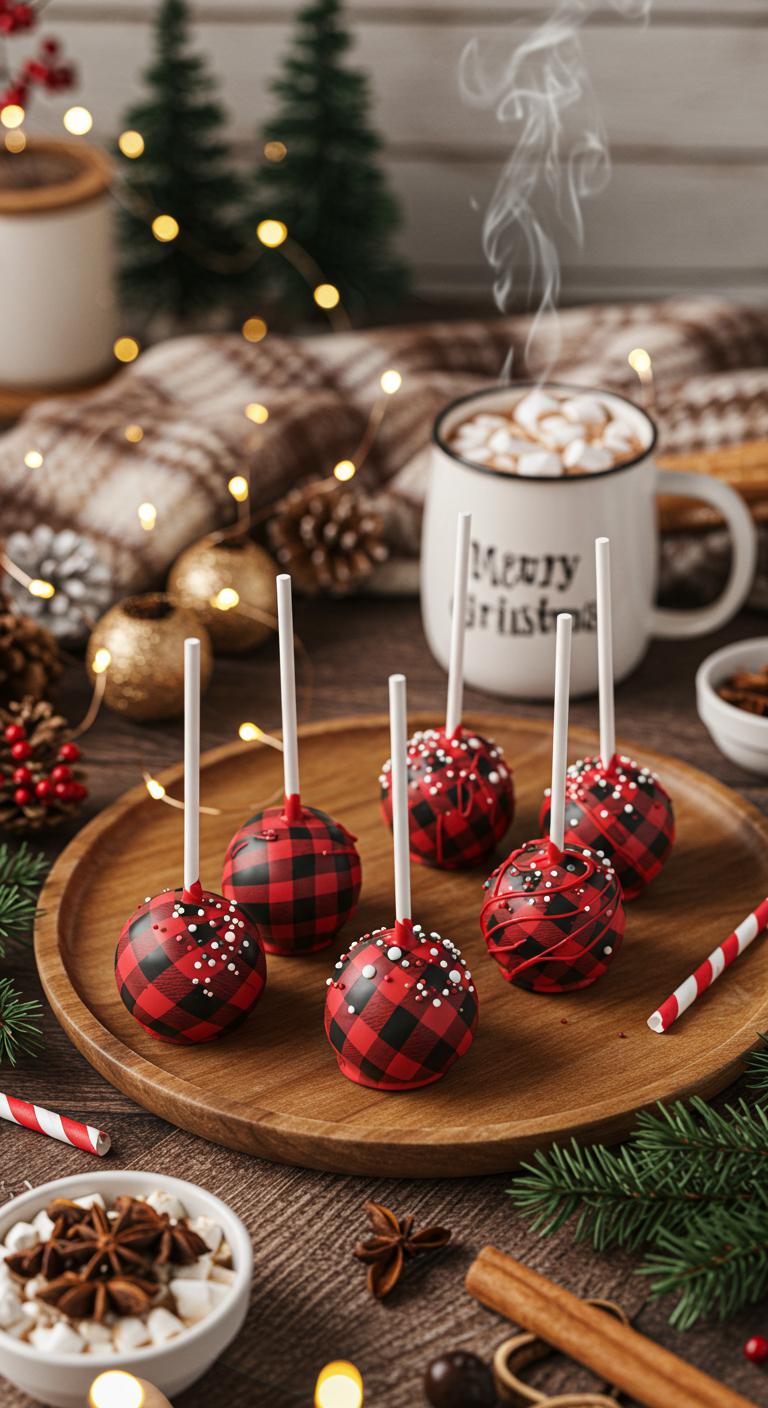
Plaid Flannel Cake Pops — cozy, plaid-patterned cake pops that look like everyone’s favorite winter flannel.
Ingredients:
- 1 batch baked and cooled cake (about 9×13 or equivalent), any flavor you like
- 1 cup frosting (cream cheese or buttercream), plus extra if needed
- 12–16 oz candy melts or melted chocolate (white or colored) for coating
- Red, black, and white food coloring (if using white melts) or pre-colored melts in those colors
- Lollipop sticks
- Styrofoam block or cake pop stand for drying
- Parchment paper or silicone mat
- Small paintbrush or food-safe decorating brush
- Microwave-safe bowls for melting
- Optional: sprinkles or edible glitter for extra cozy sparkle
How to Make:
- Crumble the cooled cake into a large bowl until fine crumbs form.
- Add about 1 cup of frosting and mix until the crumbs hold together when pressed; add more frosting a teaspoon at a time if too dry.
- Roll the mixture into 1–1.25 inch balls and place on a parchment-lined tray.
- Chill the balls in the fridge for 20–30 minutes so they firm up.
- Melt a few tablespoons of coating in a bowl and dip the tip of each lollipop stick in it, then insert the stick about halfway into each chilled cake ball. Return to the fridge for 10 minutes.
- Fully melt your main coating color (white works well for a canvas) until smooth, stirring frequently to avoid burning.
- Dip each cake pop into the melted coating, gently tap off excess, and stand upright in a block to set.
- Melt small amounts of red and black coating (or tint white melts) in separate bowls. Using a small brush or piping tip, paint or pipe horizontal and vertical stripes to create a plaid pattern: start with thin black lines, add red fills or stripes, and finish with fine white highlights for dimension.
- Let the decorated cake pops set completely at room temperature or in the fridge for quicker setting.
- Once firm, arrange them on a platter and enjoy — they look as cozy as a warm flannel blanket.
Serve these with hot cocoa and extra cheer — cozy bites perfect for gift-giving or a winter party!
Sparkling Gold and Silver Holiday Baubles

Sparkling Gold and Silver Holiday Baubles — bite-sized festive cake pops that gleam like tree ornaments.
Ingredients:
- 2 cups crumbled vanilla or white cake (about one 9-inch cake or prepared cake crumbs)
- 1/2 to 3/4 cup vanilla frosting (store-bought or homemade), enough to bind crumbs
- 12–16 oz white chocolate or candy melts, divided (for coating)
- Edible gold and silver luster dust or shimmer powder
- 1–2 tsp clear vanilla or light corn syrup (optional, for shine)
- 12–16 cake pop sticks
- Small styrofoam block or cake pop stand for drying
How to Make:
- Mix the crumbled cake and 1/2 cup frosting in a bowl until it holds together when pressed; add a little more frosting if needed.
- Roll the mixture into 1 to 1¼-inch balls and place them on a baking sheet lined with parchment.
- Chill the cake balls in the fridge 30 minutes or in the freezer 10–15 minutes until firm.
- Melt most of the white chocolate/candy melts in a microwave-safe bowl in 20–30 second bursts, stirring until smooth; reserve a few tablespoons for sealing.
- Dip the tip of a cake pop stick into the reserved melted chocolate, insert into a cake ball about halfway, and repeat for each ball.
- Dip each pop into the melted white chocolate until fully coated, letting excess drip off; tap gently to smooth.
- While coating is still wet, brush or dust each pop with edible gold or silver luster dust using a small dry brush — do one color per pop or mix for marbled sparkle.
- If you want extra shine, lightly brush a tiny bit of clear vanilla or corn syrup over the dusted surface once set.
- Insert the sticks into the styrofoam block or stand to let the pops dry completely, about 20–30 minutes.
- Store in an airtight container at cool room temperature or refrigerate briefly before serving.
Enjoy these dazzling baubles on your holiday table — they sparkle as much as they taste!
Poinsettia Flower Cake Pops
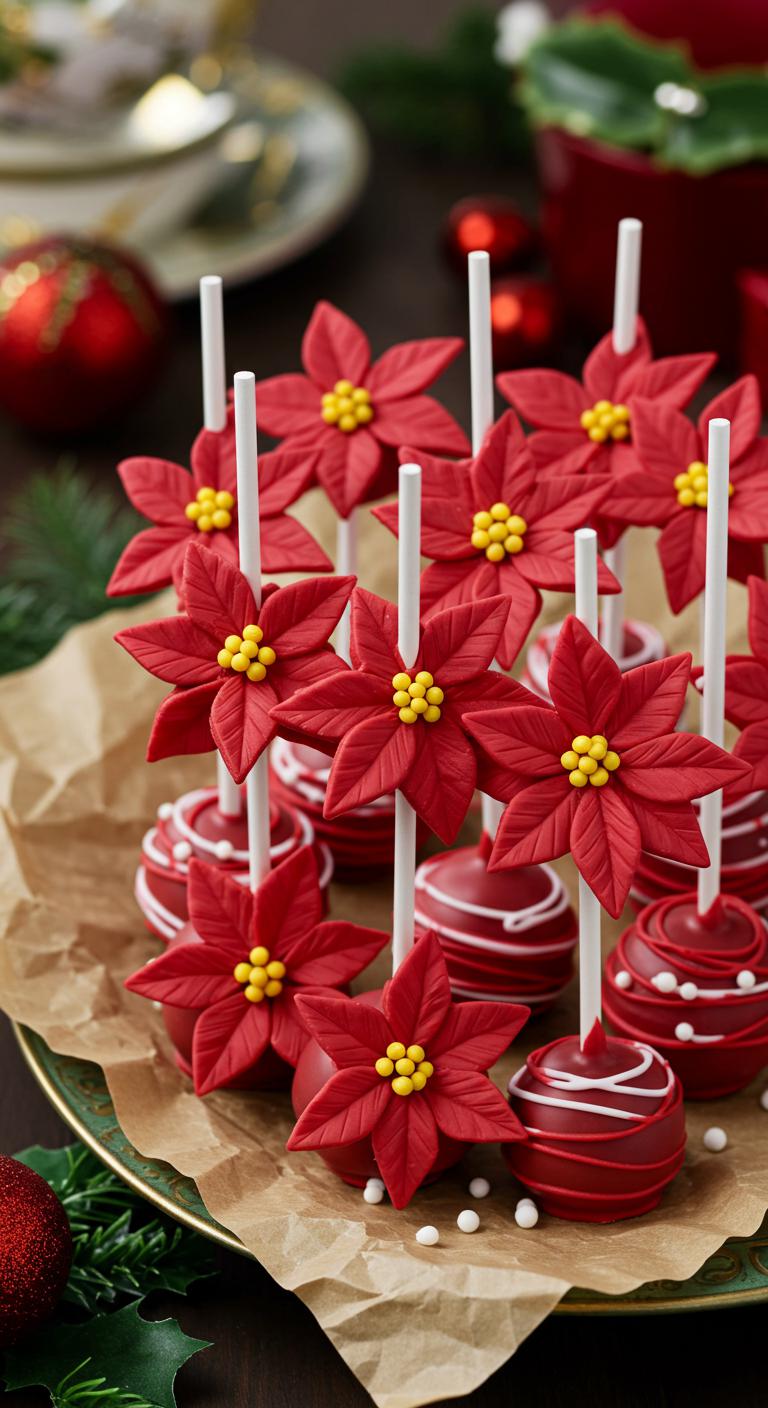
Bright red poinsettia cake pops that look like festive flowers — perfect for holiday parties!
Ingredients:
- 1 batch of cake crumbs (about 3 cups) — any flavor you like
- 1 cup frosting (cream cheese or buttercream works well)
- Red candy melts (about 12 oz)
- Yellow candy melts or yellow sanding sugar (for center)
- White candy melts (optional, for accents)
- Lollipop sticks
- Parchment paper or a silicone mat
- Small round or poinsettia-shaped cookie cutter, or a small offset spatula/knife for shaping
- Edible green leaf decorations or green candy melts (optional)
- Sprinkles (optional)
How to Make:
- Mix cake crumbs and frosting in a bowl until a dough-like consistency forms.
- Roll mixture into balls about 1 inch in diameter and chill on a baking sheet for 30 minutes.
- Melt red candy melts in a microwave-safe bowl in 20–30 second intervals, stirring until smooth.
- Dip the tip of a lollipop stick into melted red candy and insert it about halfway into each chilled cake ball; return to the fridge for 10 minutes to set.
- Dip each cake pop into the melted red candy, tapping off excess and smoothing with a spoon to form a rounded base.
- While the coating is still soft, use a small knife or cutter to gently press and shape five petal points around the top to form a poinsettia look; you can also chill briefly to firm before shaping.
- Add a small dollop of yellow candy melt or sprinkle yellow sanding sugar in the center for the flower’s stigma.
- If using, pipe or paint small white accents with melted white candy melts and add green leaves with edible decorations or green candy melts.
- Place finished pops on parchment to set completely, about 15–20 minutes.
- Serve on a festive platter or stick into styrofoam for a poinsettia bouquet display — enjoy the holiday cheer!
Enjoy these festive blooms — they look almost too pretty to eat!
Santa Hat Cake Pops
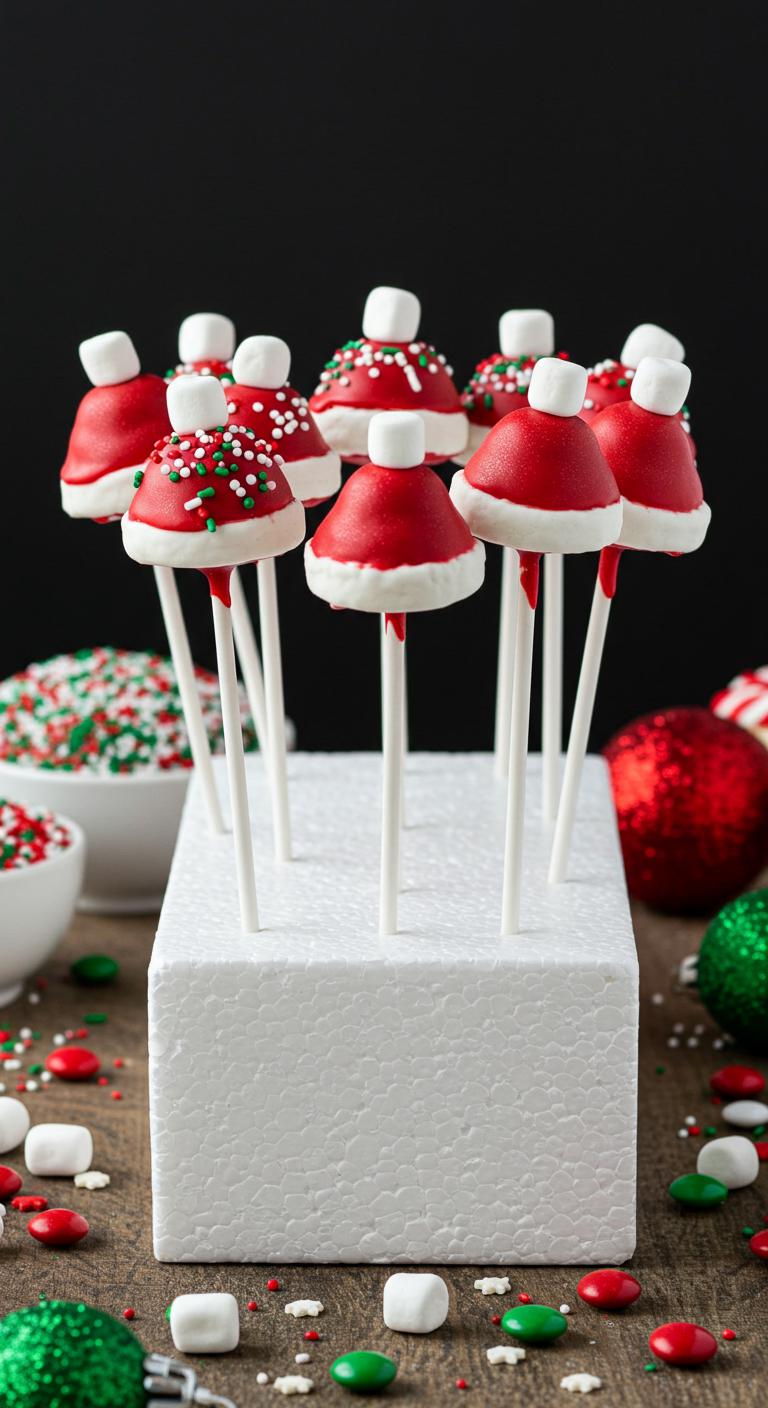
Santa Hat Cake Pops — festive, bite-sized treats that look like mini Santa hats!
Ingredients:
- 2 cups cake crumbs (any flavor you like)
- 1/2 to 3/4 cup frosting (vanilla or cream cheese), enough to bind crumbs
- Red candy melts or red chocolate coating
- White candy melts or white chocolate coating
- Mini marshmallows or white fondant balls (for pom-poms)
- Cake pop sticks
- Styrofoam block or cake pop stand (to dry)
- Small piping bag or disposable bag with tiny corner snipped (optional)
- Sprinkles (optional, for extra sparkle)
How to Make:
- Mix cake crumbs and frosting in a bowl until mixture holds together when pressed but isn’t too sticky.
- Shape mixture into small cone shapes or slightly rounded cones (pointed top, wider base) about 1–1.5 inches tall.
- Insert a cake pop stick about halfway into each cone and chill the shaped pops in the fridge 15–30 minutes to firm up.
- Melt red candy melts according to package directions until smooth.
- Dip each chilled pop into the red coating, covering the cone entirely; let excess drip off.
- Place dipped pops upright in the foam block or stand to set.
- Melt white candy melts and either dip the base of each hat into white coating or pipe a white band around the base for the hat trim.
- Attach a mini marshmallow or a small fondant/white chocolate ball to the tip of each hat using a dab of melted white coating.
- Let everything set completely until firm; add sprinkles if you like before the coating fully hardens.
- Serve and enjoy — these little Santas are ready to spread holiday cheer!
These cute Santa Hat Cake Pops are perfect for holiday parties and make great edible gifts!
Conclusion
You’ve got a dozen-plus cake pop ideas that double as decor, so pick one and get baking. Think of your first pop like tying a ribbon on a gift: I once made 50 peppermint snowballs and the last one still looked perfect — that quick win shows small steps matter. Follow a recipe, chill the balls, dip carefully, and add simple decorations. Arrange them on a stand or wrap in cellophane to gift.