
Candy and carrots meet at the snack table, and you get to make them work together. You’ll find 15 simple, kid-friendly Christmas finger foods that look festive and don’t take long to prep. Each idea includes clear steps and easy swaps for picky eaters, so you can set up a fun plate fast. Keep basic tools and a few pantry staples nearby, and you’ll be ready to assemble treats that kids can grab and enjoy.
Reindeer Pretzels

A festive, crunchy, and chocolatey snack that turns pretzels into adorable reindeer — perfect for little hands and holiday smiles!
Ingredients:
- Mini or regular pretzels (20–30)
- Brown candy melts or milk chocolate chips (1 cup)
- Mini candy eyes (40)
- Red candies for noses (M&Ms, red Smarties, or red icing) (20)
- Small pretzel twists or broken pretzel pieces for antlers (20)
- Parchment paper or a silicone mat
How to Make:
- Line a baking sheet with parchment paper or a silicone mat.
- Melt the brown candy melts or chocolate chips in a microwave-safe bowl: heat 30 seconds, stir, then heat in 15-second bursts until smooth.
- Dip each pretzel into the melted chocolate, covering the center but leaving the top edges for antlers exposed. Tap off excess.
- Place the dipped pretzels on the prepared sheet.
- Immediately press two mini candy eyes onto each chocolate-coated pretzel.
- Add a red candy for the nose below the eyes; press gently to secure.
- Stick two small pretzel twists or broken pretzel pieces into the top of each coated pretzel to make antlers.
- Let the reindeer sit at room temperature until the chocolate sets, or chill in the fridge for 10–15 minutes to speed it up.
- Once firm, arrange on a platter and serve.
Enjoy these adorable reindeer pretzels — crunchy, sweet, and ready to cheer up any holiday party!
Snowman Cheese Bites
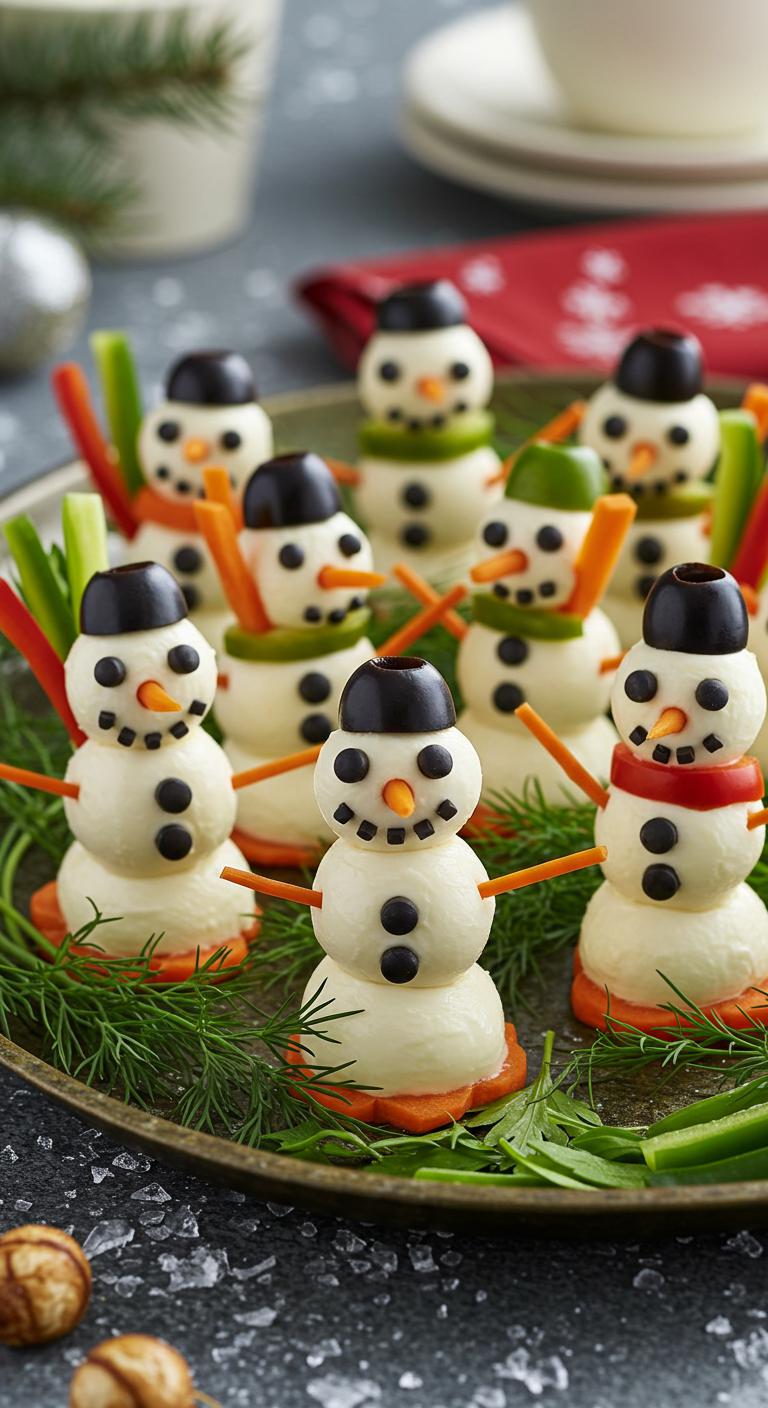
Cute Snowman Cheese Bites — tiny, festive snacks that look like snowmen and vanish fast!
Ingredients:
- 12 large mozzarella balls (ciliegine) or small bocconcini
- 12 mini mozzarella pearls (or halved small mozzarella balls) for heads
- 12 small round crackers or cucumber slices for bases (optional, for stability)
- 24 thin slices of black olive (for eyes and buttons) or use small pieces of caper
- 12 tiny carrot stars or small carrot sticks (for noses)
- 12 thin strips of red bell pepper or chive pieces (for scarves)
- 1–2 tbsp cream cheese (optional, to help pieces stick)
- Fresh parsley or dill for garnish (optional)
How to Make:
- If using, place crackers or cucumber slices on a serving tray as bases for each snowman.
- Lightly dab a little cream cheese on top of each base to act as glue.
- Place one large mozzarella ball on each base to form the snowman’s body.
- Put a mini mozzarella pearl on top of each large ball to make the head; secure with a tiny dab of cream cheese if needed.
- Cut very small circles from black olive slices (or use caper pieces) and press two onto each head for eyes.
- Insert a tiny carrot piece into the center of each head to make the carrot nose.
- Place two small black olive pieces on the body for buttons.
- Tie a thin strip of red bell pepper or wrap a chive around the neck area like a scarf.
- Garnish the tray with parsley or dill for a wintry touch.
Serve immediately or chill briefly before serving; these snowmen are ready to delight and disappear!
Mini Christmas Tree Pizzas

Mini Christmas Tree Pizzas — festive, bite-sized pizzas shaped like little Christmas trees that kids can decorate and eat!
Ingredients:
- 1 batch refrigerated pizza dough (or store-bought pizza crust)
- 1/2 cup pizza sauce or marinara
- 1 1/2 cups shredded mozzarella cheese
- 1/4 cup grated Parmesan (optional)
- Assorted toppings for decorating: sliced pepperoni, diced bell peppers (red/green), sliced black olives, cherry tomato halves, mini mozzarella balls, basil leaves
- 1 egg beaten (for egg wash) or olive oil
- Cornmeal or flour for rolling
- Small star-shaped cutter or a tiny piece of yellow bell pepper or cheese for the tree topper
How to Make:
- Preheat the oven to 425°F (220°C) and line a baking sheet with parchment paper.
- Lightly flour a surface (or sprinkle cornmeal) and roll the pizza dough to about 1/8-inch thickness.
- Use a Christmas tree-shaped cutter or cut small triangles (about 3–4 inches tall) from the dough and place them on the prepared sheet.
- Brush each tree lightly with beaten egg or olive oil to help browning.
- Spoon about 1 teaspoon of pizza sauce onto each triangle and spread it, leaving a small border for the crust.
- Sprinkle a pinch of mozzarella (and a little Parmesan if using) over the sauce.
- Let the kids decorate: arrange pepperoni, bell pepper bits, olive slices, cherry tomato halves, and mini mozzarella to look like ornaments and garlands.
- Place a tiny star of yellow bell pepper or a small star-shaped cheese piece at the top of each tree.
- Bake for 8–12 minutes, until the crust is golden and the cheese is bubbly and melted.
- Remove from the oven and let cool a couple of minutes so kids don’t burn their fingers.
Enjoy these cute, tasty mini Christmas tree pizzas — perfect for little hands and big smiles!
Festive Fruit Kabobs
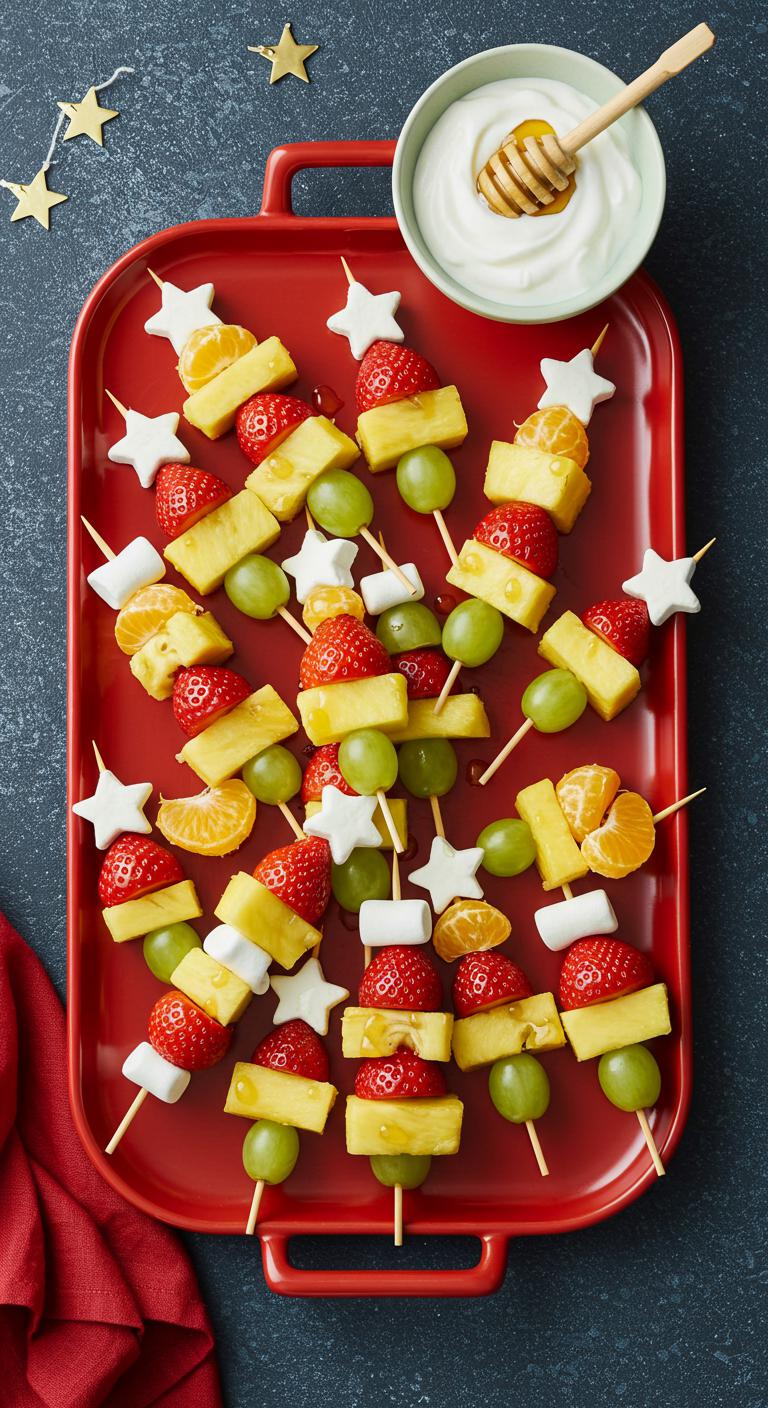
Festive Fruit Kabobs — bright, healthy little skewers that look like tiny holiday trees and are fun for kids to eat.
Ingredients:
- Strawberries, hulled (about 12)
- Green grapes (about 12)
- Pineapple chunks (fresh or canned, drained) (about 12)
- Mini marshmallows or banana slices for “stars” (12)
- Wooden skewers (12)
- Optional: a small bowl of yogurt or honey for dipping
How to Make:
- Wash all fruit thoroughly and pat dry.
- Hull strawberries and cut larger ones in half if needed so sizes are similar.
- If using pineapple chunks from a ring, cut into bite-size pieces.
- Thread fruit onto each skewer starting with a grape, then a pineapple chunk, repeat to build a stacked “tree” shape, finishing with a strawberry on top.
- Add a mini marshmallow or a small banana slice on the very tip of each skewer as the “star.”
- Arrange kabobs on a platter and cover lightly with plastic wrap until serving.
- If you like, serve with a small bowl of yogurt or a drizzle of honey for dipping.
Enjoy these colorful, kid-friendly kabobs — they’re festive, healthy, and perfect for little hands!
Santa Hat Strawberries
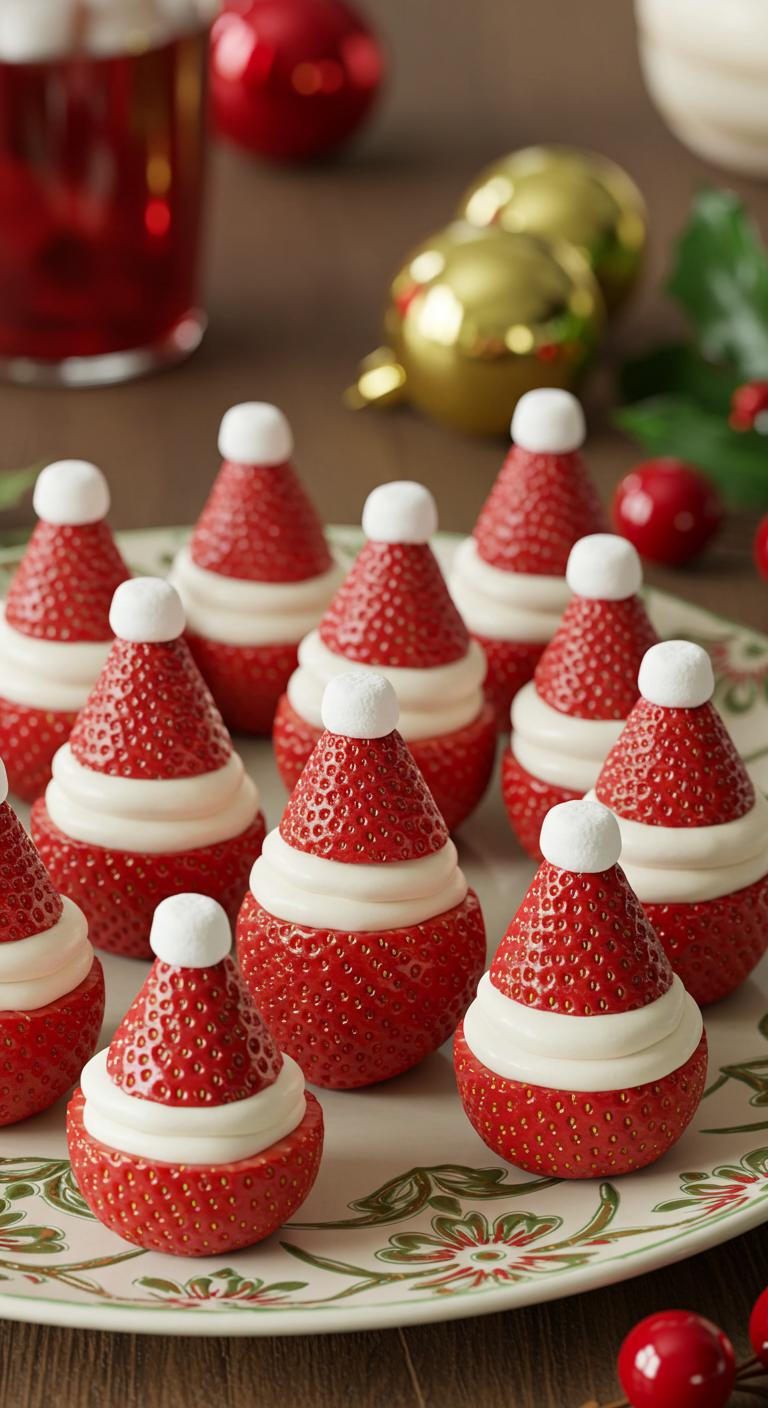
A festive, bite-sized treat that looks like Santa’s hat and tastes like a sweet holiday hug.
Ingredients:
- Fresh strawberries, hulled (tops removed)
- Mini marshmallows
- Cream cheese or whipped cream (about 1/2 cup) — for filling/“fur”
- Powdered sugar (1–2 tbsp) — optional, to sweeten cream cheese
- Vanilla extract (1/4 tsp) — optional, for flavor
- Melted white chocolate (optional, for extra stickiness)
How to Make:
- Wash and dry strawberries well, then remove the green tops and hollow a small cone out of each strawberry so marshmallow or filling fits.
- In a small bowl, mix cream cheese (or use whipped cream) with powdered sugar and vanilla until smooth and slightly fluffy.
- Spoon or pipe a small dollop of the filling into each hollowed strawberry.
- Press a mini marshmallow onto the tip of each filled strawberry to form the white pom-pom of the hat. If needed, dip the bottom of the marshmallow briefly in a little melted white chocolate before pressing to help it stick.
- If you like, add a tiny dot or ring of filling around the base of the marshmallow to look like the white brim of Santa’s hat.
- Chill the finished strawberries for 10–15 minutes to set, then serve on a festive platter.
Enjoy these adorable Santa Hat Strawberries — they’re quick, cute, and disappear fast!
Veggie Christmas Wreath Platter
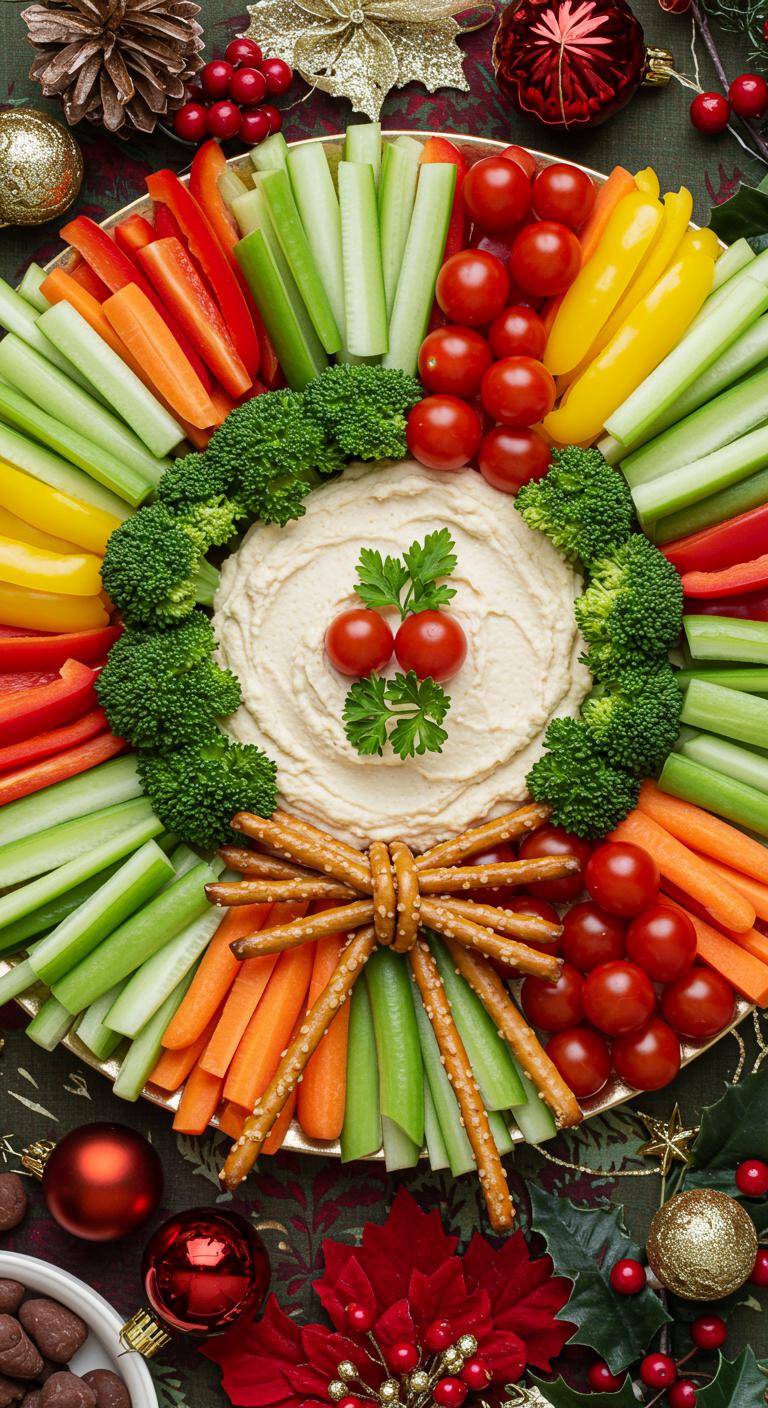
A festive, kid-friendly Veggie Christmas Wreath that’s crunchy, colorful, and fun to assemble.
Ingredients:
- 2 cups broccoli florets, bite-sized
- 2 cups cauliflower florets, bite-sized
- 1 large red bell pepper, sliced into thin strips
- 1 large yellow bell pepper, sliced into thin strips
- 1 cup cherry tomatoes
- 1 cup sugar snap peas or snow peas, trimmed
- 1/2 cup sliced radishes (optional, for extra color)
- 1/2 cup baby carrots or carrot coins
- 8 oz cream cheese or hummus (for dipping and base)
- 2 tablespoons milk (optional, to soften cream cheese)
- 1 tablespoon chopped fresh parsley or dill (optional, for garnish)
- Pretzel sticks or breadsticks for the wreath “bow” (optional)
How to Make:
- Wash and dry all vegetables thoroughly so they stay crisp.
- Trim broccoli and cauliflower into uniform, bite-sized florets.
- Slice bell peppers into thin strips and remove seeds and membranes.
- Trim sugar snap peas and slice radishes and carrots if using.
- Place the cream cheese in a small bowl; stir in milk one tablespoon at a time until spreadable, or use hummus straight from the tub.
- Transfer the dip to a round serving plate or a large round platter and spread it into a thick ring, leaving the center open like a wreath.
- Arrange broccoli and cauliflower around the dip ring as the base greenery, packing pieces close together.
- Tuck clusters of cherry tomatoes, red and yellow pepper strips, and carrot pieces around the broccoli to create colorful “ornaments.”
- Add sugar snap peas and radish slices in between for extra texture and color contrast.
- Sprinkle chopped parsley or dill lightly over the top for a fresh finishing touch.
- Place a small bunch of pretzel sticks or breadsticks at one side of the wreath to look like a decorative bow, if you like.
- Serve immediately with extra dip on the side for dipping and encourage kids to pick their favorite “ornaments.”
Have fun munching on this crunchy, colorful wreath — it’s as tasty as it’s festive!
Rudolph Rice Cake Snacks

A festive and crunchy Rudolph rice cake snack that’s quick, fun, and perfect for little hands.
Ingredients:
- 4 plain round rice cakes
- 4 tbsp cream cheese, softened (or peanut/almond butter if preferred)
- 8 slices of strawberry or banana for eyes (or mini chocolate chips)
- 4 small pretzel twists or small strips of apple for antlers
- 4 red candies (M&M, red Smartie, or a small cherry tomato) for Rudolph’s nose
- Optional: food-safe edible marker for smiling mouth, or a small strip of dark chocolate
How to Make:
- Spread 1 tablespoon of cream cheese (or nut butter) evenly on each rice cake.
- Place two slices of strawberry or banana near the top center of each rice cake as eyes, or press in two mini chocolate chips.
- Press a red candy gently into the rice cake just below the eyes to make Rudolph’s nose.
- Stick pretzel twists or small apple strips into the cream cheese at the top sides to create antlers.
- If you like, draw a little smile under the nose with an edible marker or place a tiny strip of dark chocolate for a mouth.
- Serve immediately, or chill for 10 minutes so the toppings set a bit.
Enjoy these adorable Rudolph rice cake snacks — crunchy, sweet, and guaranteed to make snack time jolly!
Grinch Guacamole Cups
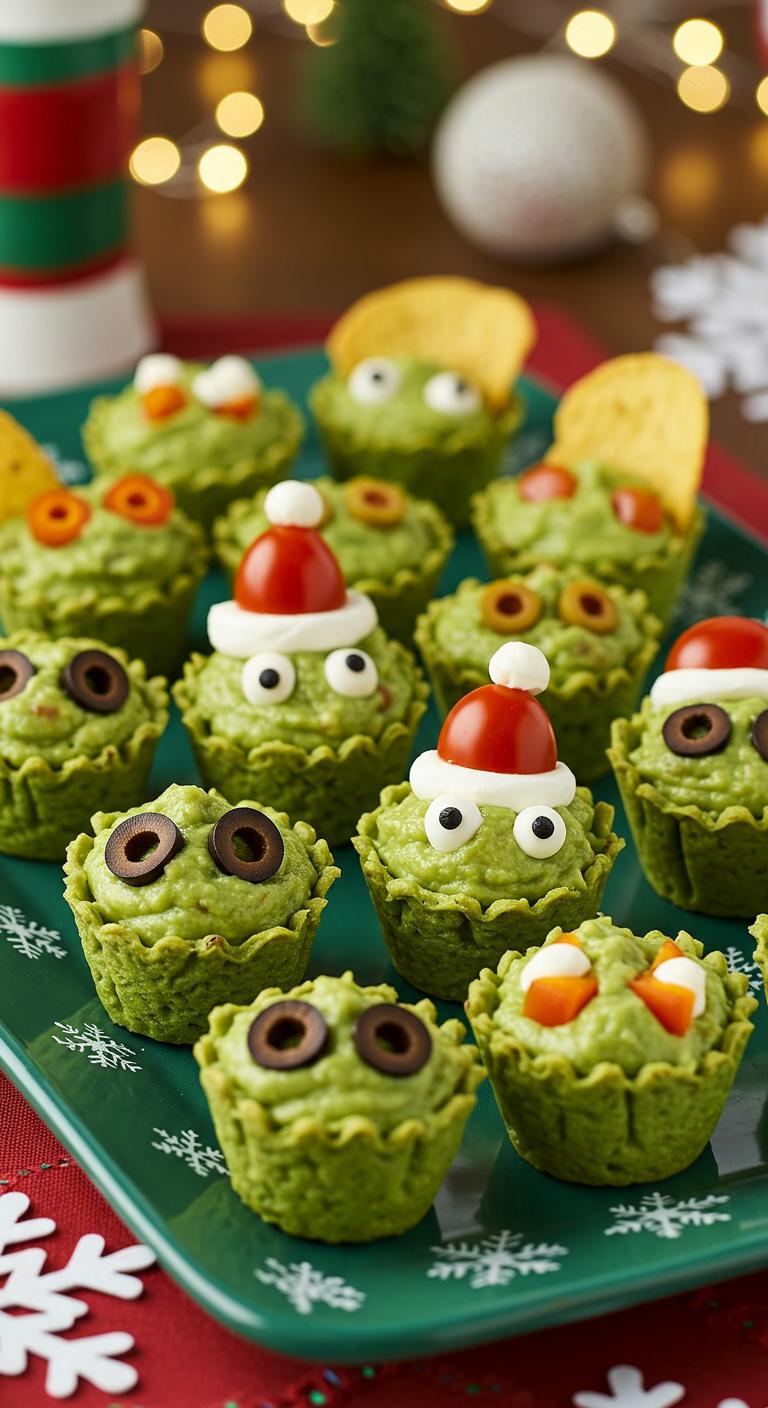
A sneaky, festive bite—Grinch Guacamole Cups are bright green, kid-friendly, and perfect for little hands at holiday parties.
Ingredients:
- 2 ripe avocados
- 1 small lime (juice)
- 2 tablespoons plain Greek yogurt or sour cream (optional, for creaminess)
- 2 tablespoons finely chopped cilantro (optional)
- 1 small tomato, seeded and finely diced
- 1 tablespoon finely chopped red onion (optional)
- Salt and pepper, to taste
- A pinch of garlic powder or 1 small garlic clove, minced (optional)
- Mini phyllo cups or small tortilla chips shaped into cups (store-bought)
- Sliced black olives (for Grinch eyes)
- Small pieces of red bell pepper or a tiny piece of cherry tomato (for the Grinch mouth or Santa hat accent)
- Tiny pieces of white mozzarella or a small dab of sour cream (for Santa hat trim, optional)
How to Make:
- Cut avocados in half, remove pits, and scoop the flesh into a bowl.
- Mash the avocados with a fork until mostly smooth but slightly chunky.
- Stir in lime juice, Greek yogurt or sour cream (if using), cilantro, and garlic; mix until combined.
- Fold in the finely diced tomato and red onion gently; season with salt and pepper to taste.
- Taste and adjust lime, salt, or pepper as needed.
- Spoon or pipe about 1–2 teaspoons of guacamole into each mini phyllo or tortilla cup.
- Place two small slices of black olive on each cup for Grinch eyes.
- Add a tiny piece of red bell pepper or tomato below the eyes to make a mischievous mouth.
- If you like, top with a tiny dab of sour cream or a small piece of mozzarella and a red pepper dot to make a Santa hat on some cups for contrast.
- Arrange on a platter and serve immediately so the cups stay crisp.
Enjoy these cheeky little Grinch bites—perfect for giggles and sneaky second helpings!
Candy Cane Caprese Bites
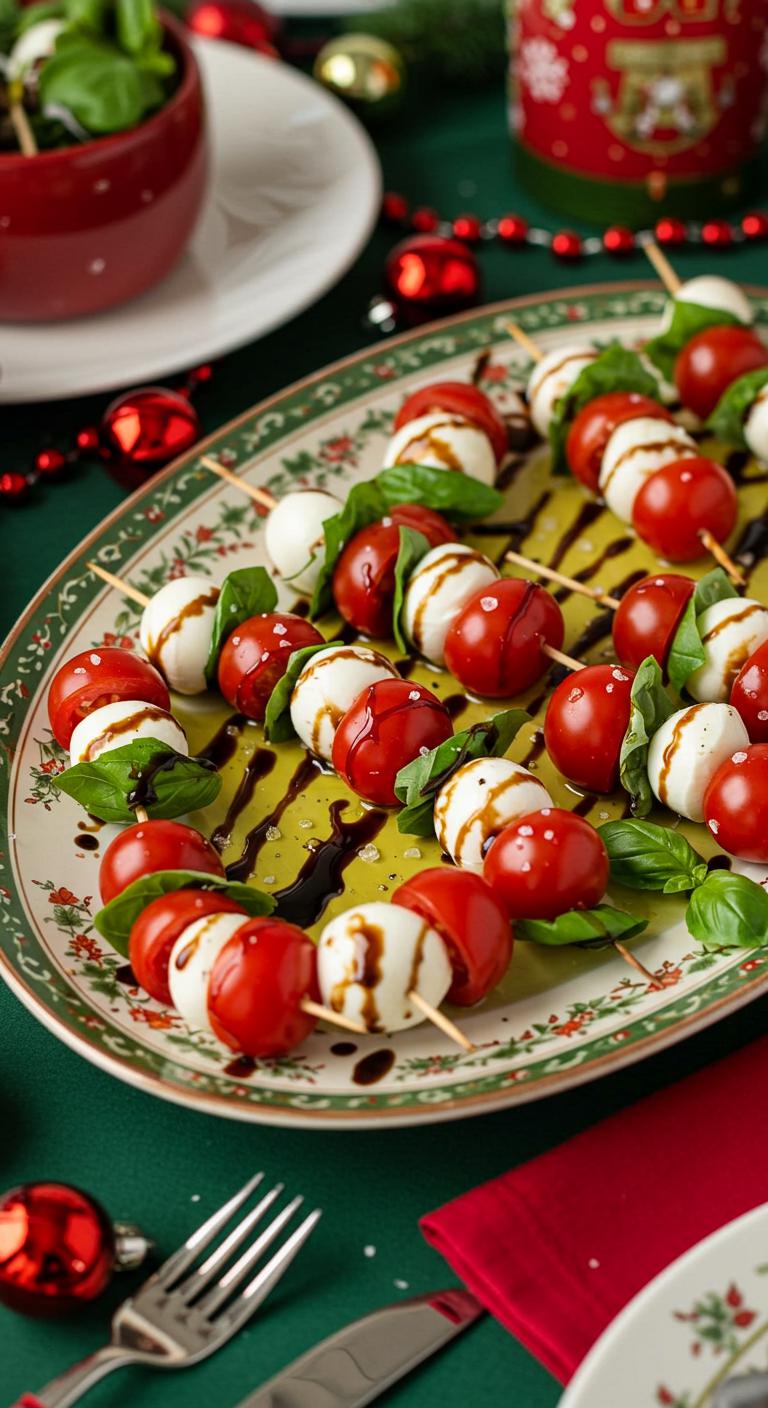
A festive, kid-friendly Caprese twist that looks like candy canes — fresh, colorful, and super easy to assemble.
Ingredients:
- Cherry tomatoes (red), about 20
- Mini fresh mozzarella balls (bocconcini), about 20
- Fresh basil leaves, about 20 small leaves
- Balsamic glaze (store-bought or homemade), about 2–3 tablespoons
- Olive oil, 1–2 teaspoons
- Salt and freshly ground black pepper, to taste
- Toothpicks or small skewers, 20
- Optional: a small pinch of dried oregano or Italian seasoning
How to Make:
- Wash tomatoes and basil; pat dry. Drain mozzarella balls.
- If using larger mozzarella, halve or slice to match cherry tomato size.
- Place a basil leaf flat against a toothpick, folding if needed to fit.
- Thread a mozzarella ball onto the toothpick next, then a cherry tomato.
- To create the candy cane curve, bend each assembled skewer gently and lay it on a platter with the top curved to one side (the soft ingredients will allow a slight curve).
- Drizzle lightly with olive oil and then with balsamic glaze.
- Sprinkle a little salt and pepper, and optional oregano, over the bites.
- Arrange on a festive plate and serve chilled or at room temperature.
Enjoy these cute, tasty candy cane Caprese bites — they’re a merry bite of Christmas in every skewer!
Holiday Ham and Cheese Roll-Ups

Savory little ham and cheese roll-ups that look festive and taste like party-ready hugs for picky eaters.
Ingredients:
- 6 large flour tortillas (8-inch)
- 8 oz (about 8–10 slices) deli ham
- 6 oz (about 6–8 slices) cheddar or Swiss cheese
- 4 tbsp cream cheese, softened
- 2 tbsp honey or brown sugar (optional, for a sweet holiday touch)
- 1 tbsp Dijon mustard or honey mustard
- 1/4 cup finely chopped green bell pepper or spinach (optional, for color)
- 1/4 cup shredded carrot (optional)
- Toothpicks or short wooden skewers
How to Make:
- Lay a tortilla flat on a clean surface.
- Spread about 2 tsp of cream cheese evenly over the tortilla.
- Drizzle or spread a thin line of mustard and a little honey or brown sugar if using.
- Layer 1–2 slices of ham across the tortilla, leaving a small border at the edges.
- Place 1 slice of cheese on top of the ham; add a sprinkle of chopped veggies or shredded carrot if you like.
- Roll the tortilla tightly from one side to the other to form a log.
- Secure with toothpicks placed evenly along the roll if needed.
- Repeat with remaining tortillas and fillings.
- Chill the rolls in the fridge for 15–20 minutes to make slicing easier.
- Slice each roll into 1–1½ inch pinwheels and arrange on a platter, removing toothpicks if you prefer.
- Serve immediately, or keep chilled until ready to serve.
These cute pinwheels are perfect for little hands — enjoy the smiles!
Snowflake Yogurt Parfaits
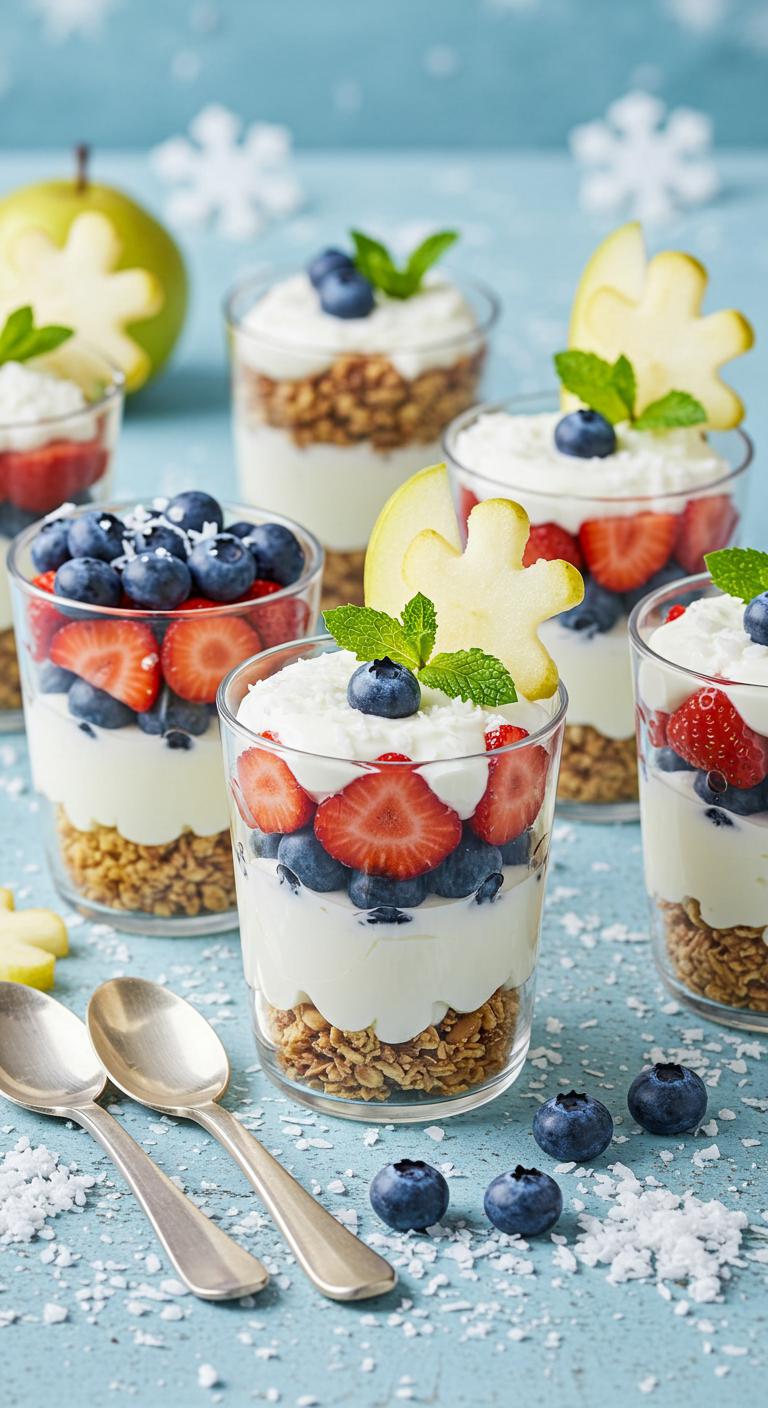
Snowflake Yogurt Parfaits — a frosty, fun snack kids can help assemble!
Ingredients:
- 2 cups vanilla or plain Greek yogurt (or dairy-free yogurt)
- 2 tablespoons honey or maple syrup (optional, for sweetness)
- 1 teaspoon vanilla extract (optional)
- 1 cup blueberries
- 1 cup strawberries, hulled and sliced
- 1 cup granola or crushed graham crackers
- 1/2 cup shredded coconut (unsweetened) or white chocolate chips for “snow”
- A few thin apple or pear slices cut into small snowflake shapes (use a small cookie cutter) or star-shaped fruit pieces
- Fresh mint leaves for garnish (optional)
How to Make:
- Stir the yogurt with honey and vanilla in a bowl until smooth and slightly sweetened.
- Spoon a couple of tablespoons of yogurt into the bottom of each clear cup or small jar.
- Add a layer of granola or crushed graham crackers for crunch.
- Spoon another layer of yogurt over the crunch.
- Add a mix of blueberries and sliced strawberries as the fruit layer.
- Sprinkle a little shredded coconut or white chocolate chips to look like snow.
- Repeat layers if your cup has room, ending with a yogurt layer.
- Press a small fruit snowflake or star on top and add a mint leaf for color.
- Chill for 10–15 minutes if you like them cold, or serve right away.
Enjoy these snowy parfaits — crunchy, creamy, and kid-approved!
Christmas Tree Tortilla Pinwheels
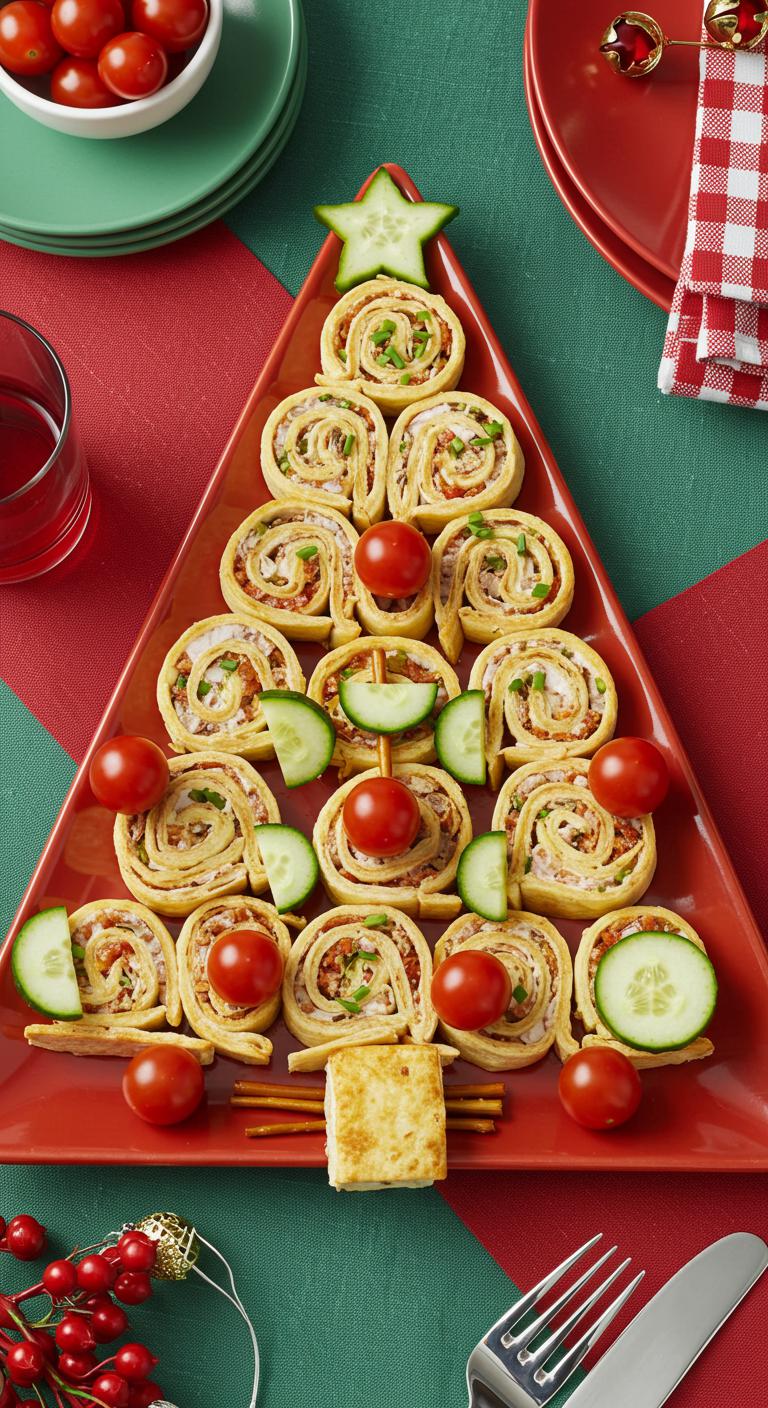
A festive, kid-friendly snack that looks like a Christmas tree and tastes like party time!
Ingredients:
- 4 large flour tortillas (green spinach tortillas if available)
- 8 oz (225 g) cream cheese, softened
- 1/2 cup sour cream or Greek yogurt
- 1 cup finely shredded cheddar cheese
- 1/2 cup finely chopped red bell pepper
- 1/4 cup finely chopped green onions
- 1/4 cup finely chopped fresh parsley or cilantro
- 1 tablespoon lemon juice
- Salt and pepper to taste
- 1 small cucumber, thinly sliced (for “ornaments”)
- 8–12 small cherry tomatoes or pomegranate arils (for “ornaments”)
- A few chives or pretzel sticks (for the trunk)
How to Make:
- In a bowl, mix the softened cream cheese and sour cream until smooth.
- Stir in shredded cheddar, chopped red bell pepper, green onions, parsley, and lemon juice.
- Season with a pinch of salt and pepper and taste; adjust as needed.
- Lay a tortilla flat and spread about a quarter of the cheese mixture evenly over the surface, leaving a small edge.
- Roll the tortilla tightly from one side to the other into a log.
- Repeat with remaining tortillas and filling.
- Wrap each log in plastic wrap and chill in the fridge for at least 30 minutes to firm up.
- Unwrap and slice each log into 1-inch rounds to make the pinwheels.
- On a serving platter, arrange pinwheels in a triangular Christmas-tree shape, starting with a wider base and tapering to a point.
- Top pinwheels with cucumber slices, cherry tomato halves or pomegranate arils as “ornaments.”
- Use short pieces of chive or small pretzel sticks at the bottom for the tree trunk.
- Serve immediately and watch the kids’ faces light up!
Enjoy your edible Christmas trees — fun to make and even more fun to eat!
Gingerbread Graham Snack Bars
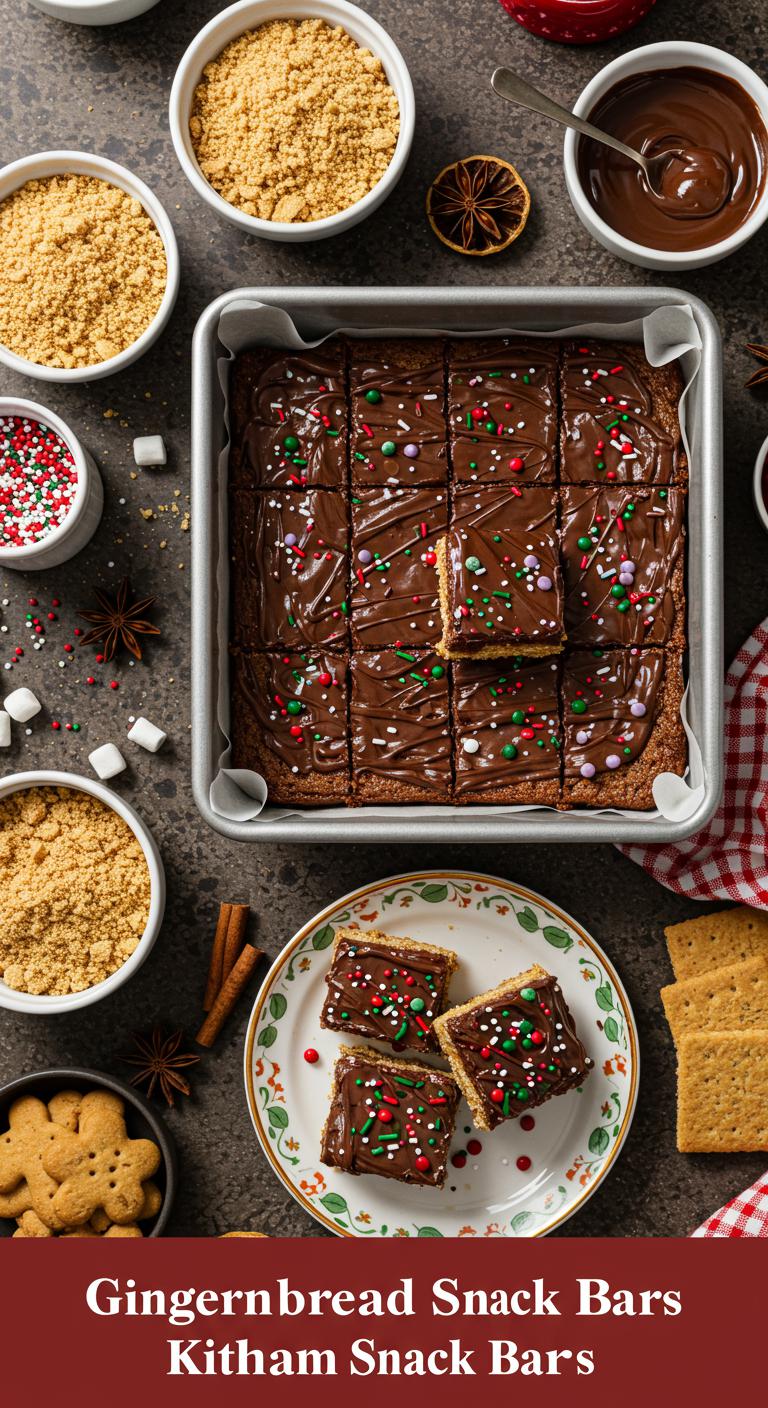
A cozy, kid-friendly gingerbread graham treat that’s crunchy, sweet, and perfect for little hands this holiday season.
Ingredients:
- 2 cups graham cracker crumbs (about 10–12 full sheets)
- 1 cup finely crushed gingersnap or gingerbread cookies (optional for extra spice)
- 1/2 cup unsalted butter, melted
- 1/3 cup brown sugar, packed
- 1/4 cup molasses
- 1/2 teaspoon ground ginger
- 1/4 teaspoon ground cinnamon
- 1/8 teaspoon ground cloves (optional)
- Pinch of salt
- 1 cup chocolate chips or white chocolate chips (for topping or drizzling)
- Festive sprinkles (optional)
How to Make:
- Preheat the oven to 350°F (175°C) and line an 8×8-inch baking pan with parchment paper, leaving an overhang to lift the bars out.
- In a bowl, stir together the graham cracker crumbs and crushed gingersnaps if using.
- In a separate microwave-safe bowl, warm the melted butter, brown sugar, and molasses briefly and stir until smooth.
- Add the ginger, cinnamon, cloves, and a pinch of salt to the wet mixture and mix well.
- Pour the wet mixture over the crumb mixture and stir until evenly combined and crumbly but slightly sticky.
- Press the mixture firmly and evenly into the prepared pan using the back of a spoon or a flat-bottomed cup.
- Bake for 10–12 minutes until set and fragrant; remove from the oven and let cool for 10 minutes.
- Sprinkle the chocolate chips or white chips over the warm bars so they melt, then spread smooth with a spatula.
- Add festive sprinkles while the chocolate is still soft, if desired, then chill in the refrigerator for 20–30 minutes to fully set.
- Lift the bars out using the parchment overhang and cut into squares or finger-sized bars.
Enjoy these gingerbread graham snack bars warm or chilled — a sweet, crunchy holiday treat kids will gobble up!
Peppermint Cocoa Brownie Bites

Peppermint Cocoa Brownie Bites — fudgy, minty little squares that taste like holiday hot chocolate in every bite.
Ingredients:
- 1 cup all-purpose flour
- 1/2 cup unsweetened cocoa powder
- 1/2 teaspoon baking powder
- 1/4 teaspoon salt
- 1/2 cup (1 stick) unsalted butter, melted
- 3/4 cup granulated sugar
- 2 large eggs
- 1 teaspoon vanilla extract
- 1/2 cup mini chocolate chips (optional)
- 1/2 cup crushed peppermint candy or candy canes (plus extra for topping)
- 1/2 cup powdered sugar (for dusting, optional)
How to Make:
- Preheat the oven to 350°F (175°C) and grease or line a 9×9-inch pan (or use silicone mini brownie pan).
- In a bowl, whisk together flour, cocoa powder, baking powder, and salt.
- In another bowl, mix melted butter and sugar until combined, then stir in eggs and vanilla until smooth.
- Fold the dry ingredients into the wet mixture just until combined; don’t overmix.
- Stir in mini chocolate chips and most of the crushed peppermint, leaving a little to sprinkle on top.
- Pour batter into the prepared pan and smooth the top; sprinkle remaining peppermint pieces over the batter.
- Bake 18–22 minutes for a 9×9 pan (or 10–12 minutes for mini pan), until a toothpick comes out with a few moist crumbs.
- Let cool completely in the pan before cutting into bite-sized squares (or popping out minis).
- Dust with powdered sugar if you like, and press any extra peppermint on top while slightly warm.
Enjoy these fudgy, minty brownie bites — perfect for little hands and big smiles at your holiday table!
Holiday Rainbow Veggie Cups

Bright, crunchy mini veggie cups that look like holiday ornaments — fun for kids and easy to munch!
Ingredients:
- 1 cup cherry tomatoes, halved
- 1 cup shredded red cabbage
- 1 cup shredded carrots
- 1 cup diced yellow bell pepper
- 1 cup diced cucumber
- 1 cup blanched or steamed broccoli florets, finely chopped
- 1 cup hummus or ranch dip (store-bought or homemade)
- 12–16 clear plastic or reusable small cups (2–4 oz)
- Fresh parsley or cilantro leaves for garnish (optional)
- Salt and pepper to taste (optional)
How to Make:
- Rinse all vegetables well and pat dry.
- Halve the cherry tomatoes and set aside.
- Shred the red cabbage and carrots, and place each in its own bowl.
- Dice the yellow bell pepper and cucumber into small, kid-friendly pieces.
- Finely chop the broccoli so it fits nicely in the cups.
- Spoon 1–2 tablespoons of hummus or ranch into the bottom of each small cup to act as a base.
- Layer the veggies in rainbow order: start with red tomatoes, then purple cabbage, orange carrots, yellow pepper, green cucumber, and finish with chopped broccoli.
- Season lightly with salt and pepper if desired.
- Garnish each cup with a small parsley or cilantro leaf for a festive touch.
- Chill in the fridge until serving so they stay crisp.
Colorful, healthy, and totally kid-approved — enjoy the crunchy holiday rainbow!
Conclusion
You’ve got 15 simple, kid-friendly finger food ideas that are quick to make and fun to assemble. Try letting kids build their own Reindeer Pretzels or Mini Christmas Tree Pizzas to keep them engaged. Note that 72% of parents say hands-on food activities make meals more enjoyable for kids, so involve them for better results. Follow the recipes step by step, prep ingredients ahead, and serve fresh for best texture and flavor.