
You've likely seen those stunning naked cakes, their exposed layers tempting you with every glance. Originating from the Victorian Era, these rustic beauties let simplicity shine through while showcasing your creative flair. But how do you craft your own masterpiece? From selecting the right cake flavors to choosing the perfect fillings and toppings, the process can be both enjoyable and rewarding. Let's explore the steps involved, ensuring your cake stands out at any gathering.
History
When you think about the naked cake, it's fascinating to realize that this trendy dessert has roots that stretch back more than a century.
Originating in the Victorian Era, when cake trends leaned toward elaborate decorations and heavy frostings, the naked cake emerged as a revitalizing alternative. Instead of hiding the cake's layers with thick icing, bakers began showcasing the natural beauty of the cake itself.
This minimalist approach highlighted the moist textures and vibrant colors of fresh fruits and flowers. Over the years, naked cakes gained popularity at weddings and celebrations for their rustic charm and simplicity.
Today, they symbolize a return to authenticity in baking, blending the past with contemporary tastes, inviting you to create your unique version.
Recipe
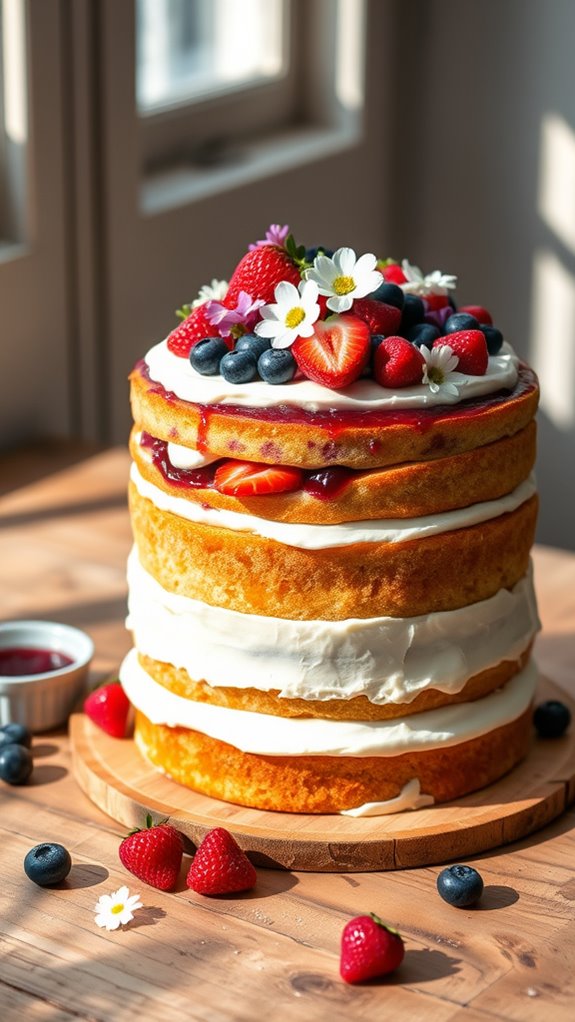
Creating a DIY Naked Cake is a delightful way to celebrate any occasion, whether it be a birthday, wedding, or just a weekend treat. This simple yet stunning dessert is characterized by its exposed layers of cake and filling, making it both visually appealing and delicious. With its rustic charm and the ability to customize flavors and fillings, the naked cake is a versatile choice that brings a personal touch to your baking endeavors.
To prepare your naked cake, you'll need to create a base cake that's moist and flavorful, as well as delicious fillings that will complement the layers. You can use different flavors for each cake layer – think vanilla, chocolate, lemon, or even spice cakes. Don't forget toppings such as fresh fruits, cream, or edible flowers for that final touch. With this step-by-step guide, you'll be able to create a naked cake that will impress your friends and family!
Ingredients:
- 2 cups all-purpose flour
- 1 ½ cups granulated sugar
- ½ cup unsalted butter, softened
- 1 cup milk (or buttermilk)
- 3 large eggs
- 2 ½ teaspoons baking powder
- 1 teaspoon vanilla extract
- ½ teaspoon salt
- Filling of your choice (e.g., whipped cream, fruit compote, ganache)
- Fresh fruit and/or edible flowers for decoration
To make the naked cake, first preheat your oven to 350°F (175°C) and grease and flour three 8-inch round cake pans. In a large mixing bowl, combine the softened butter and sugar, beating them together until light and fluffy.
Add the eggs one by one, followed by the milk and vanilla, mixing well after each addition. In a separate bowl, whisk together the flour, baking powder, and salt. Gradually incorporate the dry ingredients into the wet mixture until smooth.
Divide the batter evenly among the prepared pans, and bake for 25-30 minutes or until a toothpick inserted in the center comes out clean. Allow the cakes to cool in the pans for 10 minutes before turning them out onto a wire rack to cool completely.
When assembling your naked cake, place one layer on your serving plate and spread a layer of your desired filling on top. Add another cake layer and repeat the process, and ultimately place the last layer on top. Use any remaining filling for the top of the cake and add fresh fruits or edible flowers for a beautiful presentation.
Remember, the beauty of a naked cake lies in its simplicity, so don't worry about making it perfect!
For the best results, be sure to let the cake layers cool completely before assembling to avoid melting the filling. Feel free to experiment with different combinations of cake flavors and fillings to suit your tastes.
Also, consider refrigerating the assembled cake for about 30 minutes to help set the filling before serving. This will make slicing easier and help your cake maintain its shape. Ultimately, keep your naked cake stored in a cool place, as exposed layers and decorations can lose their freshness quickly if left out for too long. Enjoy your baking journey!
Nutritional Guide
While a DIY Naked Cake offers a delightful indulgence, it's important to contemplate the nutritional aspects of this sweet treat. The caloric content can vary considerably based on your ingredient choices.
Traditional cakes often pack a hefty calorie punch, but by opting for lighter alternatives like whole wheat flour or natural sweeteners, you can reduce that number. You might also consider incorporating fruits and nuts into your layers for added nutrition and flavor without too many calories.
Additionally, using Greek yogurt for frosting can lower fat while still providing a creamy texture. With thoughtful ingredient substitutions, you not only satisfy your sweet tooth but also create a cake that aligns better with your health goals, making each slice a bit guilt-free.
Final Thought
Making a DIY Naked Cake isn't just about layering flavors; it's also about crafting an experience that brings joy to your celebrations.
You're not just baking; you're creating a stunning centerpiece that invites admiration. With its rustic charm, your naked cake deserves beautiful cake decoration. Fresh fruits, edible flowers, or a light dusting of powdered sugar can enhance its appeal, making it even more enticing.
For serving suggestions, consider pairing it with a scoop of ice cream or a simple fruit coulis to elevate the experience. Don't forget to invite your friends to join in the fun of decorating!
In the end, this cake isn't just dessert; it's a shared moment of delight that you'll remember for years to come.