
Like finding a map to a hidden pantry, these 15 make-ahead freezer recipes help you plan meals and free up time for company. You can prep casseroles, dips, pot pies, sliders, and desserts in batches, label and freeze them, then reheat or bake when guests arrive. Follow simple steps for assembly, safe cooling, and thawing so dishes stay tasty and stress stays low—here’s how to get started.
Sausage and Egg Breakfast Casserole

A hearty make-ahead breakfast casserole that reheats perfectly for busy holiday mornings.
Ingredients:
- 1 pound bulk breakfast sausage (or 8–10 links removed from casings)
- 8 large eggs
- 2 cups whole milk (or 2% milk)
- 6 cups day-old bread cubes (about 1 loaf, crusts removed if you like)
- 2 cups shredded cheddar cheese (divided)
- 1 small onion, finely chopped
- 1 cup diced bell pepper (optional)
- 1 teaspoon salt
- 1/2 teaspoon black pepper
- 1/2 teaspoon dried sage or Italian seasoning
- 2 tablespoons chopped fresh parsley (optional)
- Nonstick spray or 1 tablespoon butter for greasing the pan
How to Make:
- Preheat oven to 350°F (175°C). Grease a 9×13-inch baking dish.
- Brown the sausage in a skillet over medium heat, breaking it into crumbles; drain excess fat. Stir in the chopped onion and bell pepper and cook until softened, about 4–5 minutes.
- In a large bowl, whisk together the eggs, milk, salt, pepper, and dried sage.
- Add the bread cubes, cooked sausage mixture, and 1 1/2 cups of the shredded cheddar to the egg mixture. Stir until bread is moistened and ingredients are well combined.
- Transfer the mixture to the prepared baking dish, pressing gently to level. Sprinkle the remaining 1/2 cup cheddar on top.
- Cover tightly with foil and bake for 35 minutes. Remove foil and bake 10–15 more minutes until puffed and golden and a knife inserted in the center comes out mostly clean.
- Let the casserole rest 5–10 minutes before slicing. Garnish with chopped parsley if desired.
- To freeze: assemble casserole in a foil pan, cover tightly, and freeze for up to 3 months. Thaw overnight in the fridge and bake as directed, adding about 10–20 minutes if still cold from fridge. For baking from frozen, increase covered bake time to about 60–75 minutes, then uncover and bake until set.
Enjoy warm slices with hot coffee — breakfast saved and stress-free!
Make-Ahead Mashed Potato Casserole
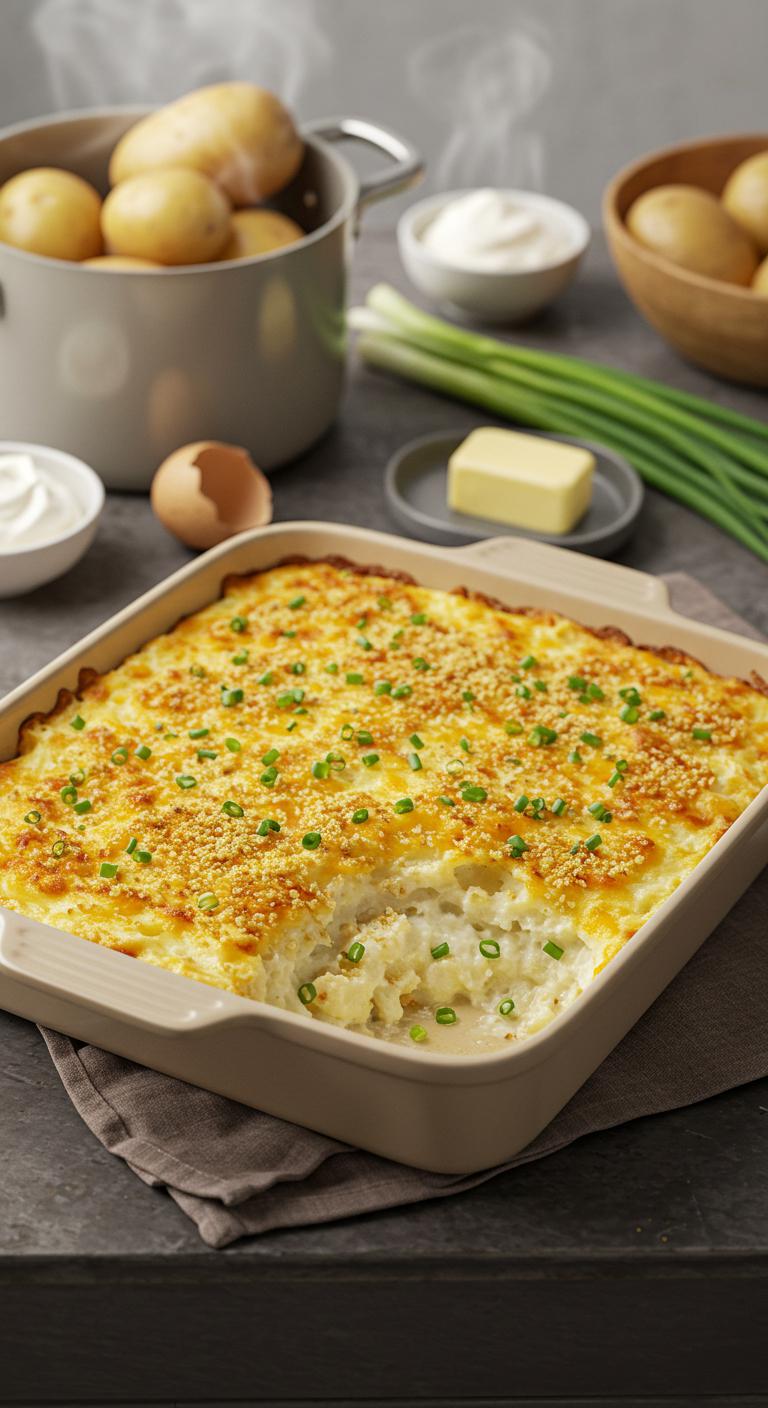
Creamy, dreamy mashed potato casserole you can make ahead and pop from freezer to oven with zero stress.
Ingredients:
- 4 pounds russet potatoes, peeled and cut into 1- to 2-inch chunks
- 1 cup whole milk (or milk of choice), warmed
- 1/2 cup sour cream
- 1/2 cup unsalted butter, melted
- 1 teaspoon salt, plus more to taste
- 1/2 teaspoon black pepper
- 1 cup shredded sharp cheddar cheese, divided
- 1/2 cup grated Parmesan cheese
- 1/2 cup chopped green onions or chives (optional)
- 1/2 cup panko breadcrumbs or crushed cornflakes (optional topping)
- 2 tablespoons melted butter for topping (optional)
How to Make:
- Place potato chunks in a large pot and cover with cold water; add a pinch of salt.
- Bring to a boil, then simmer until potatoes are very tender, about 12–15 minutes.
- Drain well and return potatoes to the hot pot for a minute to evaporate excess moisture.
- Mash the potatoes until smooth or leave slightly chunky, depending on preference.
- Stir in warmed milk, sour cream, melted butter, salt, and pepper until creamy.
- Fold in half of the shredded cheddar and the Parmesan; taste and adjust seasoning.
- Transfer mashed potatoes to a 9×13-inch baking dish, smoothing the top.
- If freezing: let the casserole cool completely, cover tightly with plastic wrap and foil, and freeze up to 3 months.
- To bake from frozen: remove plastic, keep foil on, bake at 350°F (175°C) for 60–75 minutes, then uncover and bake 10–15 minutes more until heated through and edges are bubbly.
- If using topping: mix panko or crushed cornflakes with 2 tablespoons melted butter and remaining cheddar; sprinkle over casserole for the last 10–15 minutes of baking to crisp and brown.
- After baking, sprinkle with chopped green onions or chives if desired and let sit 5 minutes before serving.
Bake, broil, or reheat — either way, this make-ahead mashed potato casserole brings cozy comfort in every forkful!
Cheesy Spinach and Artichoke Dip

A warm, bubbly cheesy spinach and artichoke dip that’s freezer-friendly and perfect for holiday parties.
Ingredients:
- 10 oz frozen chopped spinach, thawed and well-drained
- 14 oz canned artichoke hearts, drained and roughly chopped
- 8 oz cream cheese, softened
- 1/2 cup sour cream
- 1/2 cup mayonnaise
- 1 cup shredded mozzarella cheese, divided
- 1/2 cup grated Parmesan cheese
- 2 cloves garlic, minced
- 1/2 teaspoon onion powder
- 1/4 teaspoon red pepper flakes (optional)
- Salt and black pepper to taste
- 1 tablespoon olive oil (for sautéing, optional)
- Extra shredded mozzarella or Parmesan for topping
- Lemon zest (optional, a pinch for brightness)
How to Make:
- Preheat your oven to 375°F (190°C) if baking now; if freezing for later, skip preheating.
- Squeeze as much liquid as you can from the thawed spinach using a clean towel or cheesecloth.
- If you like deeper flavor, warm the olive oil in a skillet over medium, add the minced garlic, sauté 30 seconds until fragrant, then add the chopped artichokes and cook 1–2 minutes; let cool slightly.
- In a large bowl, beat the softened cream cheese until smooth.
- Stir in the sour cream and mayonnaise until combined and creamy.
- Add the drained spinach, chopped artichokes (and garlic mixture, if used), 3/4 cup mozzarella, Parmesan, onion powder, red pepper flakes, lemon zest (if using), and salt and pepper; mix until evenly combined.
- Transfer the mixture to an oven-safe baking dish, smooth the top, and sprinkle the remaining mozzarella and a little extra Parmesan over the surface.
- To bake now: bake 18–22 minutes until bubbly and golden on top. To freeze for later: cool completely, cover tightly with foil and plastic wrap, and freeze for up to 3 months.
- To heat from frozen: thaw overnight in the fridge, then bake at 350°F (175°C) about 20–25 minutes until hot and bubbly; from frozen you may need an extra 10–15 minutes covered then uncovered to brown.
- Serve warm with crackers, toasted bread, or vegetable sticks.
Enjoy the gooey, savory goodness—this dip disappears fast at every gathering!
Individual Beef Pot Pies
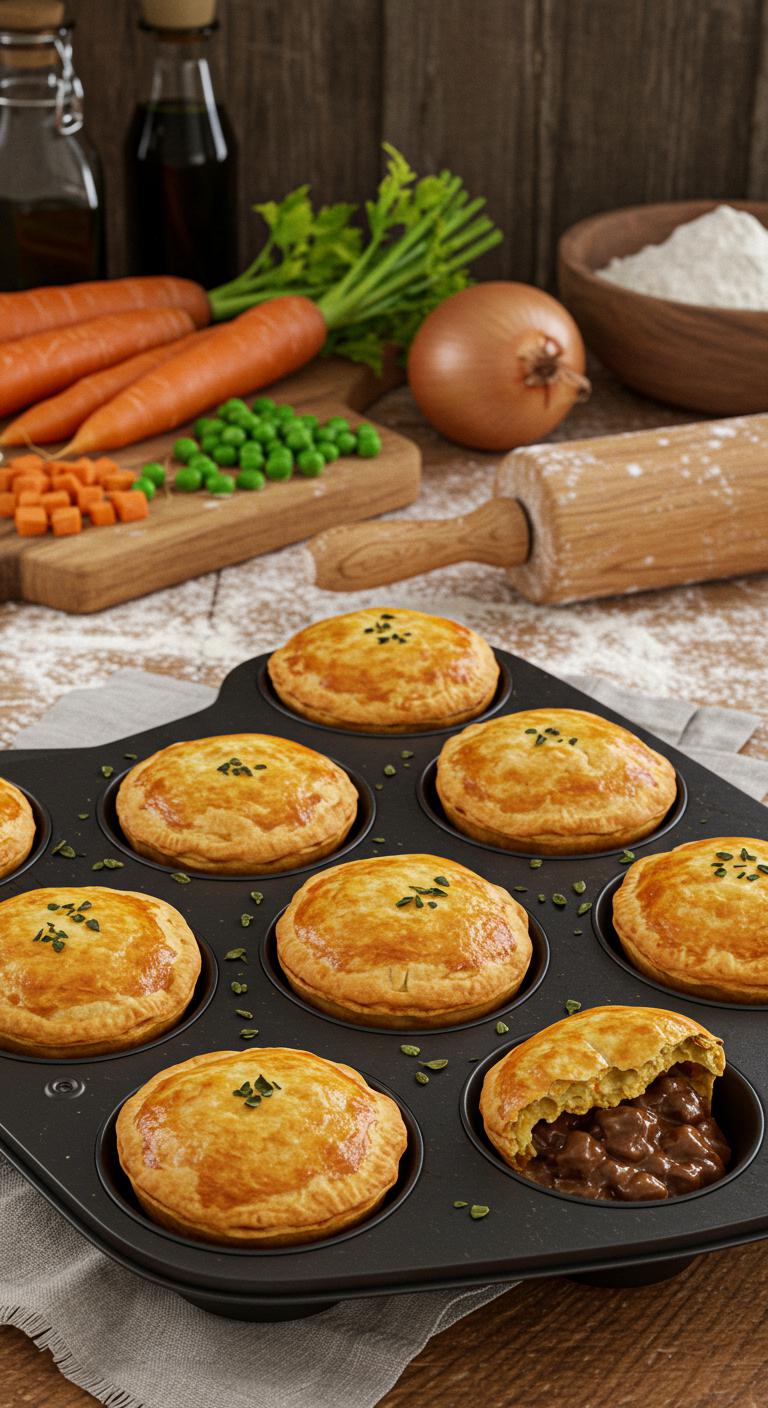
Savory, comforting mini beef pot pies — perfect for making ahead and popping from the freezer to oven when you need a cozy meal.
Ingredients:
- 1 lb (450 g) ground or finely diced beef chuck
- 1 small onion, finely chopped
- 2 carrots, diced small
- 1 celery stalk, diced small
- 1 cup frozen peas
- 2 cloves garlic, minced
- 2 tbsp tomato paste
- 2 tbsp all-purpose flour
- 1 1/2 cups beef broth
- 1 tsp Worcestershire sauce
- 1 tsp dried thyme (or 1 tbsp fresh)
- Salt and black pepper to taste
- 2 tbsp butter or oil for cooking
- 1 sheet refrigerated pie crust or puff pastry (enough for 4–6 individual pies)
- 1 egg beaten with 1 tsp water (egg wash)
- Optional: 1 tbsp chopped fresh parsley for garnish
How to Make:
- Preheat a skillet over medium heat and add the butter or oil.
- Add the onion, carrot, and celery and cook 5–7 minutes until softened.
- Stir in the garlic and cook 30 seconds until fragrant.
- Add the beef to the pan, breaking it up, and cook until browned.
- Sprinkle the flour over the meat and veggies and stir 1 minute to coat.
- Stir in the tomato paste, then slowly add the beef broth while stirring to avoid lumps.
- Add Worcestershire sauce, thyme, salt, and pepper. Simmer 5–8 minutes until the sauce thickens.
- Stir in the frozen peas, cook 1–2 minutes, then remove from heat and let the filling cool.
- Preheat oven to 400°F (200°C). Lightly grease a muffin tin or individual ramekins.
- Cut the pie crust or pastry into circles to line each muffin cup or ramekin, leaving enough to cover as a lid.
- Spoon cooled filling into each lined cup, then top with another pastry circle and pinch/seal the edges. Cut a small vent in each top.
- Brush each top with egg wash.
- Freeze on a baking sheet until firm (about 1–2 hours) if making ahead for the freezer, then transfer to a sealed freezer bag or container for up to 3 months.
- To bake from frozen: place frozen pies on a baking sheet, bake at 400°F (200°C) for 30–40 minutes until golden and bubbling. If thawed, bake 20–25 minutes.
- Let pies rest 5 minutes before serving; sprinkle parsley if using.
Enjoy a warm, flaky mini pot pie anytime — comfort food made effortless!
Turkey and Cranberry Sliders

A cozy, make-ahead slider perfect for holiday leftovers — savory turkey, tangy cranberry, and melty cheese tucked into soft rolls.
Ingredients:
- 12 small slider rolls (dinner rolls or Hawaiian rolls)
- 3 cups cooked turkey, sliced or shredded
- 1 cup cranberry sauce (whole-berry or chopped)
- 6 slices Swiss or provolone cheese (or 12 small slices to fit sliders)
- 3 tablespoons unsalted butter, melted
- 1 tablespoon Dijon mustard (optional)
- 1 tablespoon mayonnaise (optional)
- 1 small onion, thinly sliced (optional)
- 1 teaspoon fresh thyme leaves or 1/2 teaspoon dried thyme (optional)
- Salt and pepper to taste
How to Make:
- Preheat oven to 350°F (175°C).
- Slice the slider rolls in half horizontally and place the bottom halves in a baking dish or sheet pan.
- If using, spread a thin layer of Dijon mustard and/or mayonnaise on the bottom halves.
- Arrange turkey evenly over the bottoms of the rolls.
- Spoon cranberry sauce over the turkey in dollops, spreading lightly so each slider gets some.
- Add sliced onion and sprinkle thyme over the cranberry and turkey if using.
- Top with cheese so each slider is covered.
- Place the top halves of the rolls on the sliders.
- Brush the tops with melted butter and sprinkle a little salt and pepper.
- Cover the dish with foil and bake 15 minutes, then remove foil and bake 5–7 minutes more until the cheese is melted and tops are golden.
- Let cool 2–3 minutes, then carefully separate the sliders and serve warm.
Make ahead/freezer note: Assemble sliders on a sheet pan, wrap tightly with plastic and foil, and freeze. To reheat, thaw in fridge overnight, then bake covered at 350°F for 20–25 minutes and uncover for 5–7 minutes until heated through.
These sliders are a holiday mash-up that’s comforting, portable, and irresistible — enjoy!
Creamy Chicken Enchiladas
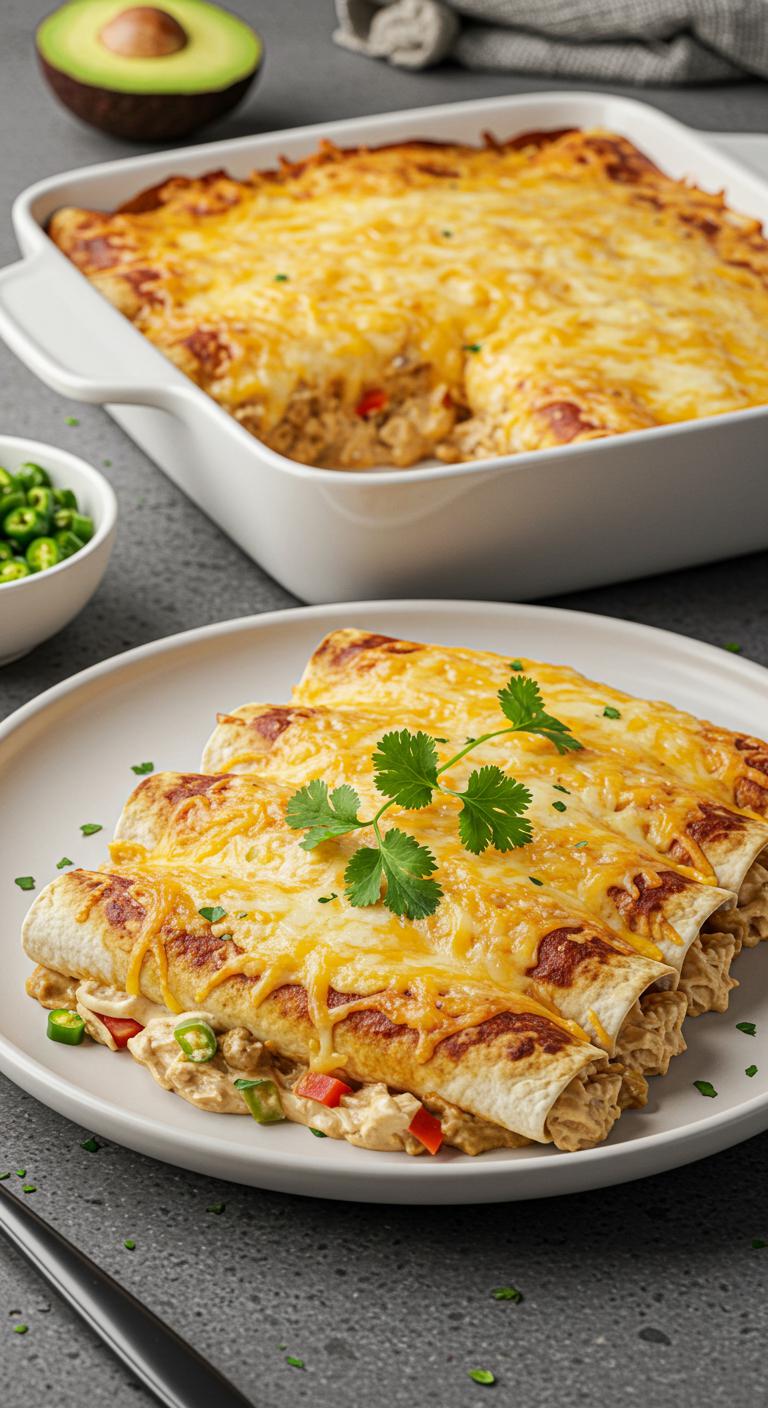
Creamy Chicken Enchiladas — comforting, make-ahead, and freezer-friendly with a silky sauce that keeps perfectly.
Ingredients:
- 3 cups cooked shredded chicken (rotisserie or poached)
- 1 tablespoon olive oil
- 1 small onion, finely chopped
- 2 cloves garlic, minced
- 1 can (4 oz) diced green chiles
- 1 teaspoon ground cumin
- 1/2 teaspoon chili powder
- 1/2 teaspoon salt (adjust to taste)
- 1/4 teaspoon black pepper
- 1 cup sour cream
- 1 cup cream cheese, softened
- 1/2 cup chicken broth
- 1 cup shredded Monterey Jack cheese (plus 1/2 cup for topping)
- 8–10 flour or corn tortillas (6–8 inch)
- 2 tablespoons chopped fresh cilantro (optional, for garnish)
- Cooking spray or a little oil for the baking dish
How to Make:
- Preheat oven to 350°F (175°C) if baking now; if freezing for later, skip baking step until reheating.
- Heat olive oil in a skillet over medium heat and sauté chopped onion until soft, about 4–5 minutes.
- Add garlic, cumin, chili powder, salt, and pepper; cook 30 seconds until fragrant.
- Stir in shredded chicken and diced green chiles; heat through for 2–3 minutes, then remove from heat.
- In a bowl, whisk together sour cream, softened cream cheese, and chicken broth until smooth and creamy.
- Fold 1 cup shredded Monterey Jack into the creamy mixture, reserving the remaining cheese for the top.
- Add the creamy sauce to the chicken mixture and stir until everything is evenly coated.
- Warm tortillas briefly in a dry skillet or microwave for 15–20 seconds to make them pliable.
- Spoon about 1/3 to 1/2 cup of the filling down the center of each tortilla, roll up, and place seam-side down in a lightly greased 9×13-inch baking dish.
- Pour any remaining sauce over the rolled enchiladas and sprinkle the reserved 1/2 cup shredded cheese evenly on top.
- To bake now: cover loosely with foil and bake 20 minutes, remove foil, and bake 5–10 more minutes until cheese is bubbly and lightly golden.
- To freeze for later: cover tightly with foil and label with date; freeze up to 3 months. To bake from frozen, thaw overnight in the fridge, then bake covered at 350°F for 25–30 minutes, uncover and bake 5–10 minutes more; if baking straight from frozen, add 15–20 minutes to the covered bake time and then uncover to brown.
- Garnish with chopped cilantro if desired and let sit 5 minutes before serving to set.
These creamy chicken enchiladas are perfect for stashing in the freezer and popping into the oven whenever you need a cozy dinner — enjoy!
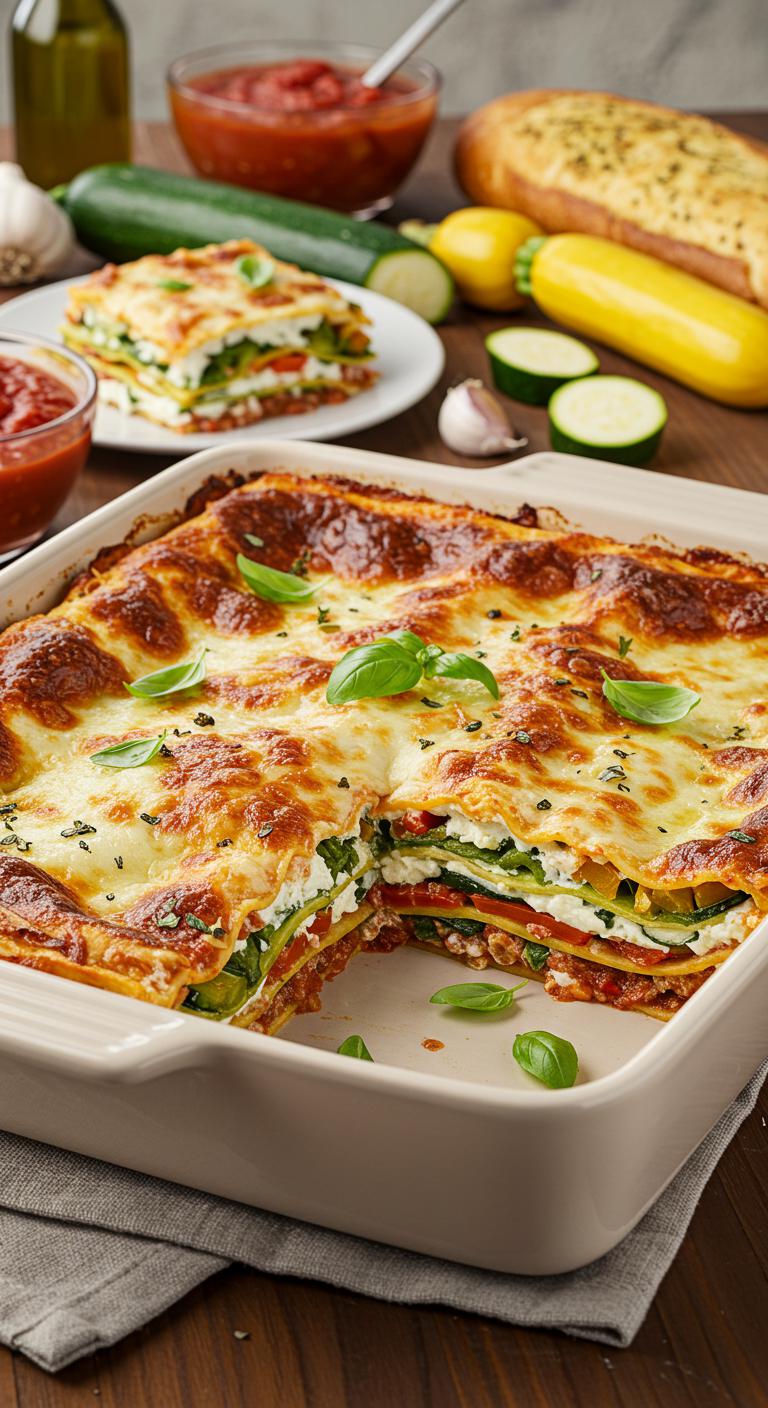
Vegetable Lasagna With Ricotta
Maple-Glazed Ham Bites

Puff Pastry Cranberry Brie Bites
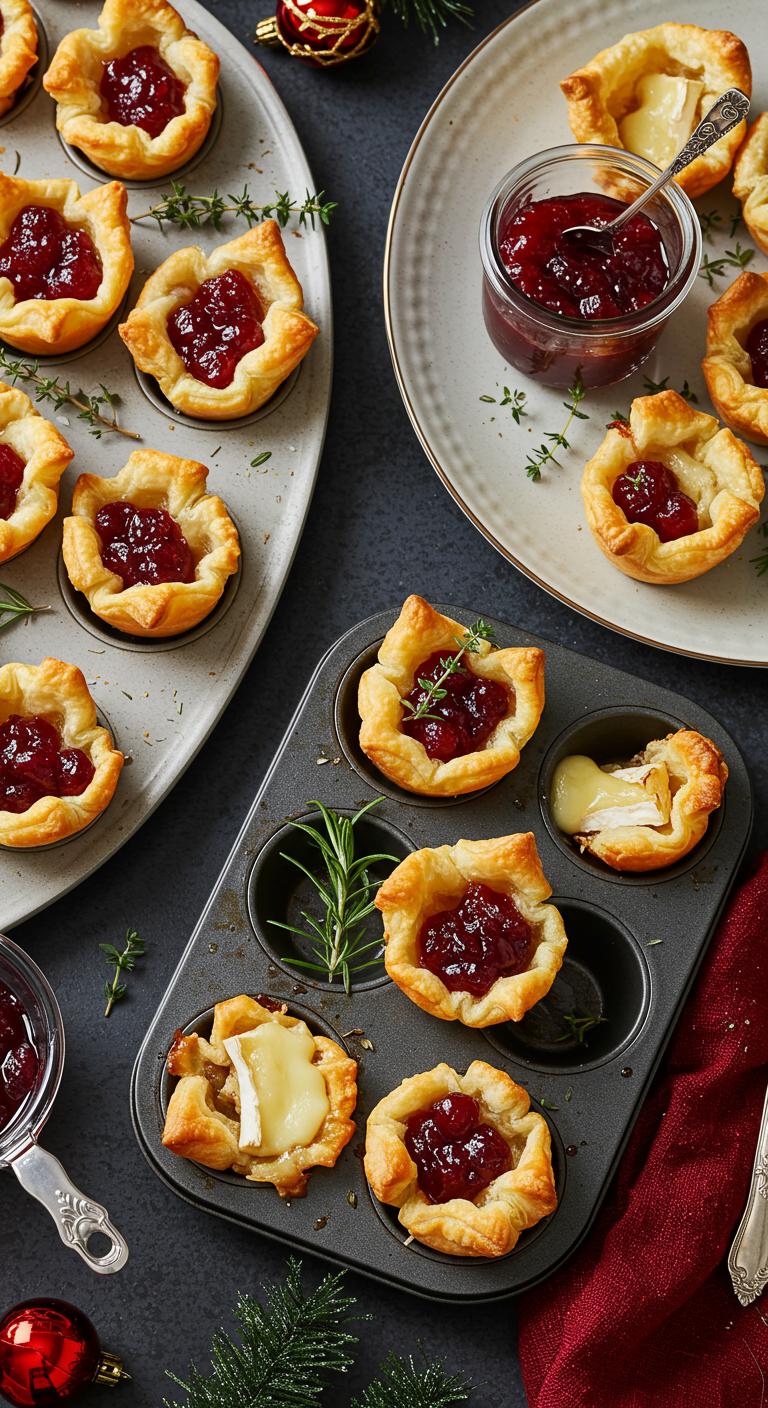
Crispy puff pastry cups filled with gooey brie and tangy cranberry — perfect little effortless holiday bites.
Ingredients:
- 1 sheet frozen puff pastry, thawed
- 8 oz wheel of brie, rind removed and cut into small pieces
- 1/2 cup cranberry sauce (whole-berry or chutney-style)
- 1 egg, beaten (for egg wash)
- 1 tablespoon water (to mix with egg)
- 1 tablespoon chopped fresh rosemary or thyme (optional)
- Pinch of freshly ground black pepper
- Flour for dusting
How to Make:
- Preheat the oven to 400°F (200°C). Lightly flour your work surface.
- Unfold the thawed puff pastry and roll gently to smooth seams; trim to a neat rectangle if needed.
- Cut the pastry into 12 equal squares (about 3×3 inches each).
- Lightly press each square into the cups of a standard 12-count muffin tin, creating little pastry cups.
- Place a small piece of brie into the bottom of each cup (about 1 tablespoon).
- Top the brie with about 1 teaspoon cranberry sauce in each cup.
- Season with a small pinch of black pepper and sprinkle a little chopped rosemary or thyme over each, if using.
- Whisk the egg with 1 tablespoon water and brush the edges of the pastry cups with the egg wash.
- Bake 12–15 minutes, until the pastry is puffed and golden and the brie is melted.
- Let the bites cool in the pan for 2–3 minutes, then transfer to a platter using a small spatula.
Serve warm and watch them disappear — flaky, melty, and holiday-perfect!
Slow-Cooker Beef Stroganoff Freezer Pack
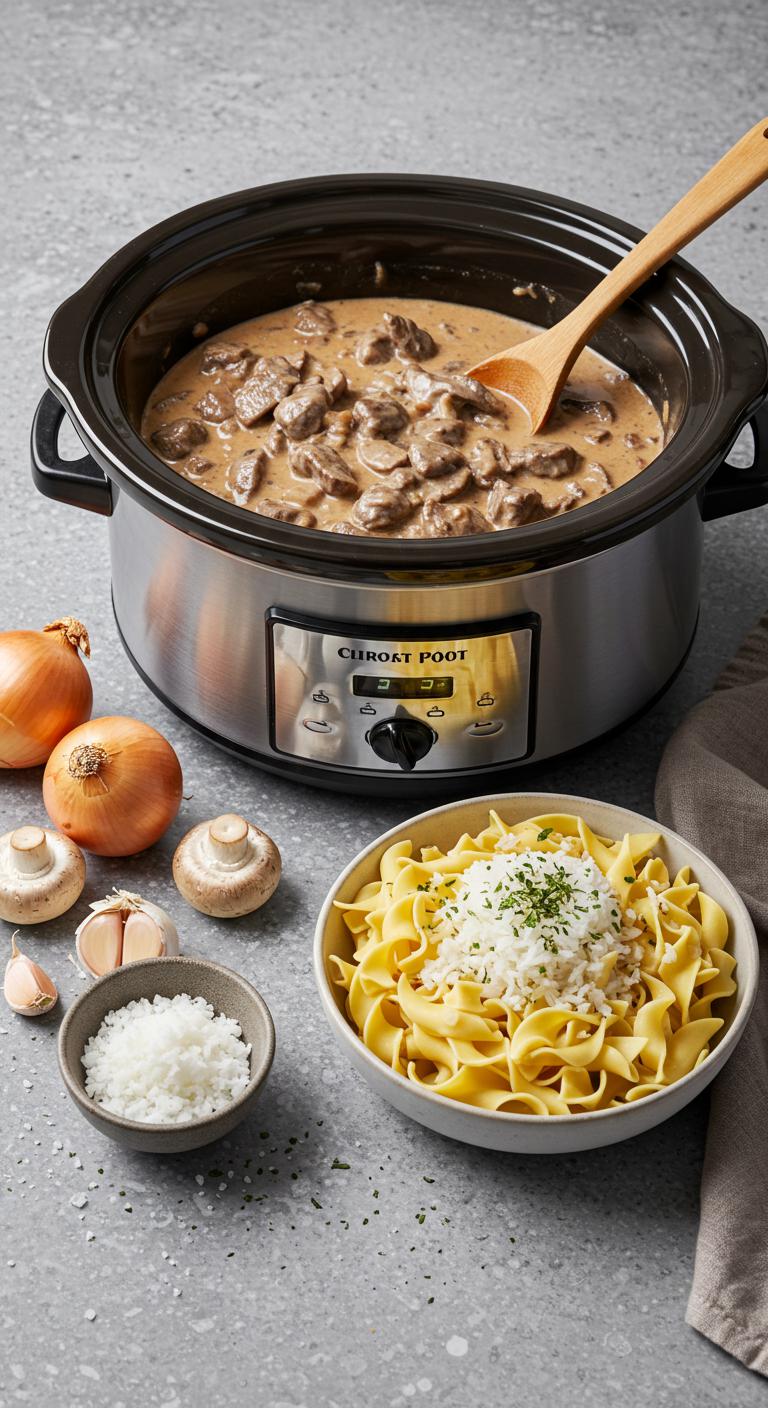
Slow-cooker comfort food made easy — freeze ahead, dump in the slow cooker later, and enjoy creamy beef stroganoff with zero fuss.
Ingredients:
- 2 lb (900 g) beef stew meat, cut into bite-sized pieces
- 1 large onion, thinly sliced
- 3 cloves garlic, minced
- 8 oz (225 g) cremini or white mushrooms, sliced
- 1 cup (240 ml) beef broth
- 2 tbsp Worcestershire sauce
- 1 tbsp Dijon mustard
- 1 tsp paprika
- 1/2 tsp salt
- 1/2 tsp black pepper
- 2 tbsp all-purpose flour (for thickening; optional for freezer pack)
- 1 cup (240 ml) sour cream (add when cooking, not for freezer pack)
- 2 tbsp butter (optional, add when cooking)
- Cooked egg noodles or rice, for serving
- Fresh parsley, chopped, for garnish
How to Make:
- In a large bowl, toss the beef with flour, paprika, salt, and pepper until evenly coated.
- In a freezer-safe bag or airtight container, layer the flour-coated beef, sliced onion, minced garlic, and sliced mushrooms.
- Pour in the beef broth, Worcestershire sauce, and Dijon mustard; seal the bag, pressing out excess air, and gently mix to combine.
- Label the bag with contents and date; freeze flat for up to 3 months.
- When ready to cook, thaw the freezer pack in the refrigerator overnight.
- Transfer the contents to your slow cooker and stir once to combine.
- Cook on LOW for 6–8 hours or HIGH for 3–4 hours, until the beef is tender.
- About 15 minutes before serving, stir in the sour cream and butter until smooth and heated through; adjust seasoning to taste.
- Serve spooned over cooked egg noodles or rice and sprinkle with chopped parsley.
Dig in and enjoy a creamy, cozy meal that’s practically effortless because you made it ahead!
Sweet Potato and Sage Gratin
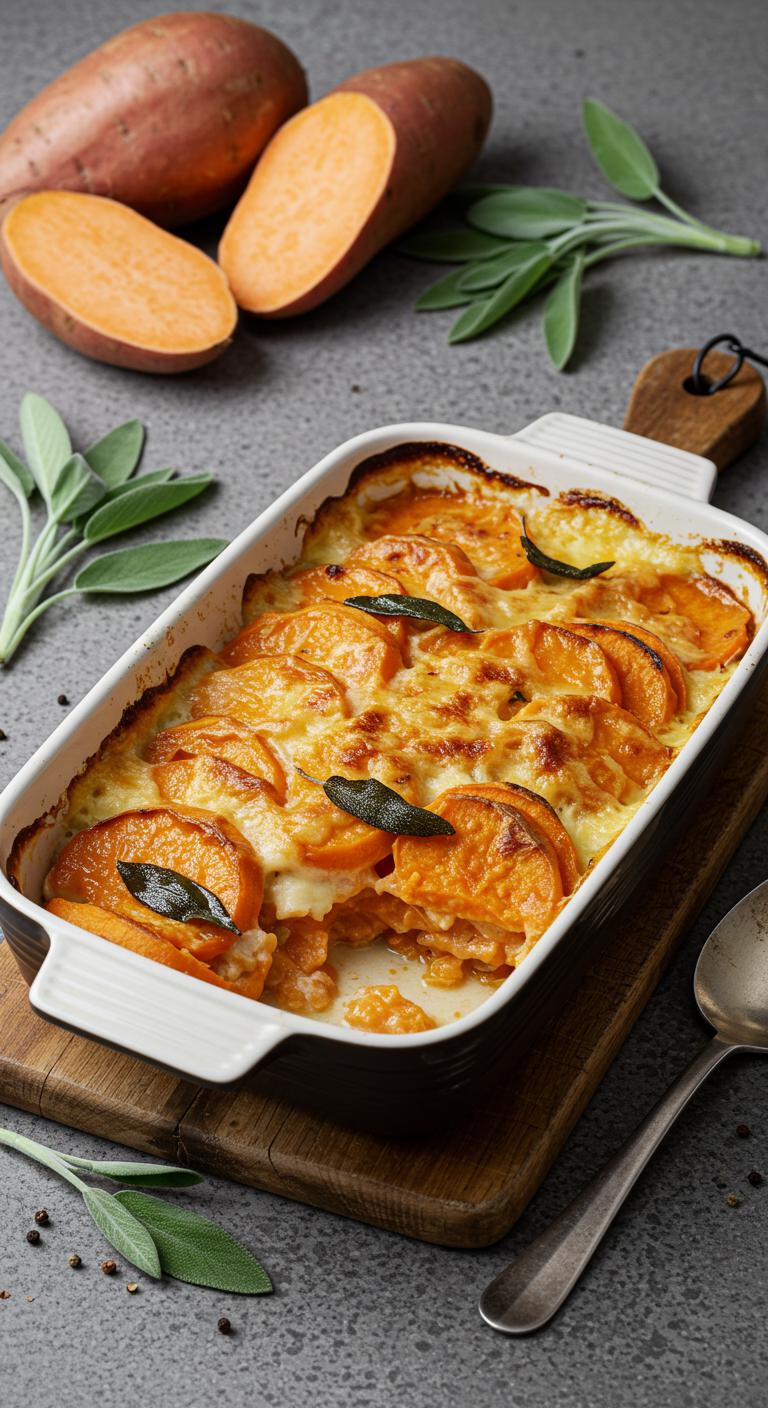
A cozy, savory-sweet gratin that pairs tender sweet potatoes with fragrant sage for a holiday side that’s make-ahead friendly.
Ingredients:
- 3 large sweet potatoes (about 2–2½ lbs), peeled
- 2 tbsp unsalted butter
- 1 small onion, finely chopped
- 2 garlic cloves, minced
- 1 tbsp fresh sage, thinly sliced (or 1 tsp dried sage)
- 1 cup heavy cream
- 1/2 cup whole milk
- 1/2 tsp ground nutmeg
- Salt and freshly ground black pepper, to taste
- 1 cup grated Gruyère or sharp cheddar (divided)
- 1/4 cup grated Parmesan
- 1 tbsp olive oil (optional, for drizzling)
- Fresh sage leaves for garnish (optional)
How to Make:
- Preheat the oven to 375°F (190°C) and butter a 9×9-inch or similarly sized baking dish.
- Slice the sweet potatoes into 1/8- to 1/4-inch rounds using a knife or mandoline for even layers.
- In a skillet, melt the butter over medium heat, add the chopped onion and cook until soft, about 4–5 minutes.
- Add the garlic and sliced sage to the skillet, cook 30–60 seconds until fragrant, then remove from heat.
- Stir the cream, milk, nutmeg, salt, and pepper into the onion mixture.
- Arrange a single layer of sweet potato slices in the baking dish, slightly overlapping.
- Spoon a few tablespoons of the cream mixture over the layer and sprinkle with a little of the grated Gruyère.
- Repeat layers until all potatoes, cream, and most of the cheese are used, finishing with a layer of potatoes topped with the remaining Gruyère and the Parmesan.
- Cover the dish tightly with foil and bake for 35 minutes.
- Remove the foil and bake another 20–25 minutes until potatoes are tender and the top is golden and bubbling.
- Let the gratin rest for 10 minutes before serving; drizzle a little olive oil and scatter fresh sage leaves on top if you like.
Make ahead tip: assemble the gratin, cover tightly, and refrigerate for up to 24 hours before baking, or freeze for longer storage (thaw overnight in fridge before baking).
Enjoy this comforting, herby side that’ll steal the show at any holiday table!
Breakfast Berry French Toast Casseroles
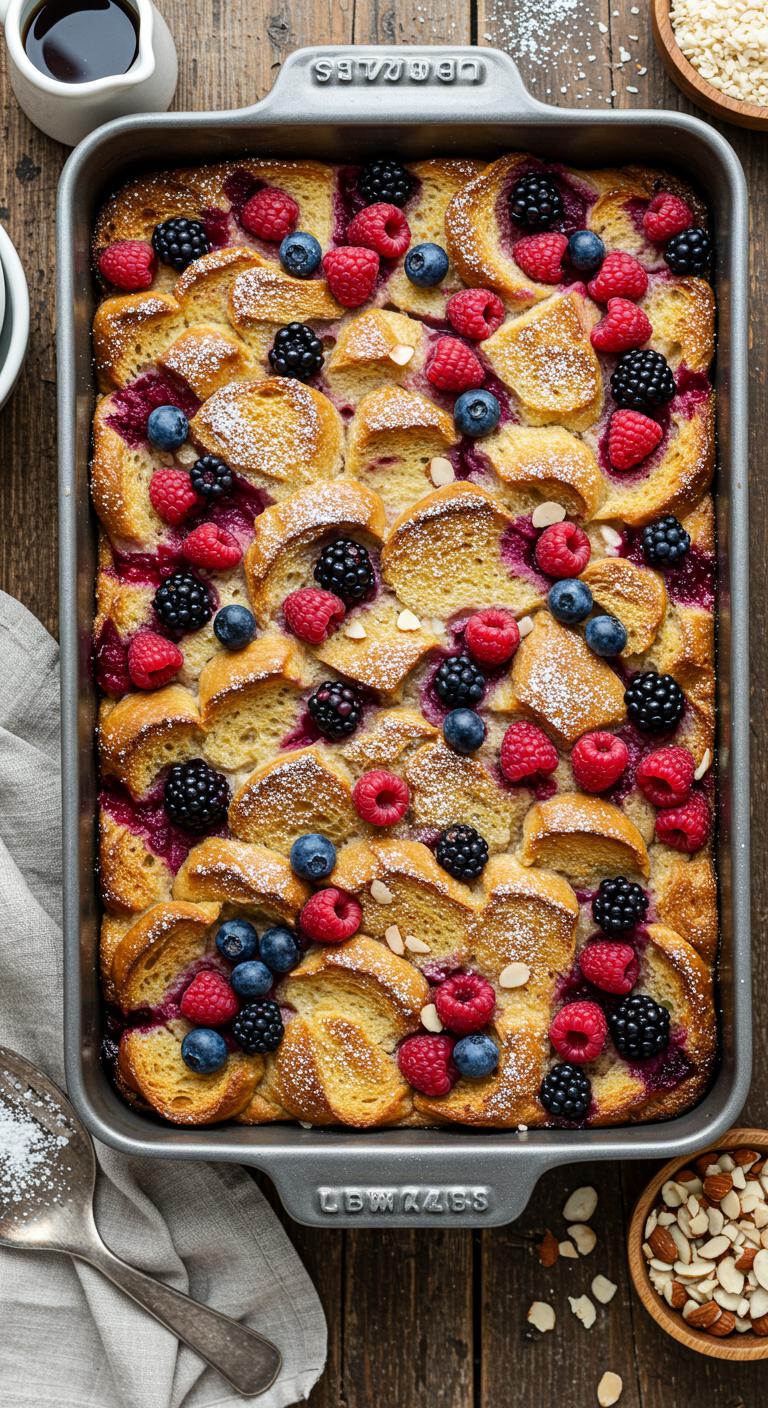
Berry Bliss French Toast Casserole — a sweet, make-ahead breakfast that’s perfect from freezer to oven.
Ingredients:
- 1 loaf (about 1 pound) challah or brioche, cubed into 1-inch pieces
- 2 cups mixed berries (fresh or frozen; blueberries, raspberries, strawberries)
- 8 large eggs
- 2 cups whole milk (or 1 cup milk + 1 cup half-and-half for richer custard)
- 1/2 cup granulated sugar
- 1/4 cup brown sugar, packed
- 2 teaspoons vanilla extract
- 1 teaspoon ground cinnamon
- 1/4 teaspoon salt
- 4 tablespoons unsalted butter, melted (plus extra for greasing)
- Optional topping: powdered sugar, maple syrup, or toasted almonds
How to Make:
- Grease a 9×13-inch baking dish with butter and spread the cubed bread evenly in the dish.
- Scatter the mixed berries over the bread, tucking some berries into the cubes.
- In a large bowl, whisk together eggs, milk, granulated sugar, brown sugar, vanilla, cinnamon, salt, and melted butter until smooth.
- Pour the custard evenly over the bread and berries, pressing gently so the bread soaks up the mixture.
- Cover the dish tightly with plastic wrap and then foil; freeze flat for up to 3 months.
- To bake from frozen: remove plastic wrap, re-cover with foil, and bake at 350°F (175°C) for 30 minutes; then remove foil and bake another 25–30 minutes until golden and set.
- If baking from thawed (overnight in fridge), bake at 350°F (175°C) for 35–40 minutes until puffed and golden.
- Let rest 10 minutes before dusting with powdered sugar or serving with maple syrup and toasted almonds.
Warm, fruity, and totally brunch-worthy — enjoy every gooey, berry-studded bite!
Mini Quiche Variety Pack

Mini Quiche Variety Pack — bite-sized, freezer-friendly breakfasts (or party snacks) ready to pop and go.
Ingredients:
- 12 mini tart shells or 24 mini muffin liners (store-bought or homemade)
- 6 large eggs
- 1 cup milk or half-and-half
- 1/2 teaspoon salt
- 1/4 teaspoon black pepper
- 1/2 cup shredded cheddar cheese
- 1/2 cup shredded Swiss or Gruyère cheese
- 1/2 cup cooked and crumbled bacon (about 6 slices)
- 1/2 cup diced ham
- 1/2 cup chopped spinach (fresh, lightly wilted and squeezed dry)
- 1/4 cup diced red bell pepper
- 2 tablespoons chopped green onions
- Optional: pinch of nutmeg for the spinach versions
How to Make:
- Preheat the oven to 350°F (175°C) and arrange mini tart shells or muffin liners on a baking sheet.
- In a bowl, whisk together the eggs, milk, salt, pepper, and nutmeg (if using) until smooth.
- Divide the cheeses and fillings among the shells to create a variety: bacon & cheddar, ham & Swiss, and spinach & red pepper with green onion.
- Pour the egg mixture over each filled shell, filling about 3/4 full so they don’t overflow.
- Bake for 15–18 minutes, or until the centers are set and the tops are lightly golden.
- Let cool briefly, then transfer to a rack to cool completely before freezing.
- To freeze: arrange cooled mini quiches in a single layer on a baking sheet and freeze until solid, then pack in freezer-safe containers or bags with parchment between layers for up to 3 months.
- To reheat from frozen: bake on a lined sheet at 350°F (175°C) for 12–15 minutes or until heated through, or microwave on a plate for 1–2 minutes (timing may vary).
Enjoy a savory bite anytime — little quiches, big flavors!
Chocolate Peppermint Brownie Bars

A rich, fudgy brownie bar topped with a creamy peppermint layer and crushed candy canes—perfect for gifting or a holiday freezer stash.
Ingredients:
- 1 cup (226 g) unsalted butter
- 8 oz (225 g) semisweet chocolate, chopped
- 1 1/2 cups (300 g) granulated sugar
- 3/4 cup (150 g) packed brown sugar
- 4 large eggs
- 1 tsp vanilla extract
- 1 cup (125 g) all-purpose flour
- 1/2 cup (45 g) unsweetened cocoa powder
- 1/2 tsp salt
- 1 cup (170 g) chocolate chips (semisweet or bittersweet)
- 8 oz (225 g) cream cheese, softened
- 1/3 cup (40 g) powdered sugar
- 1/2 tsp peppermint extract (adjust to taste)
- 1 cup (120 ml) cool heavy cream (for whipping) OR 1 cup (175 g) prepared frosting alternative
- 1/2 to 3/4 cup crushed candy canes or peppermint candies, plus extra for garnish
How to Make:
- Preheat oven to 350°F (175°C). Line a 9×13-inch baking pan with foil or parchment, leaving an overhang for easy removal; grease lightly.
- Melt the butter and chopped chocolate together in a heatproof bowl over simmering water or in short bursts in the microwave, stirring until smooth; let cool slightly.
- Whisk together granulated sugar, brown sugar, and the slightly cooled chocolate mixture until combined.
- Add eggs one at a time, whisking after each addition, then stir in vanilla.
- Sift in flour, cocoa powder, and salt and fold gently until just combined; avoid overmixing.
- Fold in chocolate chips, then spread batter evenly into the prepared pan.
- Bake 25–30 minutes, or until a toothpick inserted near the center comes out with a few moist crumbs; don’t overbake. Cool completely in the pan.
- While brownies cool, beat the cream cheese until smooth, add powdered sugar and peppermint extract, and mix until combined.
- Whip the heavy cream to soft peaks and fold into the cream cheese mixture to make a light peppermint topping; if using frosting alternative, beat until smooth and fluffy, then fold in peppermint extract.
- Spread the peppermint layer evenly over the cooled brownies.
- Sprinkle crushed candy canes over the top, pressing gently so they adhere.
- Refrigerate or freeze until firm (refrigerate 1–2 hours, freeze for longer storage). For clean bars, chill fully before slicing.
- Lift brownies from the pan using the foil/parchment overhang and cut into bars. Store chilled for up to 5 days or freeze in layers separated by parchment for up to 3 months.
Enjoy these festive, minty-sweet brownie bars straight from the freezer or thawed—perfect for sharing (or sneaking) all season long!
Apple Cinnamon Hand Pies
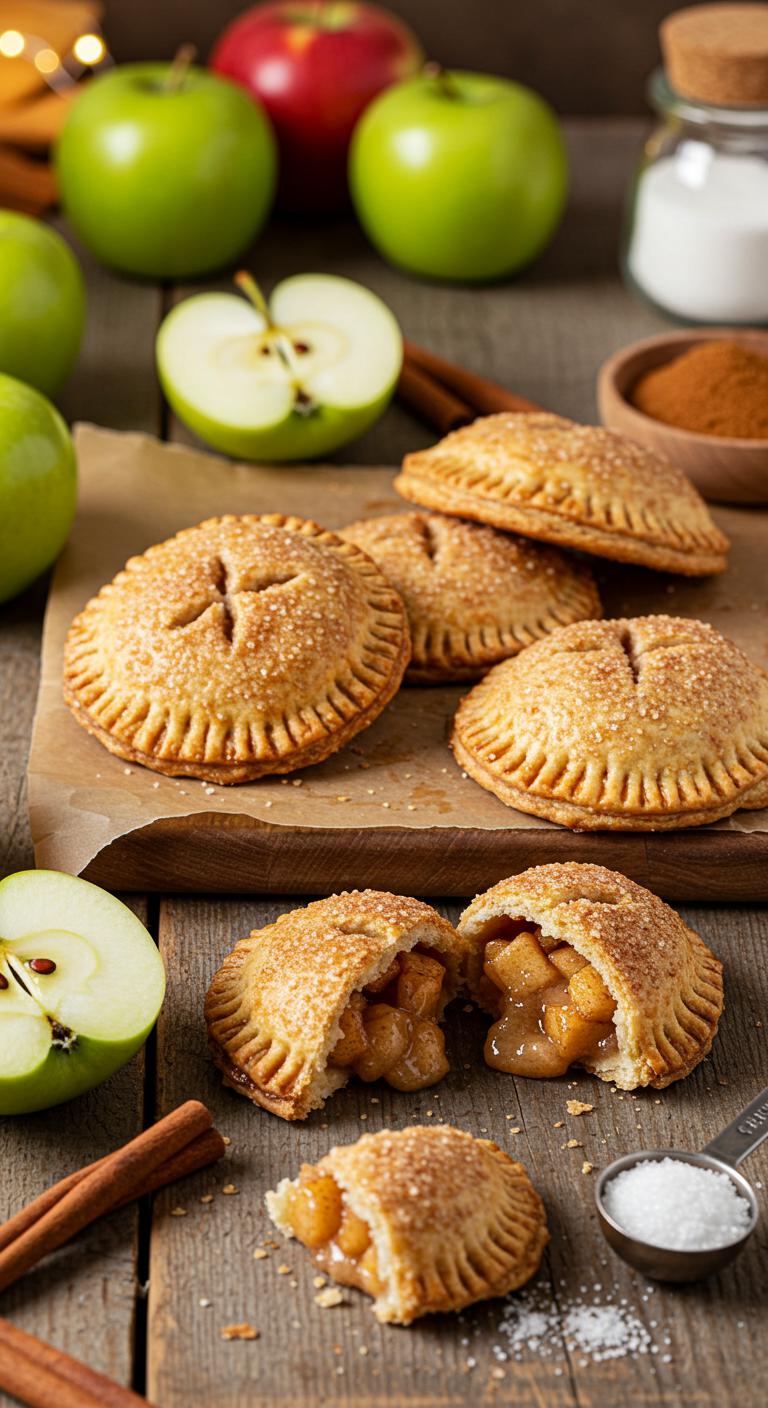
Apple Cinnamon Hand Pies — flaky pockets of sweet fall apples you can make ahead and freeze.
Ingredients:
- 2 sheets refrigerated pie crust (or enough for 8 hand pies), thawed
- 2 medium apples (Granny Smith or Honeycrisp), peeled, cored and finely diced
- 1/4 cup granulated sugar
- 1 tablespoon brown sugar
- 1 teaspoon ground cinnamon
- 1/2 teaspoon lemon juice
- 1 tablespoon all-purpose flour (to thicken)
- Pinch of salt
- 1 egg, beaten (for egg wash) or milk for brushing
- 1 tablespoon unsalted butter, cut into tiny pieces (optional)
- 1 tablespoon coarse sugar for sprinkling (optional)
How to Make:
- Preheat the oven to 375°F (190°C) if baking now, or prepare a sheet pan if freezing to bake later.
- In a bowl, toss the diced apples with granulated sugar, brown sugar, cinnamon, lemon juice, flour and a pinch of salt until evenly coated.
- Unroll or roll out each pie crust sheet and cut into 8 equal squares or circles, about 3–4 inches across.
- Spoon about 1 to 2 tablespoons of the apple filling into the center of each square, then top with a tiny dot of butter if using.
- Brush the edges of the crust with beaten egg or milk, fold over to form a pocket, and press the edges with a fork to seal.
- Use a small knife to cut a couple of vents in the top of each hand pie and brush the tops with more egg or milk; sprinkle coarse sugar if desired.
- If freezing to bake later: place the pies on a parchment-lined sheet pan and freeze until solid, then transfer to a freezer bag or airtight container for up to 3 months. Thaw and bake from chilled at 375°F for 20–25 minutes, or bake from frozen adding a few extra minutes as needed.
- If baking now: bake on a parchment-lined sheet pan for 18–22 minutes, until golden brown and bubbly.
- Let cool a few minutes before serving so the filling sets.
Enjoy warm or reheated — these hand pies are perfect on the go or straight from the oven with a scoop of vanilla ice cream!
Conclusion
You’ve got a freezer full of ready meals, so you’ll spend less time cooking and more time enjoying company. Pull out a casserole, slider, or pie, thaw if needed, and heat until hot. Label containers with dates and reheating instructions so you won’t guess later. Rotate dishes by date to avoid waste. With these recipes, you’ll handle holiday meals calmly, like having a friendly helper in the kitchen when things get busy.