
Get kids into the kitchen with 12 simple holiday recipes that make cooking easy and fun. You’ll find quick projects like Cocoa Reindeer Cups, Santa Hat Strawberries, and no-bake Candy Cane Pretzel Clusters, plus savory options like Mini Veggie Snowmen Skewers and Turkey Handprint Sandwiches. Each recipe uses few ingredients, clear steps, and safe tasks for little hands, so you can plan prep, supervise, and enjoy tasty results—and then try the next one.
Cocoa Reindeer Cups

Cocoa Reindeer Cups — warm chocolatey drinks dressed up with a holiday face.
Ingredients:
- 4 cups milk (dairy or any plant milk)
- 1/3 cup unsweetened cocoa powder
- 1/4 cup granulated sugar (adjust to taste)
- 1/2 teaspoon vanilla extract
- Pinch of salt
- Whipped cream for topping
- Mini pretzels (for antlers) — 8 small or 4 large broken in half
- Chocolate chips or chocolate candies (for eyes and nose)
- Optional: red candy (M&M or similar) for Rudolph’s nose
How to Make:
- In a medium saucepan, whisk together cocoa powder, sugar, and salt.
- Add about 1/2 cup of the milk and whisk to form a smooth paste with no lumps.
- Pour in the remaining milk and warm over medium heat, stirring often until hot but not boiling (about 4–6 minutes).
- Remove from heat and stir in the vanilla extract.
- Pour hot cocoa into four small heatproof cups or mugs, leaving room at the top for toppings.
- Top each cup with a generous swirl of whipped cream.
- Press two mini chocolate chips or small chocolate candies into the whipped cream for eyes.
- Place a red candy or a larger chocolate piece in the center for the nose.
- Gently stick two mini pretzels into the whipped cream at the top of each cup to make antlers.
- Serve immediately and watch the smiles light up.
Enjoy these cozy, silly Cocoa Reindeer Cups — perfect for little hands and big holiday grins!
No-Bake Candy Cane Pretzel Clusters
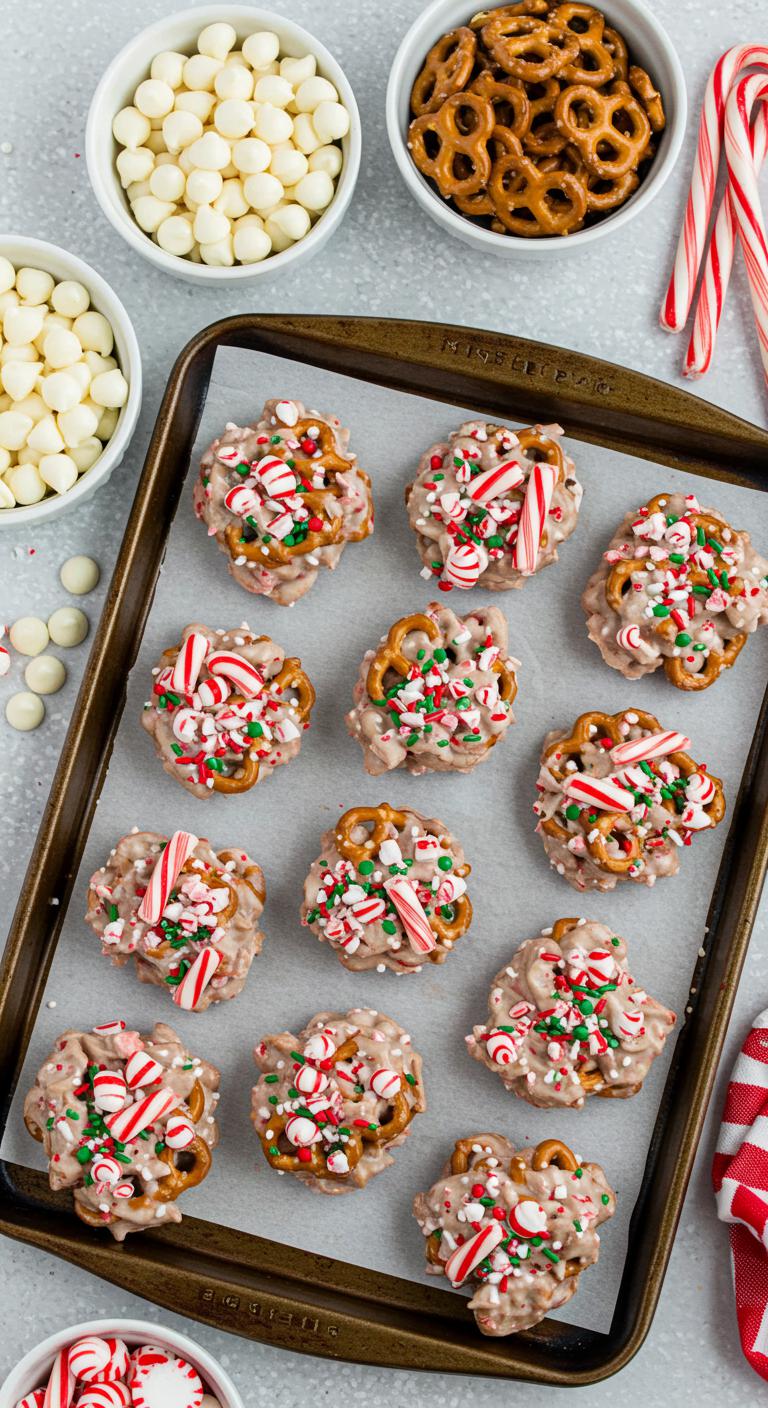
Sweet, salty, and oh-so-festive — these no-bake candy cane pretzel clusters are a snap to make and perfect for little hands.
Ingredients:
- 3 cups mini pretzels (or broken regular pretzels)
- 12 oz white chocolate chips or melting wafers
- 1/2 tsp peppermint extract (optional)
- 1/2 cup crushed candy canes or peppermint candy
- Red and green sprinkles (optional)
- Parchment paper or silicone mat
How to Make:
- Line a baking sheet with parchment paper or a silicone mat.
- Place pretzels in a medium bowl and set aside.
- Melt white chocolate chips in a microwave-safe bowl in 20–30 second bursts, stirring between each, until smooth. (Or melt in a double boiler.)
- Stir in the peppermint extract if using.
- Pour the melted white chocolate over the pretzels and gently toss until pretzels are evenly coated.
- Use a spoon to scoop small clusters (about 1–2 tablespoons each) onto the prepared sheet.
- Immediately sprinkle crushed candy canes and sprinkles over each cluster so they stick.
- Let the clusters set at room temperature for 30–60 minutes, or chill in the fridge for 10–15 minutes until firm.
- Once set, store clusters in an airtight container between layers of parchment for up to one week.
Enjoy these crunchy, minty treats — perfect for gifting or nibbling by the handful!
Mini Veggie Snowmen Skewers
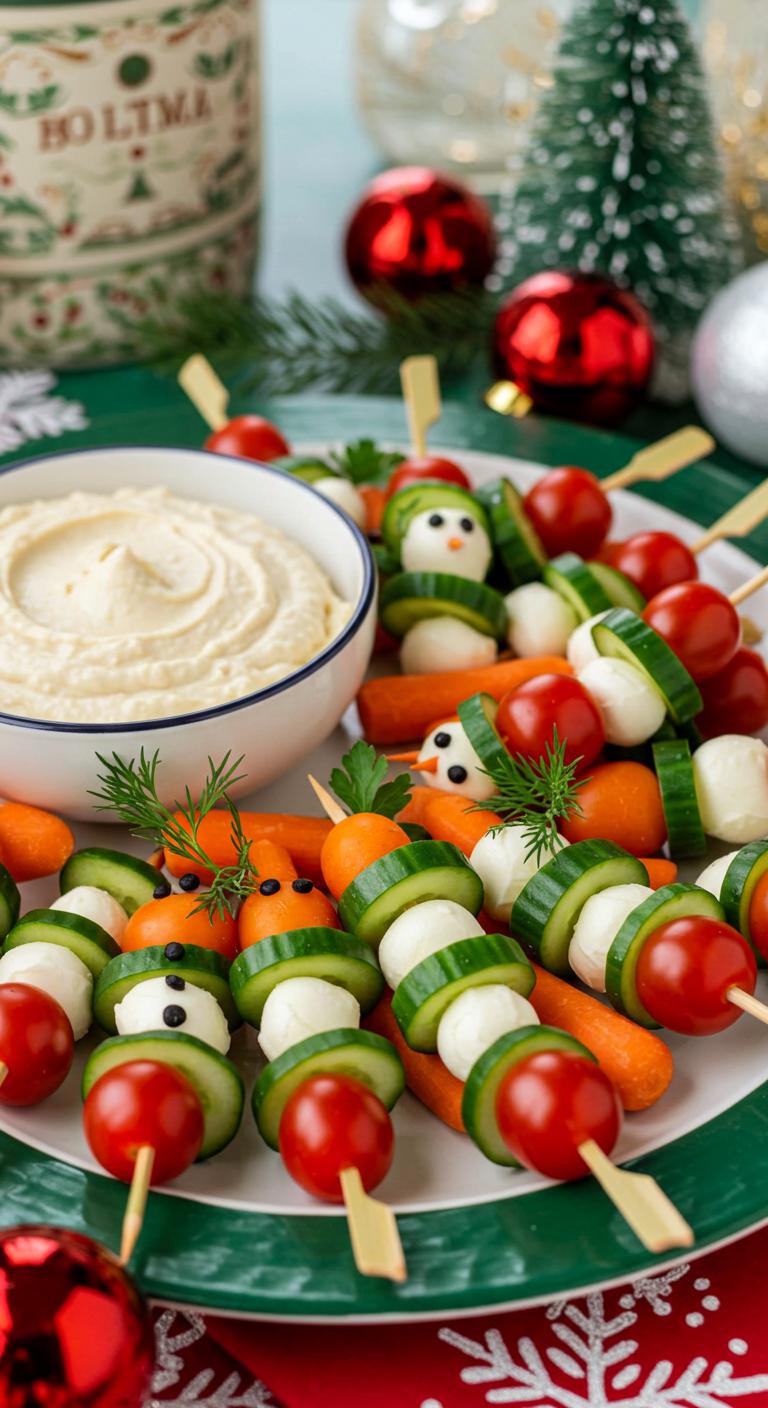
Mini Veggie Snowmen Skewers — cute, crunchy, and perfect for little hands at holiday parties!
Ingredients:
- Cherry tomatoes (small, round) — about 20
- Mini mozzarella balls (bocconcini) — about 20
- Cucumber — 1 medium, peeled if desired
- Baby carrots — 10, cut into quarters lengthwise
- Black olives — 10, pitted (for eyes/buttons)
- Fresh parsley or dill — small bunch (for scarves/green garnish)
- Wooden cocktail skewers or short kabob sticks — 20
- Hummus or ranch dip — for serving
- Toothpicks (optional, for olive pieces)
How to Make:
- Rinse all produce. Pat dry the cherry tomatoes and mozzarella.
- Slice the cucumber into 20 rounds about 1/4 inch thick to make hats or base pieces.
- Cut baby carrots into pieces roughly the height of your mozzarella + tomato so the snowmen look proportioned.
- Assemble each skewer: thread a cucumber round (hat or base), then a mozzarella ball (head), then a cherry tomato (body). Adjust order if you prefer tomato as head.
- For eyes and buttons: cut each olive into small pieces and press two tiny pieces into the mozzarella for eyes and one or two onto the tomato for buttons. Use a toothpick to help place them.
- Add a small parsley or dill sprig between the head and body or tied around the neck as a little scarf.
- Repeat until all skewers are assembled and arrange them on a platter around a bowl of hummus or ranch for dipping.
- Keep refrigerated until serving to keep mozzarella firm and veggies crisp.
Enjoy serving these giggle-worthy veggie snowmen — they disappear as fast as a snowball fight!
Easy Sugar Cookie Cutouts

Easy Sugar Cookie Cutouts — soft, sweet, and perfect for decorating with kids!
Ingredients:
- 2 3/4 cups all-purpose flour
- 1 teaspoon baking powder
- 1/2 teaspoon salt
- 1 cup (2 sticks) unsalted butter, softened
- 1 1/2 cups granulated sugar
- 1 large egg
- 2 teaspoons vanilla extract
- 2 tablespoons milk (plus a little more if dough is too dry)
- Optional: food coloring, sprinkles, or icing for decorating
How to Make:
- Preheat the oven to 350°F (175°C) and line two baking sheets with parchment paper.
- In a bowl, whisk together the flour, baking powder, and salt; set aside.
- In a large bowl, beat the softened butter and sugar until light and fluffy.
- Mix in the egg and vanilla until combined, then add the milk and beat briefly.
- Gradually add the dry ingredients to the wet, mixing until a soft dough forms; if it’s too crumbly, add a teaspoon of milk at a time.
- Divide the dough in half, wrap each in plastic, and chill in the fridge for 20–30 minutes (this makes rolling easier).
- Lightly flour a surface and roll one dough portion to about 1/4-inch thickness.
- Use cookie cutters to cut shapes and transfer them to the prepared baking sheets, spacing them about 1 inch apart.
- Bake for 8–10 minutes, until the edges are set but the centers are still soft; don’t overbake to keep them tender.
- Let cookies cool on the sheet for 5 minutes, then transfer to a wire rack to cool completely before decorating.
- Decorate with icing, sprinkles, or food coloring as desired — have fun with it!
These cookies are perfect for little hands and big imaginations — enjoy decorating and eating!
Santa Hat Strawberries

A festive, bite-sized treat that looks like Santa himself — sweet, simple, and perfect for little hands.
Ingredients:
- 1 pint fresh strawberries, hulled
- 1 cup whipped cream or whipped topping (cool whip)
- 2 tablespoons powdered sugar (optional, to sweeten whipped cream)
- Mini chocolate chips or small chocolate sprinkles (for eyes; optional)
How to Make:
- Wash and dry strawberries thoroughly so the cream sticks well.
- Cut about 1/4 inch off the tip of each strawberry to create a flat base for the hat top.
- Using a spoon or piping bag, dollop or pipe a small amount of whipped cream onto the cut side of each strawberry tip.
- Place the cream-topped tip back onto the strawberry to form the hat — press gently so it stays in place.
- Add a tiny dot of whipped cream on the very top of the hat tip to look like the pom-pom.
- If you like, press two mini chocolate chips or sprinkle small chocolate sprinkles onto the strawberry for eyes.
- Chill in the fridge for 10–15 minutes if you want them extra firm before serving.
Enjoy these cheerful Santa Hat Strawberries — a sweet, festive snack kids will love!
Cheesy Christmas Tree Quesadillas
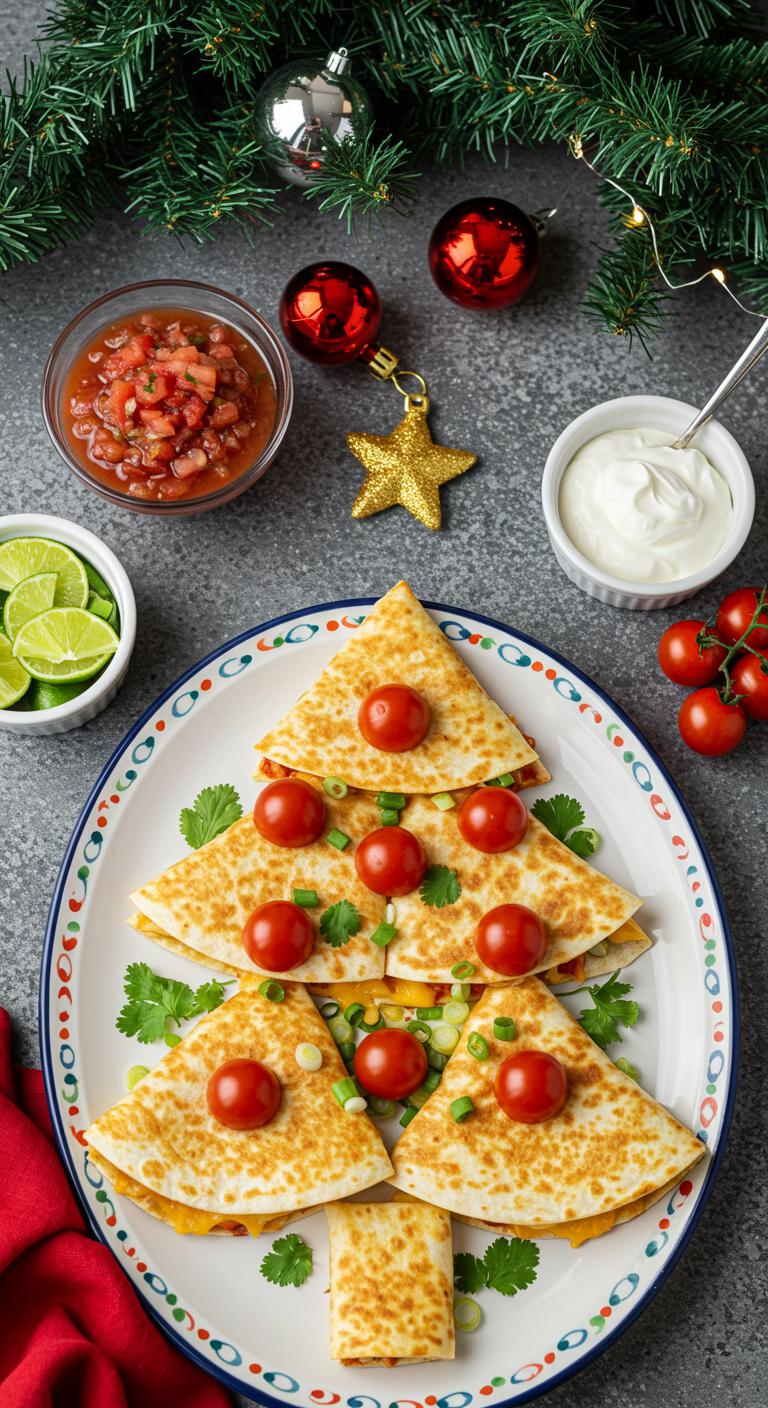
A festive, melty quesadilla that looks like a Christmas tree — super easy and fun for kids to help make!
Ingredients:
- 4 large flour tortillas
- 1 1/2 cups shredded mild cheddar cheese (or Mexican blend)
- 1/2 cup shredded mozzarella
- 1/4 cup finely chopped green bell pepper
- 2 tablespoons chopped green onions (optional)
- 8 small cherry tomatoes, halved (for “ornaments”)
- 4 tablespoons butter or oil for cooking
- Salsa or sour cream for dipping
How to Make:
- Mix the shredded cheddar and mozzarella in a bowl. Stir in chopped green bell pepper and green onions.
- Lay a tortilla flat and spoon about 1/4 of the cheese mixture into a tree shape (triangular) in the center, leaving a little border.
- Fold the tortilla in half over the filling to form a half-moon, pressing gently so the cheese fills the triangle shape.
- Heat 1 tablespoon butter or oil in a nonstick skillet over medium heat.
- Place the folded tortilla in the skillet and cook 2–3 minutes per side, until golden brown and cheese is melted. Press gently with a spatula as it cooks.
- Repeat steps 2–5 for the remaining tortillas, adding more butter or oil as needed.
- Let each quesadilla cool slightly, then slice into 3 pieces. Arrange the slices tip-up to form a tree shape on a plate.
- Decorate with halved cherry tomatoes as “ornaments” and a few extra green onion pieces or chopped cilantro for extra green.
- Serve warm with salsa or sour cream for dipping.
Enjoy these cheesy Christmas tree quesadillas — festive, gooey, and perfect for little helpers!
Snowball Coconut Truffles

Snowball Coconut Truffles — bite-sized, snowy treats perfect for little hands and holiday smiles.
Ingredients:
- 2 cups sweetened shredded coconut, plus extra for rolling
- 1 (8 oz) package cream cheese, softened
- 1/3 cup powdered sugar
- 1/2 teaspoon vanilla extract
- Pinch of salt
- Optional: mini chocolate chips or sprinkles for decoration
How to Make:
- In a mixing bowl, combine the softened cream cheese, powdered sugar, vanilla, and a pinch of salt until smooth.
- Stir in 2 cups shredded coconut until the mixture is well combined and holds together.
- Scoop tablespoon-sized portions and roll them into balls with your hands.
- Roll each ball in extra shredded coconut to coat completely.
- Place the truffles on a baking sheet lined with parchment paper.
- Chill in the refrigerator for at least 1 hour to firm up.
- If using, press a mini chocolate chip or sprinkle a decoration on top of each truffle before serving.
Enjoy these snowy coconut truffles with a glass of milk — kid-approved and holiday-ready!
Festive Fruit Loop Wreaths
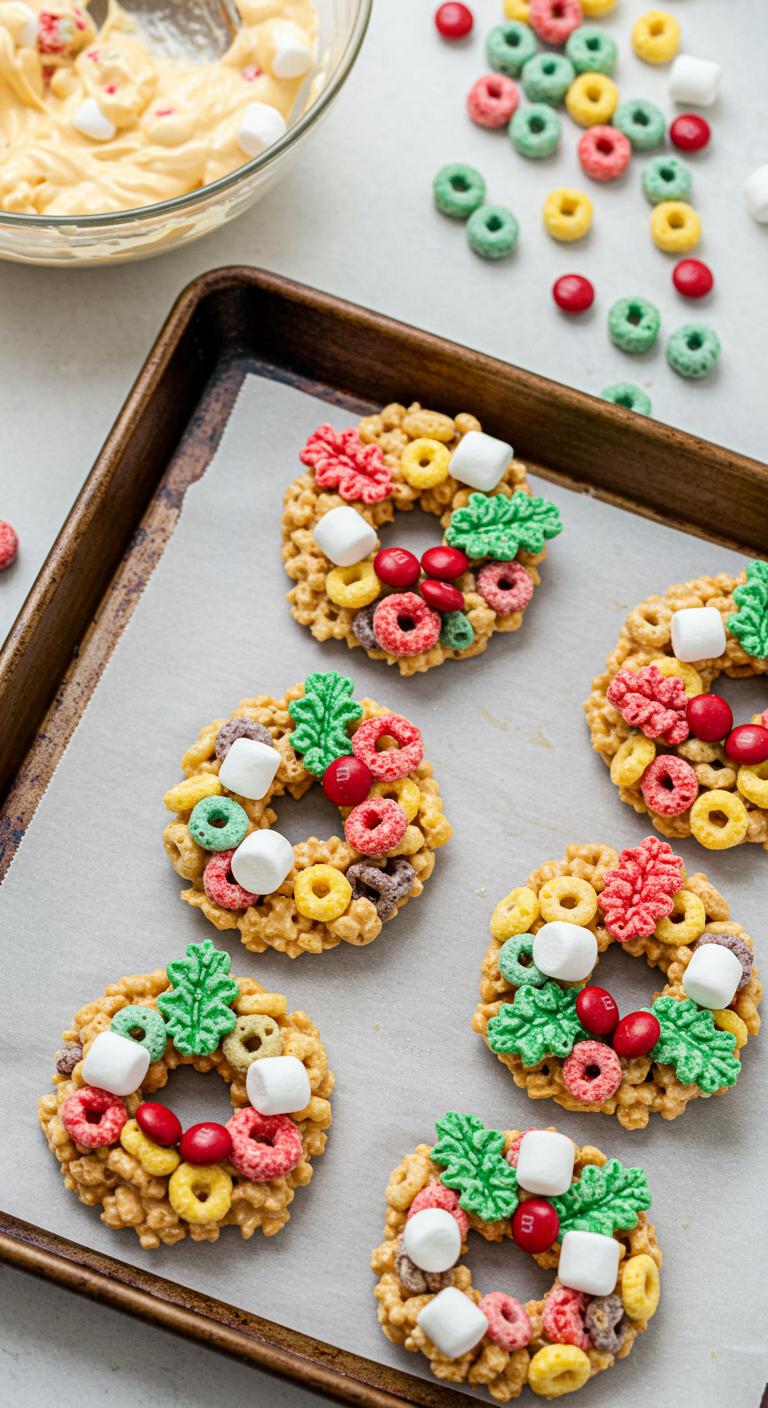
A crunchy, colorful wreath snack that’s as fun to make as it’s to eat!
Ingredients:
- 3 cups Fruit Loop cereal
- 1 cup mini marshmallows
- 2 tablespoons butter
- 1/2 teaspoon vanilla extract (optional)
- Green food coloring (a few drops)
- Red M&M’s or small red candies for “berries”
- Parchment paper or a silicone mat
How to Make:
- Line a baking sheet with parchment paper or a silicone mat.
- In a large microwave-safe bowl, combine the butter and marshmallows.
- Microwave in 30-second intervals, stirring between, until marshmallows are melted and smooth (about 1–1½ minutes total).
- Stir in vanilla extract and a few drops of green food coloring until the mixture is uniformly green.
- Pour the Fruit Loops into the bowl and fold gently until every loop is coated with the green marshmallow mixture.
- Using lightly buttered hands or a greased spoon, shape the coated cereal into small wreath rings on the prepared sheet (about 3–4 inches across).
- Press a few red M&M’s or red candies into each wreath to look like holly berries.
- Let the wreaths cool and set at room temperature for about 20–30 minutes.
- Once firm, carefully transfer to a serving plate.
Enjoy these cheerful wreaths — perfect for snacking or gifting during the holidays!
Hot Chocolate Dippers

A warm, dunkable treat that turns cozy cocoa into a fun, kid-friendly dessert.
Ingredients:
- 2 cups whole milk (or any milk of choice)
- 3 tablespoons unsweetened cocoa powder
- 2 tablespoons granulated sugar (adjust to taste)
- 1/4 teaspoon vanilla extract
- Pinch of salt
- 12 large marshmallows or 6 jumbo marshmallows (for dipping)
- 12 sturdy cookies, biscotti, or pretzel rods for dipping
- Optional toppings: mini marshmallows, chocolate shavings, sprinkles
How to Make:
- Heat the milk in a small saucepan over medium heat until warm but not boiling.
- Whisk in the cocoa powder, sugar, and pinch of salt until smooth and fully combined.
- Continue to heat, stirring occasionally, until the hot chocolate is steaming and slightly thickened, about 3–4 minutes.
- Remove from heat and stir in the vanilla extract.
- Pour the hot chocolate into a wide mug or small bowl for easy dunking.
- Thread a marshmallow onto each cookie, biscotti, or pretzel rod if using, or use them separately for dipping.
- Dip cookies, biscotti, or marshmallow-topped skewers into the hot chocolate and let them soak for a few seconds for gooey goodness.
- Top with extra mini marshmallows, chocolate shavings, or sprinkles if you like.
- Serve immediately and enjoy dipping while warm.
Dip, dunk, and delight — cozy sips and sticky smiles guaranteed!
Gingerbread Pancake Stackers

Warm, spiced pancakes piled high with gingerbread flavor — perfect for cozy holiday breakfasts.
Ingredients:
- 1 1/2 cups all-purpose flour
- 2 tbsp brown sugar
- 1 tbsp ground ginger
- 1 tsp ground cinnamon
- 1/4 tsp ground cloves (or nutmeg)
- 1 tsp baking powder
- 1/2 tsp baking soda
- 1/4 tsp salt
- 1 1/4 cups milk (dairy or plant-based)
- 1 large egg
- 2 tbsp molasses
- 2 tbsp melted butter (or neutral oil)
- 1 tsp vanilla extract
- Butter or oil for the pan
- Optional toppings: maple syrup, whipped cream, chopped nuts, extra molasses, or powdered sugar
How to Make:
- In a large bowl, whisk together flour, brown sugar, ginger, cinnamon, cloves, baking powder, baking soda, and salt.
- In another bowl, beat the egg then stir in milk, molasses, melted butter, and vanilla until smooth.
- Pour the wet ingredients into the dry and gently stir until just combined — small lumps are okay.
- Heat a nonstick skillet or griddle over medium heat and brush with a little butter or oil.
- Pour 1/4 cup batter per pancake onto the hot surface and cook until bubbles form on top and edges look set, about 2 minutes.
- Flip and cook the other side until golden, about 1–2 more minutes.
- Keep finished pancakes warm on a plate in a low oven (about 200°F / 95°C) while you cook the rest.
- Stack pancakes, drizzle with maple syrup or extra molasses, and add whipped cream or nuts if you like.
Stack them up and enjoy a cozy, gingerbread-y morning treat!
Peppermint Yogurt Parfaits

Cool, creamy peppermint yogurt parfaits—festive, fast, and perfect for kids!
Ingredients:
- 3 cups plain or vanilla Greek yogurt (or non-dairy yogurt)
- 2–3 tablespoons honey or maple syrup (adjust to taste)
- 1 teaspoon peppermint extract (start with 1/2 tsp if kids are sensitive)
- 1 cup crushed graham crackers or crushed plain cookies
- 3/4 cup mini chocolate chips or chopped dark chocolate
- 1/2 cup crushed candy canes or peppermint candies (plus extra for garnish)
- Fresh berries (optional, for color)
- Whipped cream or coconut whipped cream (optional, for topping)
- Small clear cups or jars for serving
How to Make:
- In a bowl, stir the yogurt, honey (or maple syrup), and peppermint extract until smooth and well combined.
- Taste and add more sweetener or extract if needed.
- Place a spoonful of crushed graham crackers into the bottom of each cup to make the first crunchy layer.
- Add a layer of the peppermint yogurt over the crumbs, smoothing gently with the back of a spoon.
- Sprinkle a few mini chocolate chips and a pinch of crushed candy cane over the yogurt layer.
- Repeat layers (crumbs, yogurt, chocolate, candy) until cups are nearly full, ending with a yogurt layer.
- Top each parfait with a dollop of whipped cream, a few chocolate chips, and a sprinkle of crushed candy cane (and a berry if you like).
- Chill in the fridge for 15–30 minutes if you want the candy to soften a little, or serve right away for extra crunch.
Enjoy these peppermint parfaits—cool, crunchy, and totally kid-approved!
Turkey Handprint Sandwiches
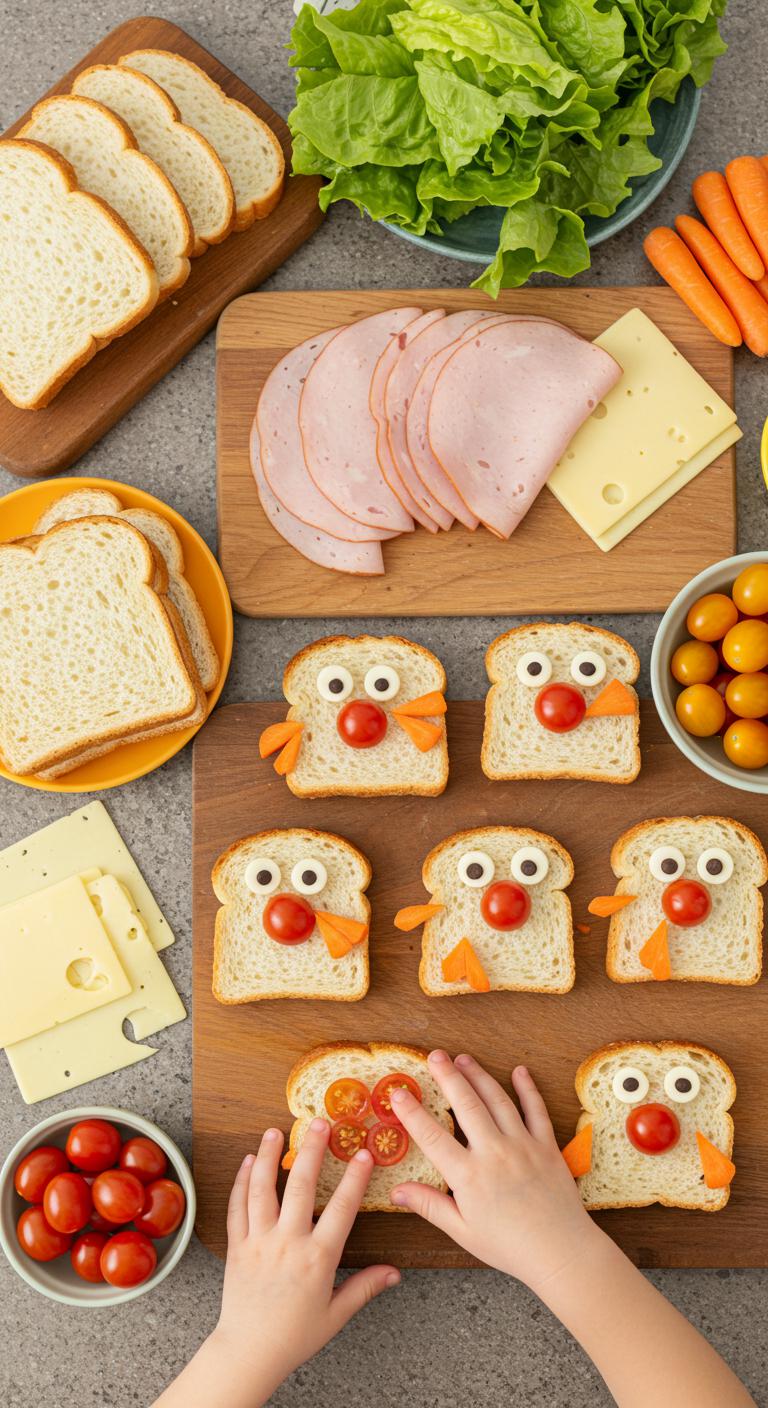
Cute Turkey Handprint Sandwiches — a fun, kid-made holiday snack!
Ingredients:
- Sliced bread (white or whole wheat), 2–4 slices
- Deli turkey slices, 4–6
- Cheese slices (cheddar or American), 2–4
- Lettuce leaves, 2–4
- Cherry tomato or olive slices for eyes, 4 pieces
- Small carrot pieces or bell pepper for beak, 2 pieces
- Mayonnaise or cream cheese (optional), as needed
- Butter or soft cheese for sticking (optional)
- Cookie cutter or a plate to trace a hand (optional)
How to Make:
- If needed, spread a thin layer of mayonnaise or cream cheese on each slice of bread.
- Place a deli turkey slice on one piece of bread, smoothing it flat.
- Layer a cheese slice and a lettuce leaf on top of the turkey.
- Place another bread slice on top to make a sandwich; gently press together.
- Using a child’s hand (clean!) or a hand-shaped template, trace the hand on the sandwich with a knife and carefully cut out the handprint shape.
- Arrange the sandwich so the fingers point up — this is the turkey’s feathers.
- Stick two small cherry tomato halves or olive slices near the base for eyes using a dab of cream cheese or butter.
- Add a small carrot or bell pepper triangle under the eyes for the beak; secure with a dab of spread.
- Make two little feet from extra carrot or bell pepper and place them under the sandwich on the plate.
- Repeat to make as many turkey handprint sandwiches as you like.
Serve these adorable sandwiches at your holiday table — they’re tasty, playful, and perfect for little helpers!
Conclusion
You’ve got twelve easy recipes that keep kids involved and meals simple. Pick one or two to try, gather ingredients, and set up stations for mixing, assembling, and decorating. Give clear roles, show one step, then let them do it. Taste and adjust together. Clean as you go. These activities build small skills and good memories—like a tiny holiday workshop where every finished treat rings a little bell of pride.