
You can make sugar cookies that taste great and look like decorations for trees, tables, or gift boxes. Start with a sturdy cutout dough, bake pieces that hold shape, and use royal icing, glazes, or edible paint for fine detail. Try stars, snowflakes, poinsettias, or tiny houses, and add ribbons or toothpick hangers before icing sets. Follow simple steps and tools, and you’ll have edible decor ready to arrange.
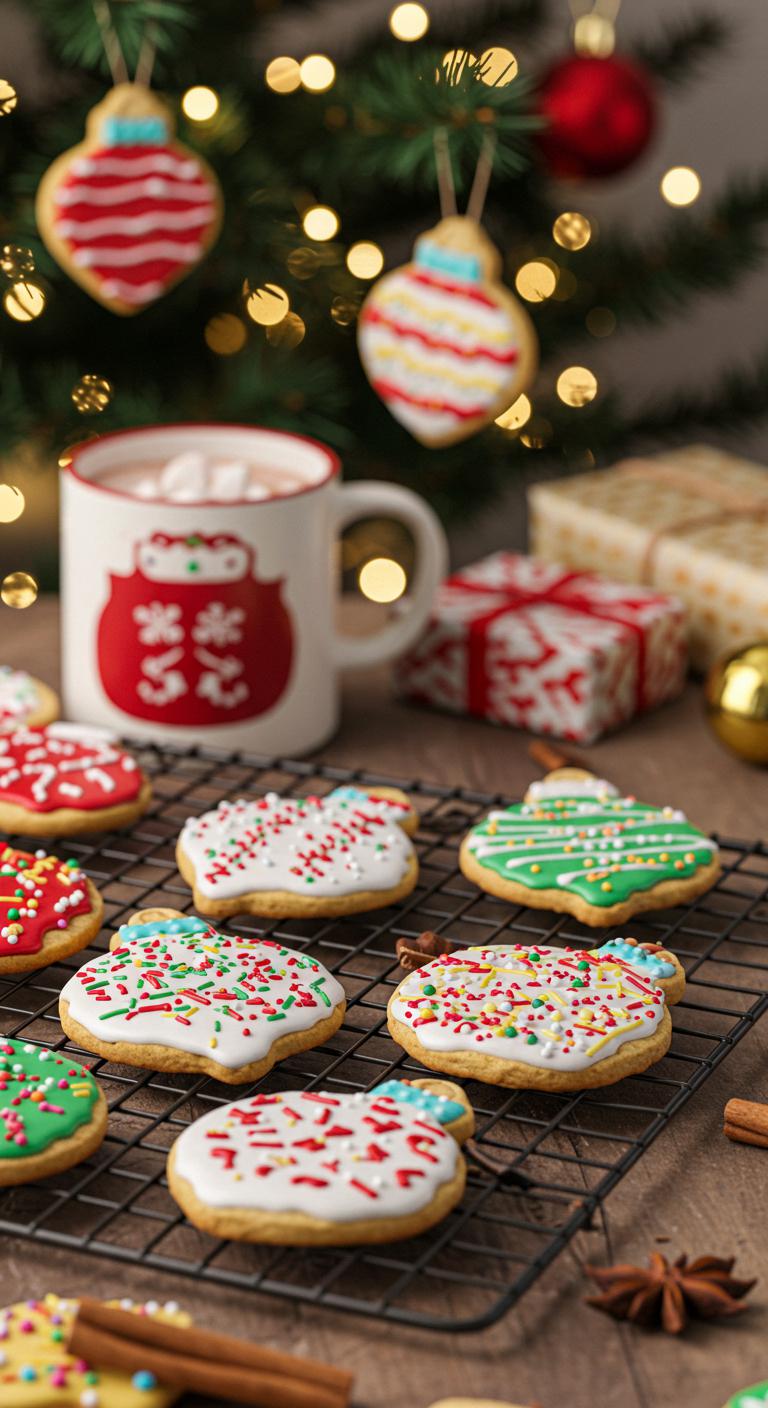
Classic Royal-Iced Star Cookies
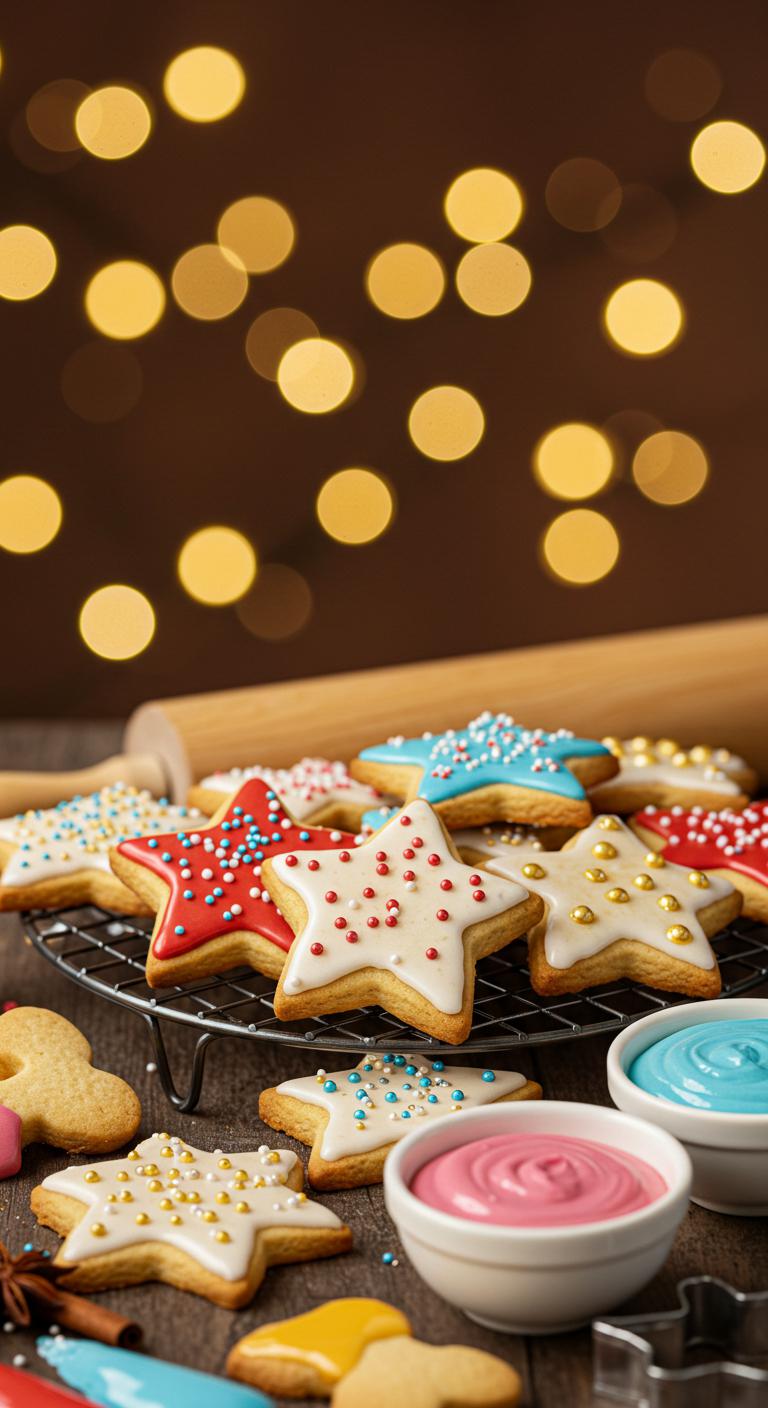
A crisp, buttery sugar cookie shaped like stars and topped with glossy royal icing — perfect for holidays or anytime you want a touch of sparkle.
Ingredients:
- 2 1/2 cups (315 g) all-purpose flour
- 1/2 teaspoon baking powder
- 1/4 teaspoon salt
- 3/4 cup (170 g) unsalted butter, softened
- 3/4 cup (150 g) granulated sugar
- 1 large egg
- 1 teaspoon pure vanilla extract
- 1/2 teaspoon almond extract (optional)
- 1–2 tablespoons milk (if needed)
Royal Icing:
- 3 cups (360 g) powdered sugar, sifted
- 2 tablespoons meringue powder
- 4–5 tablespoons warm water (adjust for consistency)
- 1/2 teaspoon vanilla or almond extract (optional)
- Food coloring and sprinkles (optional)
How to Make:
- Whisk together flour, baking powder, and salt in a bowl; set aside.
- Beat softened butter and sugar until light and fluffy, about 2–3 minutes.
- Add egg, vanilla, and almond extract and beat until combined.
- Gradually add the dry ingredients and mix until a soft dough forms; add 1–2 tablespoons milk only if dough feels too dry.
- Divide dough in half, flatten to disks, wrap in plastic, and chill in the fridge for at least 1 hour.
- Preheat oven to 350°F (175°C) and line baking sheets with parchment.
- Roll chilled dough on a lightly floured surface to about 1/4-inch thick.
- Cut out star shapes with a cookie cutter and place them 1 inch apart on prepared sheets.
- Bake for 8–10 minutes, until the edges are just set and very lightly golden; avoid overbaking.
- Let cookies cool on the sheet for 5 minutes, then transfer to a wire rack to cool completely.
- To make royal icing, whisk powdered sugar and meringue powder, then add warm water a tablespoon at a time until you reach a stiff but pipeable consistency; add extract if using.
- Divide and color the icing as desired; thin with a little water for flooding and keep some thicker for outline details.
- Pipe an outline on each cooled cookie, then flood the center with thinned icing; use a toothpick to smooth and pop any air bubbles.
- Add sprinkles or decorations before the icing sets, then let cookies dry completely (several hours or overnight) on a flat surface.
- Store in an airtight container at room temperature for up to 5 days.
Enjoy gifting or nibbling on these shiny, starry treats — they’re as fun to decorate as they’re to eat!
Lace Snowflake Sugar Cookies
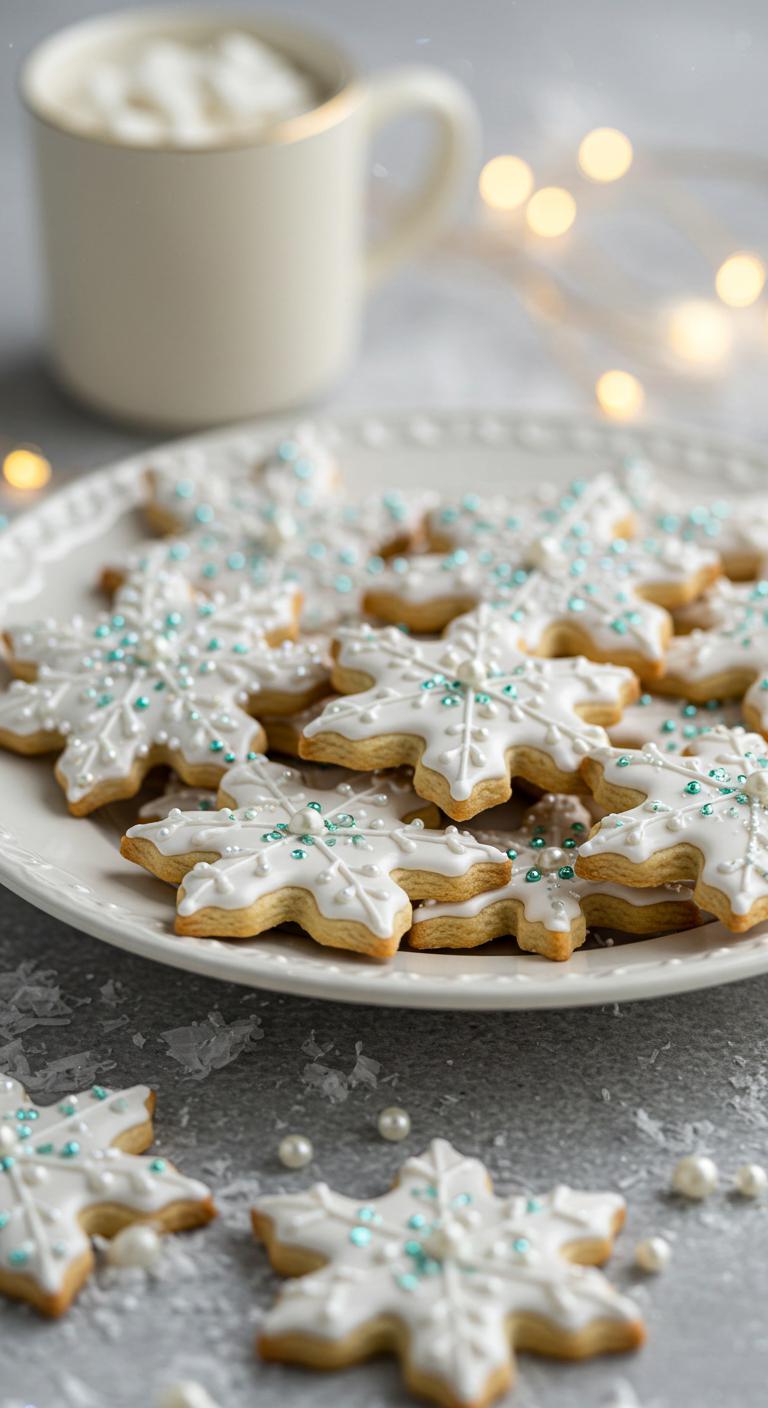
Delicate, lacy snowflake sugar cookies that look like they belonged on a winter wonderland table.
Ingredients:
- 1 cup (2 sticks) unsalted butter, softened
- 1 cup granulated sugar
- 1 large egg
- 1 teaspoon pure vanilla extract
- 2 1/2 cups all-purpose flour
- 1/2 teaspoon baking powder
- 1/4 teaspoon salt
- 1/4 cup cornstarch (for tender, crisp edges)
- 1/4 cup powdered sugar (for rolling and dusting)
- Royal icing (see note) or white royal icing tube for decorating
- Edible shimmer dust or pearl sprinkles (optional)
How to Make:
- Preheat oven to 350°F (175°C) and line baking sheets with parchment paper.
- In a large bowl, cream the softened butter and granulated sugar until light and fluffy, about 2–3 minutes.
- Beat in the egg and vanilla until fully combined.
- In a separate bowl, whisk together flour, baking powder, salt, and cornstarch.
- Gradually add the dry ingredients to the butter mixture and mix until a smooth dough forms.
- Lightly dust your work surface with powdered sugar and roll the dough out to about 1/8-inch thickness.
- Use a snowflake cookie cutter (or small cutters to create lace sections) to cut shapes; for lace effect, carefully cut out smaller interior shapes or use a lace embossing mat.
- Transfer cookies to the prepared baking sheets, spacing about 1 inch apart.
- Bake for 8–10 minutes, until the edges are just set and the cookies are pale golden; avoid overbaking to keep them tender.
- Let cookies cool on the baking sheet for 5 minutes, then transfer to a wire rack to cool completely.
- Pipe royal icing onto cooled cookies in snowflake patterns; work from the center outward and use thin lines and dots to create delicate lace details.
- While the icing is still wet, add edible shimmer dust or pearl sprinkles if desired.
- Allow icing to dry completely (at least 2 hours) before stacking or storing.
Enjoy these airy lace snowflakes with a cup of hot cocoa — they’re almost too pretty to eat, but totally irresistible.
Edible Poinsettia Cookies
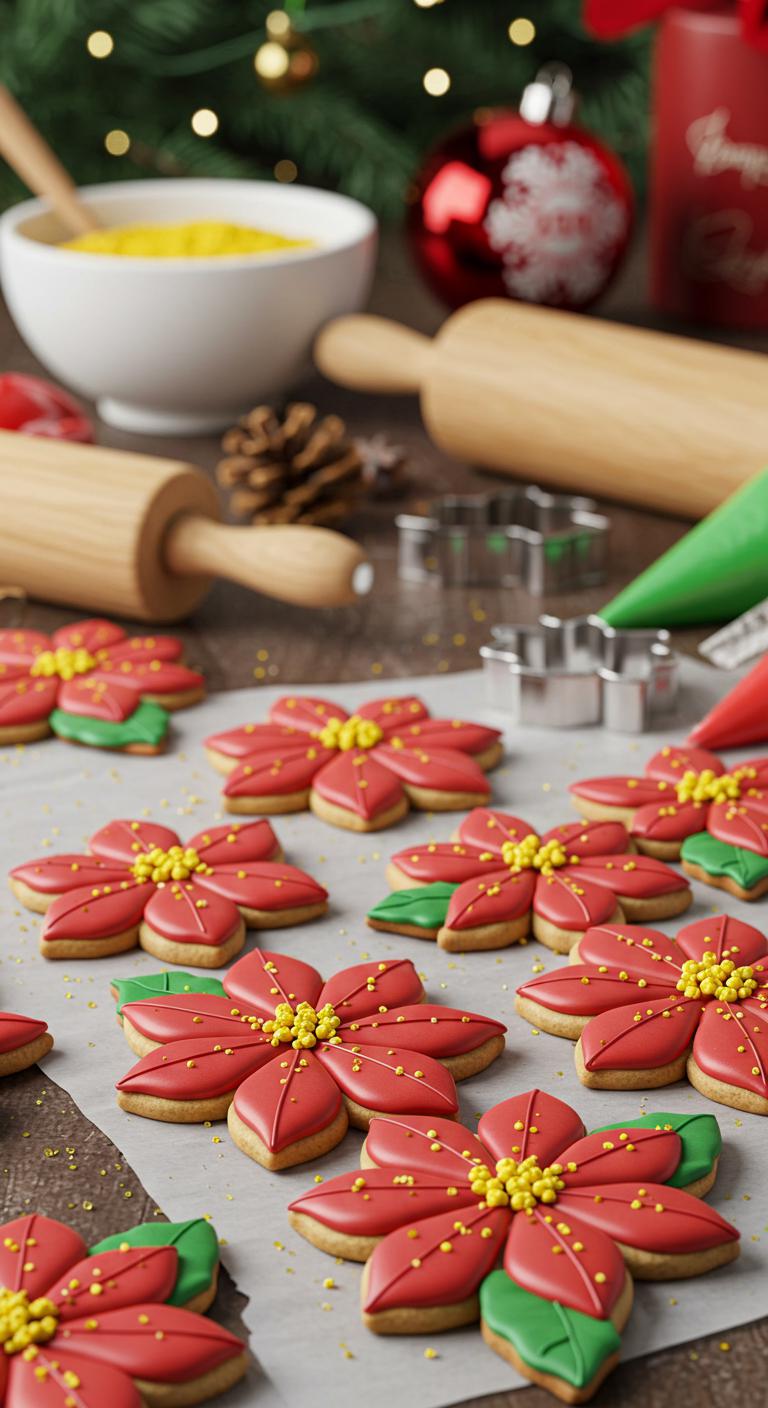
Festive poinsettia cookies that look like flowers and taste like buttery sugar bliss.
Ingredients:
- 2 1/2 cups all-purpose flour
- 1/2 teaspoon baking powder
- 1/4 teaspoon salt
- 3/4 cup (1 1/2 sticks) unsalted butter, softened
- 1 cup granulated sugar
- 1 large egg
- 1 teaspoon vanilla extract
- 1/2 teaspoon almond extract (optional, for extra flavor)
- Red gel food coloring
- Green gel food coloring
- 1 cup royal icing (see note) divided into red, green, and a small amount white
- Yellow sanding sugar or yellow nonpareils for centers
- Piping bags and small round/petit-fours tip or squeeze bottles
- Poinsettia cookie cutter set or small flower-shaped cutter and a leaf cutter
How to Make:
- Preheat oven to 350°F (175°C). Line baking sheets with parchment paper.
- Whisk flour, baking powder, and salt in a bowl and set aside.
- In a large bowl, beat softened butter and sugar until light and fluffy, about 2–3 minutes.
- Beat in the egg, vanilla, and almond extract until combined.
- Gradually add the dry ingredients and mix until a smooth dough forms. Don’t overmix.
- Divide dough in half, wrap each portion in plastic, and chill for 30 minutes.
- Roll dough on a lightly floured surface to about 1/4-inch thickness.
- Cut out flower shapes for the poinsettia and leaf shapes for accents. Transfer to prepared sheets.
- Bake 8–10 minutes, until edges are just set. Cool on the tray for 5 minutes, then transfer to a wire rack to cool completely.
- Prepare royal icing and tint most of it red, a portion green, and a tiny amount white. Thin icing slightly with water if needed for flooding.
- Outline each flower cookie with red icing, then flood the center petals and use a toothpick to smooth. Let crust form for a few minutes.
- Pipe layered petal lines from center outward to give a petal texture; add a second layer of smaller petals if you like dimension.
- Use green icing to pipe leaves on separate leaf cookies or directly under the flower as accents.
- Add a small dot of white icing in the center and immediately sprinkle with yellow sanding sugar or press on yellow nonpareils for the flower’s center.
- Let cookies dry completely (several hours or overnight) before stacking or packaging.
Have fun decorating — these poinsettia cookies are as pretty as they’re delicious!
Note: For quick royal icing, beat 2 cups powdered sugar, 2–3 tablespoons meringue powder, and 3–4 tablespoons water until thick and glossy; adjust water to reach piping or flooding consistency.
Three-Dimensional Gingerbread Reindeer Cookies
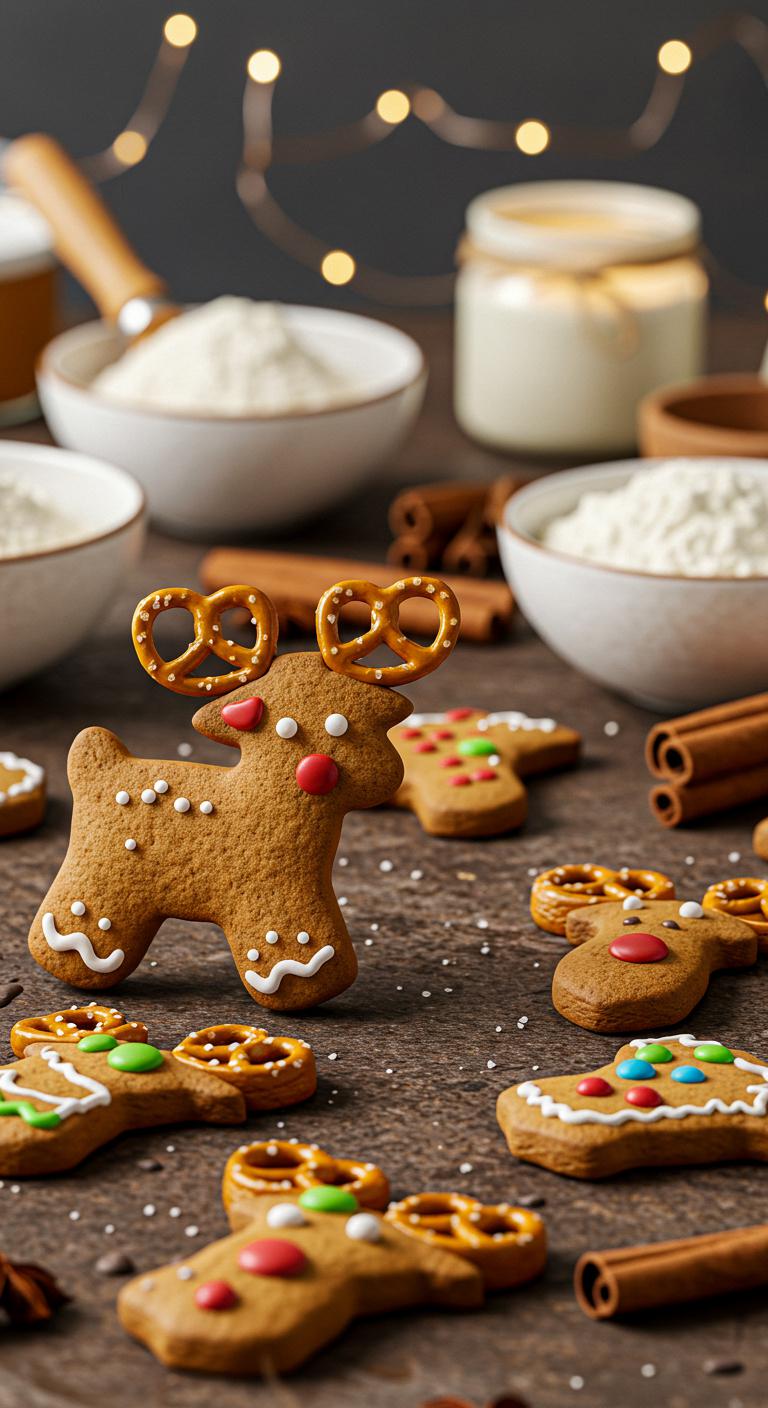
Three-Dimensional Gingerbread Reindeer Cookies — adorable, sturdy, and perfect for decorating or gifting.
Ingredients:
- 3 cups all-purpose flour
- 1 teaspoon ground ginger
- 1 teaspoon ground cinnamon
- 1/2 teaspoon ground cloves
- 1/2 teaspoon baking soda
- 1/2 teaspoon salt
- 3/4 cup (1 1/2 sticks) unsalted butter, softened
- 3/4 cup packed brown sugar
- 1 large egg
- 1/2 cup unsulphured molasses
- 1 teaspoon vanilla extract
- Royal icing or store-bought icing for assembly and decoration
- Small candies, chocolate chips, pretzel sticks or other small decorations for eyes, nose, antlers
- Powdered sugar for dusting (optional)
How to Make:
- In a bowl, whisk together flour, ginger, cinnamon, cloves, baking soda, and salt.
- In a separate large bowl, cream the softened butter and brown sugar until light and fluffy.
- Beat in the egg, molasses, and vanilla until smooth.
- Gradually mix the dry ingredients into the wet until a soft dough forms.
- Divide dough in half, flatten into disks, wrap in plastic, and chill in the fridge for at least 1 hour.
- Preheat oven to 350°F (175°C). Line baking sheets with parchment paper.
- Roll chilled dough on a lightly floured surface to about 1/4-inch thickness.
- Cut reindeer pieces using a 3D reindeer cookie template (body, head, legs/stand, and any connecting tabs) or a set of coordinating cutters.
- Transfer pieces to prepared baking sheets, spacing about 1 inch apart.
- Bake 8–10 minutes or until edges are set and cookies are slightly firm. Let cool on the sheet for 5 minutes, then move to a wire rack to cool completely.
- Prepare royal icing to a medium-stiff consistency for assembling and a thinner consistency for piping details.
- Use icing to glue tabs and slots together to form the 3D reindeer structure—attach legs/stand to the body, then the head. Hold pieces briefly until set or use cans/glasses to support while drying.
- Once assembled and dry, pipe facial details and antler lines. Press on candy eyes, a candy nose, and small pretzel sticks or shaped fondant for antlers.
- Allow all icing to harden completely before handling or stacking (several hours or overnight).
- Dust lightly with powdered sugar for a wintry finish if desired.
Enjoy showing off these charming, three-dimensional gingerbread reindeer — they’re as fun to make as they’re to eat!
Glazed Cinnamon-Spice Ornament Cookies
Glazed Cinnamon-Spice Ornament Cookies — sweet, spicy, and pretty enough to hang on your tree.
Ingredients:
- 2 1/2 cups all-purpose flour
- 1/2 teaspoon baking powder
- 1/4 teaspoon salt
- 1 tablespoon ground cinnamon
- 1 teaspoon ground ginger
- 1/4 teaspoon ground cloves
- 3/4 cup (1 1/2 sticks) unsalted butter, softened
- 3/4 cup granulated sugar
- 1 large egg
- 1 teaspoon vanilla extract
- 2 tablespoons milk (plus more if needed)
- 1 cup powdered sugar (for glaze)
- 1–2 teaspoons milk or lemon juice (to thin glaze)
- Food coloring, sprinkles, or sanding sugar for decorating
- Optional: ribbon for hanging if you cut an ornament hole before baking
How to Make:
- Preheat the oven to 350°F (175°C) and line two baking sheets with parchment paper.
- In a bowl, whisk together flour, baking powder, salt, cinnamon, ginger, and cloves.
- In a separate large bowl, cream the softened butter and granulated sugar until light and fluffy.
- Beat in the egg and vanilla until combined, then stir in the 2 tablespoons milk.
- Gradually add the dry ingredients to the wet, mixing just until a soft dough forms; add a touch more milk if dough feels too stiff.
- Divide dough in half, flatten to disks, wrap in plastic, and chill 30 minutes until firm enough to roll.
- On a lightly floured surface, roll dough to about 1/4-inch thickness and cut into ornament shapes; if making hanging ornaments, use a straw to make small holes near the top.
- Transfer cookies to prepared sheets about 1 inch apart and bake 8–10 minutes, until edges are set and lightly golden.
- Let cookies cool on the sheet 5 minutes, then move to a wire rack to cool completely.
- Mix powdered sugar with 1–2 teaspoons milk or lemon juice until a smooth, spreadable glaze forms; divide and tint as desired.
- Glaze and decorate cookies with colored icing, sprinkles, or sanding sugar; thread ribbon through holes once fully dry if you made hanging ornaments.
Enjoy these warm, spiced ornaments on the tree or with a mug of cocoa — they taste as cheerful as they look!
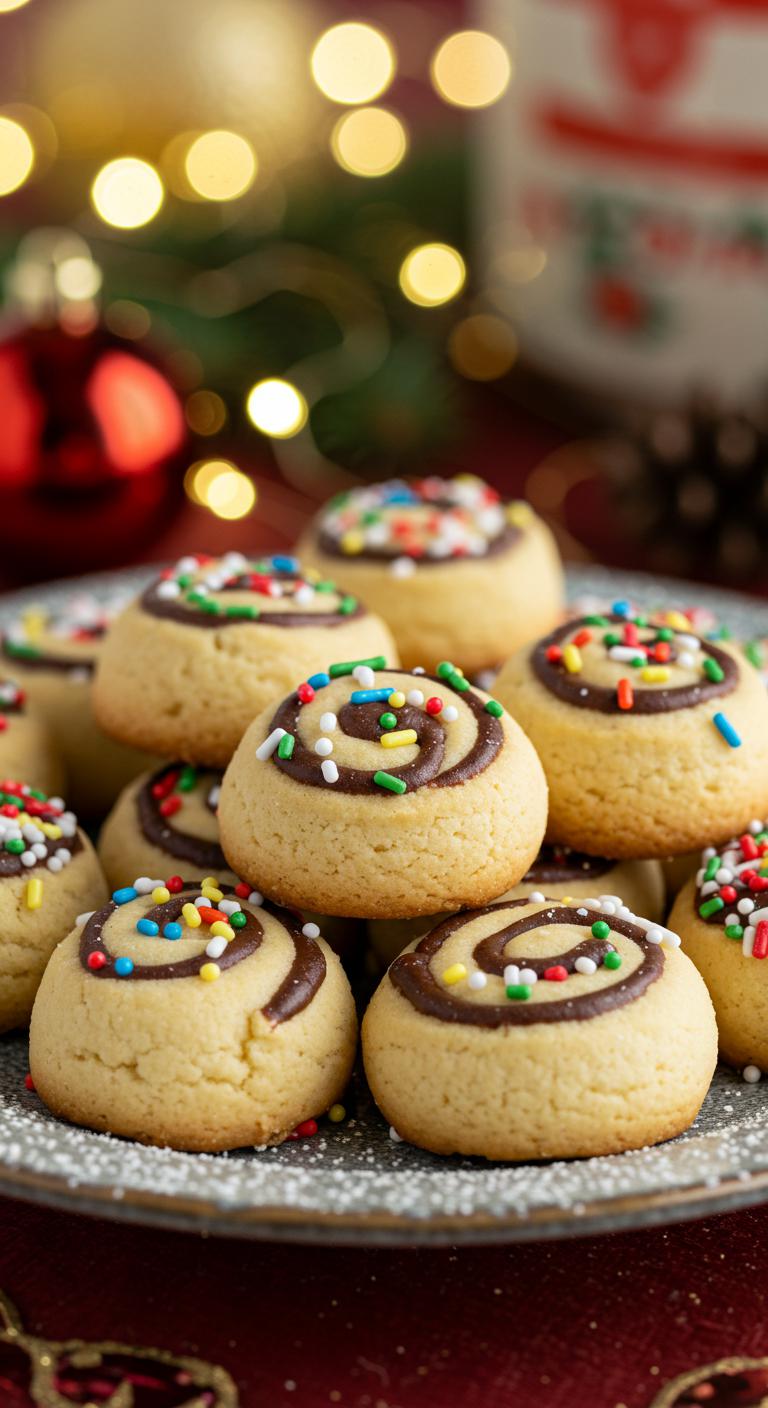
Peppermint Swirl Cookie Baubles
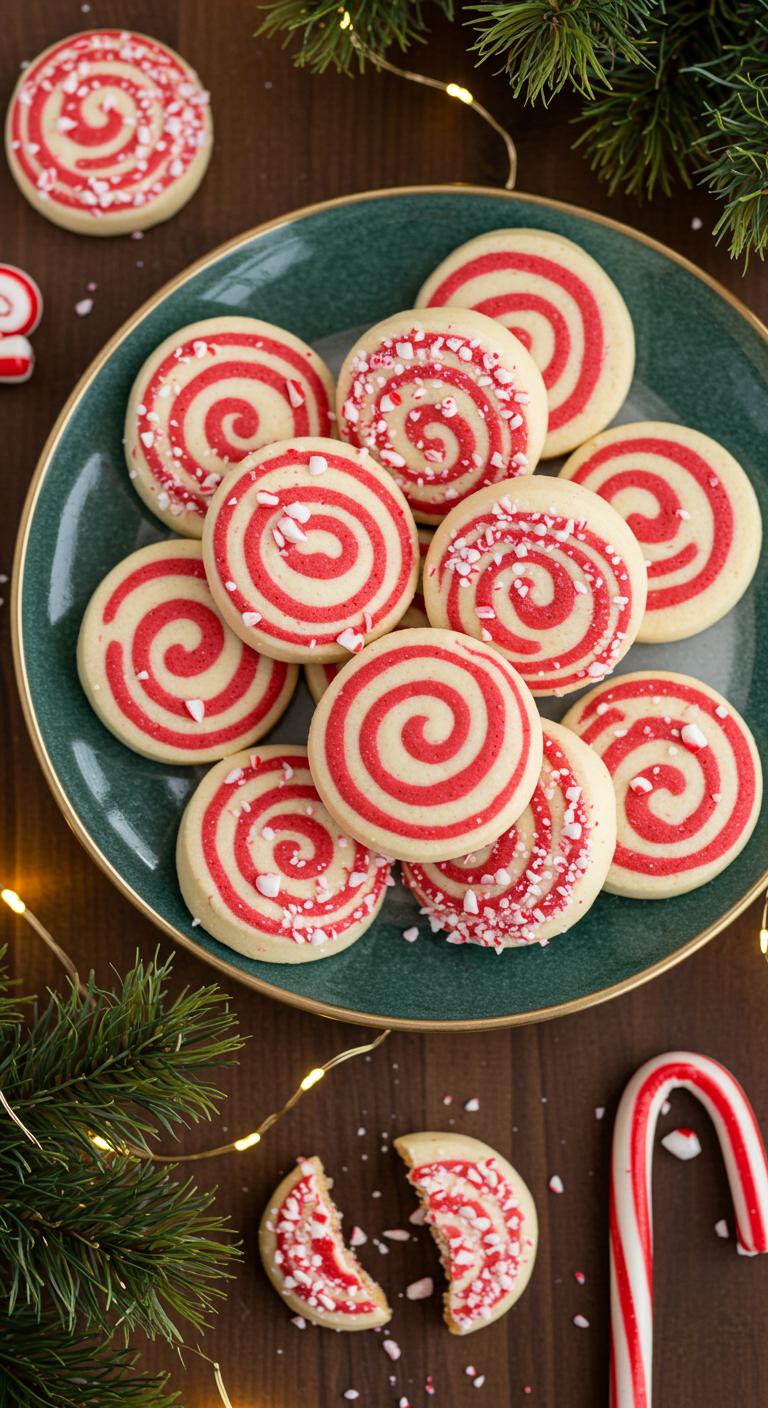
Peppermint Swirl Cookie Baubles: festive round sugar cookies with a cheerful red-and-white swirl and a bright peppermint crunch.
Ingredients:
- 2 1/2 cups (320 g) all-purpose flour
- 1/2 teaspoon baking powder
- 1/4 teaspoon salt
- 3/4 cup (170 g) unsalted butter, softened
- 1 cup (200 g) granulated sugar
- 1 large egg
- 1 teaspoon pure vanilla extract
- 1/2 teaspoon peppermint extract
- Red gel food coloring (about 1/2 teaspoon) or as needed
- 1/2 cup finely crushed peppermint candies or candy canes
- Extra granulated sugar for rolling (optional)
How to Make:
- Preheat the oven to 350°F (175°C) and line two baking sheets with parchment paper.
- In a bowl, whisk together the flour, baking powder, and salt; set aside.
- In a large bowl, beat the softened butter and sugar until light and fluffy, about 2–3 minutes.
- Beat in the egg, vanilla extract, and peppermint extract until smooth.
- Gradually add the dry ingredients to the wet mixture and stir until a soft dough forms.
- Divide the dough in half; keep one half plain and tint the other half with red gel food coloring until you get a bright pink/red color.
- Take small portions (about 1 tablespoon each) of red and plain dough and press them together side-by-side; roll gently into a ball and then roll between your palms to create a subtle swirl pattern without fully mixing the colors.
- If desired, roll each ball lightly in extra granulated sugar, then place on the prepared baking sheets about 2 inches apart.
- Flatten each ball slightly with the bottom of a glass or your palm to form a bauble shape about 1/4–1/2 inch thick.
- Sprinkle the tops with the finely crushed peppermint candies, pressing lightly so they stick.
- Bake for 9–12 minutes, until the edges are just set and the centers are still soft.
- Let the cookies cool on the baking sheet for 5 minutes, then transfer to a wire rack to cool completely.
Enjoy these peppermint swirl baubles with a cup of hot cocoa or share them as a bright, minty holiday treat!
Festive Cookie Wreaths With Icing Bows
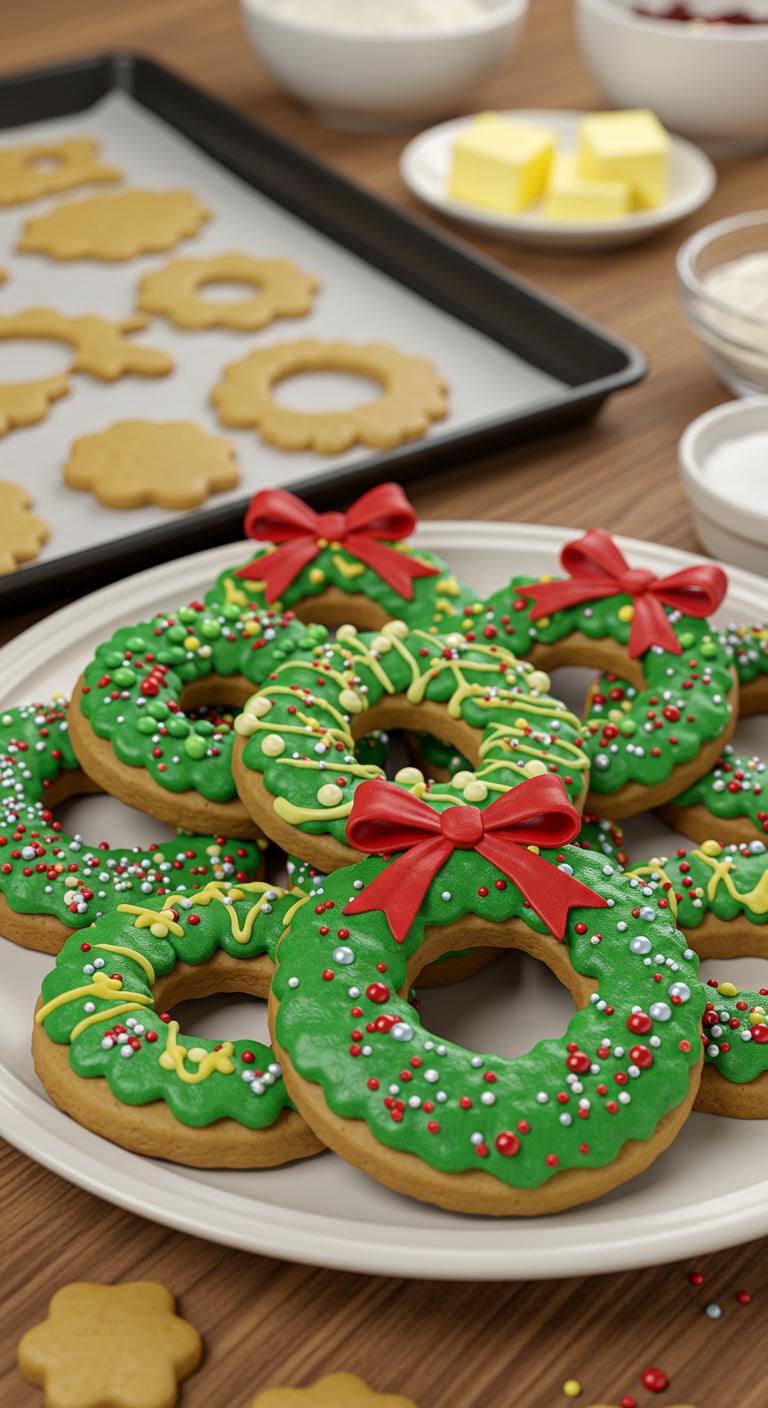
Festive Cookie Wreaths With Icing Bows — a merry twist on sugar cookies that looks like a holiday centerpiece you can eat.
Ingredients:
- 2 3/4 cups (345 g) all-purpose flour
- 1 tsp baking powder
- 1/2 tsp salt
- 1 cup (227 g) unsalted butter, room temperature
- 1 cup (200 g) granulated sugar
- 1 large egg
- 2 tsp vanilla extract
- 1/2 tsp almond extract (optional, for extra flavor)
- 2–3 tbsp milk (if needed to adjust dough consistency)
- Green and red gel or paste food coloring (for icing)
- 3 cups (360 g) powdered sugar (for royal or glaze icing)
- 2–3 tbsp meringue powder or 1 egg white (for royal icing) OR 3–4 tbsp milk for a glaze
- 1/2 tsp vanilla extract (for icing)
- Small edible decorations: sprinkles, nonpareils, edible glitter
- Piping bags and small round tips (or zip-top bags with a snipped corner)
How to Make:
- Preheat oven to 350°F (175°C). Line baking sheets with parchment paper.
- Whisk together flour, baking powder, and salt in a bowl; set aside.
- In a large bowl, beat butter and sugar until light and fluffy, about 2–3 minutes.
- Add the egg, vanilla, and almond extract; mix until combined.
- Gradually add dry ingredients to the wet mixture and mix until a soft dough forms. Add 1–2 tbsp milk only if dough is too crumbly.
- Divide dough in half, flatten into disks, wrap in plastic, and chill for 30 minutes.
- On a lightly floured surface, roll one disk to about 1/4-inch thickness.
- Use a large round cutter (about 3–4 inches) and a smaller round cutter (about 1–1.5 inches) to cut wreath shapes: cut the large rounds, then cut centers out to make rings.
- Transfer rings to prepared baking sheets 1 inch apart. Re-roll scraps and repeat.
- Bake 8–10 minutes until edges just begin to set; don’t brown. Cool on the sheet 5 minutes, then transfer to a wire rack to cool completely.
- Prepare icing: for royal icing, beat powdered sugar with meringue powder and 2–3 tbsp water (or egg white) until thick and smooth; add vanilla. For glaze, mix powdered sugar with milk until thick but pipeable.
- Divide icing into bowls and tint most of it green for the wreaths; reserve a small amount red (or pink/white) for bows.
- Fill piping bags and outline each wreath with green icing, then flood the center. Use a toothpick to smooth and remove air bubbles.
- Pipe small dots or tiny leaf shapes around the ring to create a textured wreath look. Add sprinkles or tiny silver balls as holly berries.
- On a separate parchment, pipe small bows with red icing (two loops and a center knot) and let dry; or pipe the bow directly onto the cooled wreath and add details.
- Let icing set completely (several hours or overnight for royal icing) before stacking or packing.
- Serve your festive cookie wreaths on a platter or hang one per place setting for a sweet holiday touch.
Enjoy—these cheerful wreaths will steal the show (and a few seconds of your plate)!
Stained-Glass Window Sugar Cookies

Stained-Glass Window Sugar Cookies — sweet cookies with colorful candy centers that sparkle like little stained-glass panes.
Ingredients:
- 2 1/2 cups all-purpose flour
- 1/2 teaspoon baking powder
- 1/4 teaspoon salt
- 3/4 cup (1 1/2 sticks) unsalted butter, softened
- 3/4 cup granulated sugar
- 1 large egg
- 1 teaspoon vanilla extract
- 1/2 teaspoon almond extract (optional)
- Assorted hard candies (Jolly Ranchers, Life Savers, etc.), unwrapped and placed in separate sandwich bags for crushing
- Extra flour for rolling
How to Make:
- Preheat the oven to 350°F (175°C). Line baking sheets with parchment paper.
- In a bowl, whisk together flour, baking powder, and salt; set aside.
- In a large bowl, cream the softened butter and sugar until light and fluffy.
- Beat in the egg, vanilla, and almond extract until combined.
- Gradually add the dry ingredients to the wet and mix until a soft dough forms.
- Divide dough in half, wrap each in plastic, and chill for 30 minutes to firm up.
- On a lightly floured surface, roll one portion of dough to about 1/4-inch thickness.
- Use cookie cutters to cut shapes; then use a smaller cutter or piping tip to cut out the center window of each cookie.
- Place cookies on prepared baking sheets about 1 inch apart.
- Fill small wells in the center of each cookie with a spoonful of crushed candy (or sprinkle candy pieces evenly into the holes).
- Bake 8–10 minutes, until the cookie edges are set and the candy has melted into a glossy center.
- Let cookies cool on the baking sheet for 5–10 minutes so the candy sets, then transfer to a wire rack to cool completely.
- Repeat with remaining dough and candy; store cookies in an airtight container.
These stained-glass window cookies are perfect for gifting or trimming the cookie jar with a burst of color and shine—enjoy the sparkle!
Hand-Painted Vintage Ornament Cookies

Hand-Painted Vintage Ornament Cookies — classic sugar cookies turned into charming, edible holiday ornaments.
Ingredients:
- 2 3/4 cups (345 g) all-purpose flour
- 1 teaspoon baking powder
- 1/2 teaspoon salt
- 1 cup (227 g) unsalted butter, softened
- 1 cup (200 g) granulated sugar
- 1 large egg
- 2 teaspoons vanilla extract
- 1/2 teaspoon almond extract (optional, for a vintage note)
- 2 tablespoons sour cream or heavy cream (for tender dough)
- Royal icing for decorating (see note) or 3 cups (360 g) powdered sugar + 2–3 tablespoons meringue powder + 4–5 tablespoons water to make a medium-stiff royal icing
- Food gel colors (assorted) for painting
- Clear piping gel or thinned royal icing (for “glaze” shine)
- Edible metallic luster dust or gold/silver food paint (optional)
- Small round brush(es) for painting
- Ribbon or thin food-safe twine (if you’ll hang these; optional)
How to Make:
- Whisk together flour, baking powder, and salt in a bowl; set aside.
- In a large bowl, cream the softened butter and granulated sugar until light and fluffy, about 2–3 minutes.
- Beat in the egg, vanilla, and almond extract (if using) until combined.
- Mix in sour cream or heavy cream.
- Gradually add the dry ingredients and stir until a smooth dough forms; don’t overwork it.
- Divide dough in half, flatten into discs, wrap in plastic, and chill at least 1 hour until firm.
- Preheat oven to 350°F (175°C). Line baking sheets with parchment.
- Roll chilled dough on a lightly floured surface to about 1/4-inch thickness.
- Cut with ornament-shaped cookie cutters (round, teardrop, bell, etc.). If you plan to hang them, use a straw or small piping tip to make a hole near the top of each cookie.
- Transfer cookies to prepared sheets and bake 8–10 minutes, until edges are set but not browned.
- Let cookies cool on the sheet 5 minutes, then transfer to a wire rack to cool completely.
- Prepare royal icing to a medium thickness for base flooding, or use ready-made icing. Flood each cookie base and let dry fully (several hours or overnight).
- Mix small amounts of food gel with a few drops of clear alcohol (vodka) or lemon extract to make paintable colors; temper the consistency so they flow from a brush.
- Using fine brushes, paint vintage designs (garlands, stars, stripes, poinsettias, dotting, and delicate scrollwork) on the dried iced surface. Work in layers, letting paint dry between colors.
- Add metallic highlights with luster dust or edible metallic paint for a true vintage shimmer.
- Seal designs with a thin layer of clear piping gel or thinned royal icing if you want a glossy finish; allow to dry completely.
- Thread ribbon or food-safe twine through pre-made holes to hang, or present on a platter if not hanging.
Enjoy these hand-painted vintage ornament cookies as charming gifts or festive decorations — they’re almost too pretty to eat, but delicious when you do!
Mini Gingerbread House Cookie Ornaments
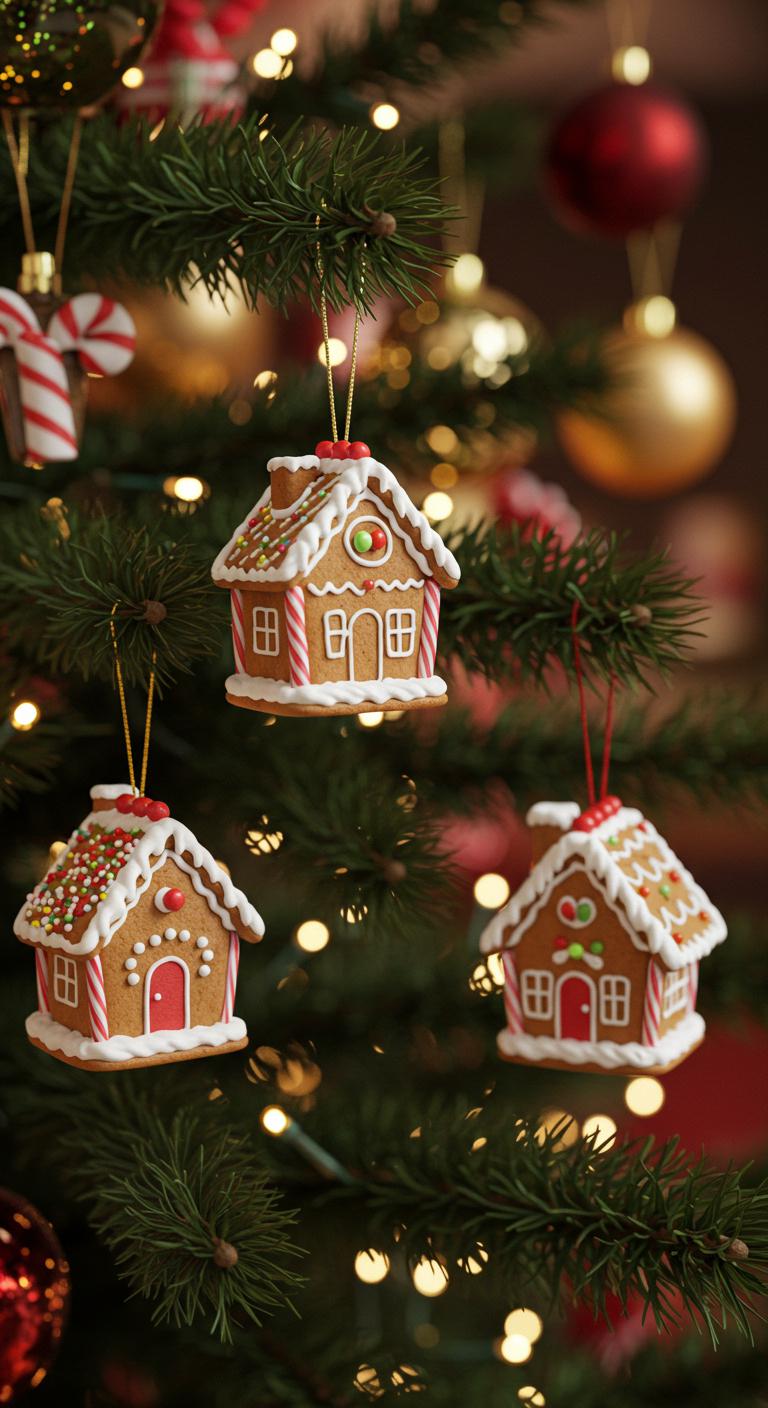
A tiny, festive gingerbread house cookie that doubles as a cute ornament for your tree.
Ingredients:
- 2 1/4 cups (280 g) all-purpose flour
- 1/2 tsp baking soda
- 1/2 tsp fine salt
- 1 tsp ground ginger
- 1 tsp ground cinnamon
- 1/4 tsp ground cloves (optional)
- 1/4 tsp ground nutmeg
- 6 tbsp (85 g) unsalted butter, softened
- 1/2 cup (100 g) packed brown sugar
- 1 large egg
- 1/3 cup (115 g) molasses
- 1 tsp vanilla extract
- Powdered sugar royal icing (see note) or thick icing for decorating
- Small candies, sprinkles, edible glitter for decoration
- Thin straw or skewer to make hanging hole
How to Make:
- Whisk flour, baking soda, salt, and spices together in a bowl; set aside.
- Beat softened butter and brown sugar in a large bowl until light and creamy.
- Mix in the egg, molasses, and vanilla until smooth.
- Gradually add the dry ingredients and mix until a cohesive dough forms.
- Divide dough in half, flatten into disks, wrap in plastic, and chill at least 1 hour or until firm.
- Preheat oven to 350°F (175°C) and line baking sheets with parchment.
- Roll chilled dough on a lightly floured surface to about 1/8-inch (3 mm) thickness.
- Cut small house shapes using a mini gingerbread house cutter or a simple template (front, back, two sides, roof pieces).
- Use a thin straw or skewer to poke a small hole near the top of one house piece for hanging; make sure the hole is large enough for a ribbon after baking.
- Transfer shapes to prepared sheets and bake 8–10 minutes, until edges are set but not darkened.
- Let cookies cool on the sheet 5 minutes, then transfer to a wire rack to cool completely.
- Prepare royal icing (stiff consistency) and pipe edges and details to assemble houses: attach walls, let set, then add roof pieces and decorations.
- Use icing as glue to add candies and sprinkles; let everything dry fully (several hours or overnight).
- Thread a ribbon through the pre-baked hole (or a small hole made with a skewer after baking) and tie to hang.
Enjoy hanging your miniature gingerbread houses — they’re adorable, edible, and full of holiday cheer!
Note: For royal icing, mix 2 cups powdered sugar, 1–2 tbsp meringue powder, and 2–3 tbsp water until stiff peaks form; adjust water to desired consistency.
Frosted Sugar Cookie Snowball Drops
Frosted Sugar Cookie Snowball Drops — bite-sized, buttery cookies rolled in frosting and sprinkles for a festive, melt-in-your-mouth treat.
Ingredients:
- 1 cup (2 sticks) unsalted butter, softened
- 1 cup granulated sugar
- 1 large egg
- 1 teaspoon vanilla extract
- 2 1/2 cups all-purpose flour
- 1/2 teaspoon baking powder
- 1/4 teaspoon salt
- 1/3 cup powdered sugar (for rolling, optional)
- 1 cup vanilla frosting (store-bought or homemade), slightly thinned if needed
- Colored sprinkles or sanding sugar, for decorating
How to Make:
- Preheat the oven to 350°F (175°C) and line a baking sheet with parchment paper.
- In a large bowl, cream the softened butter and granulated sugar until light and fluffy.
- Beat in the egg and vanilla until well combined.
- Whisk together the flour, baking powder, and salt, then gradually mix into the wet ingredients until a soft dough forms.
- Scoop tablespoon-sized portions of dough and roll into balls; optionally roll each ball in powdered sugar for a snowy look.
- Place the dough balls on the prepared baking sheet about 2 inches apart.
- Bake for 10–12 minutes, or until the bottoms are lightly golden and the tops are set.
- Let the cookies cool on the baking sheet for 5 minutes, then transfer to a wire rack to cool completely.
- If the frosting is too thick, stir in a teaspoon or two of milk to thin slightly for easier dipping.
- Dip the top of each cooled cookie into the frosting, letting excess drip off, then immediately sprinkle with colored sprinkles or sanding sugar.
- Set the decorated cookies on a rack or parchment-lined sheet until the frosting sets, about 20–30 minutes.
Enjoy these festive Frosted Sugar Cookie Snowball Drops — one bite and you’ll be hooked!
Winter Woodland Animal Cookies

Sweet, snowy critters that taste as delightful as they look—perfect for cozy winter gatherings.
Ingredients:
- 2 3/4 cups (345 g) all-purpose flour
- 1 teaspoon baking powder
- 1/2 teaspoon salt
- 1 cup (227 g) unsalted butter, softened
- 1 cup (200 g) granulated sugar
- 1 large egg
- 1 teaspoon vanilla extract
- 1/2 teaspoon almond extract (optional, for a nutty hint)
- 2 tablespoons sour cream or plain yogurt (for tender cookies)
- Assorted food coloring (brown, gray, white, pink)
- Royal icing or cookie icing for decorating (about 2–3 cups prepared)
- Sprinkles, mini chocolate chips, edible pearls, and sanding sugar for details
How to Make:
- Preheat the oven to 350°F (175°C) and line baking sheets with parchment paper.
- Whisk together the flour, baking powder, and salt in a bowl; set aside.
- In a large bowl, beat the softened butter and sugar until light and fluffy, about 2–3 minutes.
- Add the egg, vanilla, and almond extract; mix until combined.
- Stir in the sour cream or yogurt.
- Gradually add the dry ingredients to the wet mixture, mixing until a soft dough forms.
- Divide the dough into portions if you want different colored cookies; wrap each portion and chill for 30–60 minutes.
- On a lightly floured surface, roll dough to about 1/4-inch thickness.
- Use woodland animal cookie cutters (foxes, deer, owls, rabbits, bears) to cut shapes and transfer to prepared baking sheets.
- Bake 8–10 minutes, or until edges are just set and bottoms are lightly golden.
- Let cookies cool on the baking sheet for 5 minutes, then transfer to a wire rack to cool completely.
- Tint royal icing into desired colors and decorate animals with fur markings, eyes, noses, and rosy cheeks; use mini chocolate chips or edible pearls for eyes and sanding sugar for snowy accents.
- Allow icing to set completely before stacking or storing, about 2–4 hours.
Have fun decorating—these winter woodland animals are as charming on the plate as they’re delicious!
Conclusion
You’ll finish these recipes and hang the cookies like ornaments, so plan simple steps and tidy workspaces. Remember the year your child handed you a lopsided star and everyone smiled—those imperfect cookies became the tree’s best piece. Bake, cool, ice, and string with ribbon. Use sturdy dough for shapes, chill cutters, and let royal icing set fully. Store in a shallow tin between layers of parchment to keep them fresh and neat.